Structure and Automate AI Workflows with MLOps and LLMOps
Giovanni Ciatto
Dipartimento di Informatica — Scienza e Ingegneria (DISI), Sede di Cesena,
Alma Mater Studiorum—Università di Bologna
(version: 2026-04-28 )
Link to these slides
Outline
-
Motivation and Context
- the ML workflow
- the GenAI workflow
- need for MLOps, definition, expected benefits
-
MLOps with MLflow
- API, tracking server, backend store, artifact store, setups
- interactive usage (notebook)
- batch usage + project setup
- interoperability with Python libraries
-
End-to-end example for classification
-
End-to-end example for LLM agents
What is the goal of a Machine Learning workflow?
Training a model from data, in order to:
- do prediction on unseen data,
- e.g. spam filter
- or mine information from it,
- e.g. profiling customers
- or automate some operation which is hard to code explicitly
- e.g. NPCs in video games
What is a model in the context of ML? (pt. 1)
In statistics (and machine learning) a model is a mathematical representation of a real-world process
(commonly attained by fitting a parametric function over a sample of data describing the process)
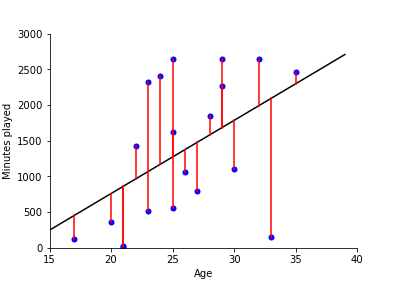
e.g.: $f(x) = \beta_0 + \beta_1 x $ where $f$ is the amount of minutes played, and $x$ is the age
What is a model in the context of ML? (pt. 2)
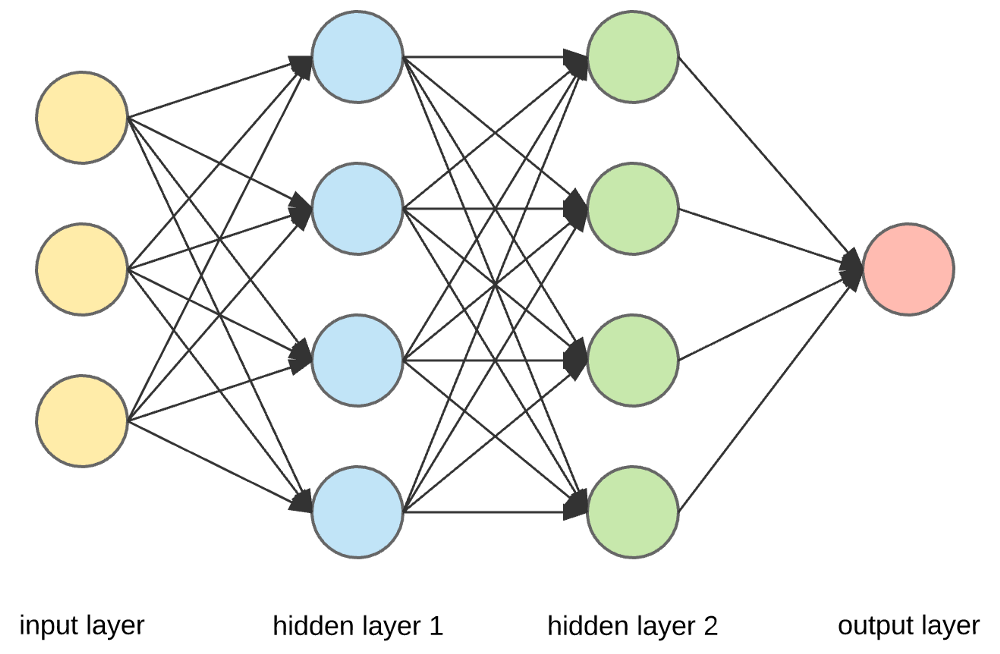
E.g. neural networks (NN) are a popular family of models
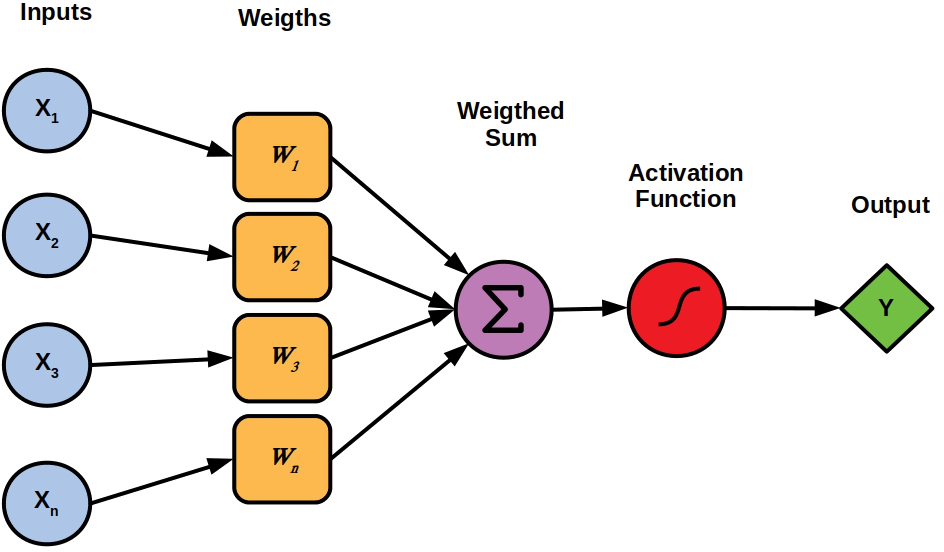
Single neuron
(Feed-forward)
Neural network $\equiv$ cascade of layers
Many admissible architectures, serving disparate purposes
What is the outcome of a Machine Learning workflow?
-
A software module (e.g. a Python object) implementing a mathematical function…
- e.g.
predict(input_data) -> output_data
- e.g.
-
… commonly tailored on a specific data schema
- e.g. customer information + statistics about shopping history
-
… which works sufficiently well w.r.t. test data
-
… which must commonly be integrated into a much larger software system
- e.g. a web application, a mobile app, etc.
-
… which may need to be re-trained upon data changes.
What are the phases of a Machine Learning workflow?
The process of producing a ML model is not linear nor simple:
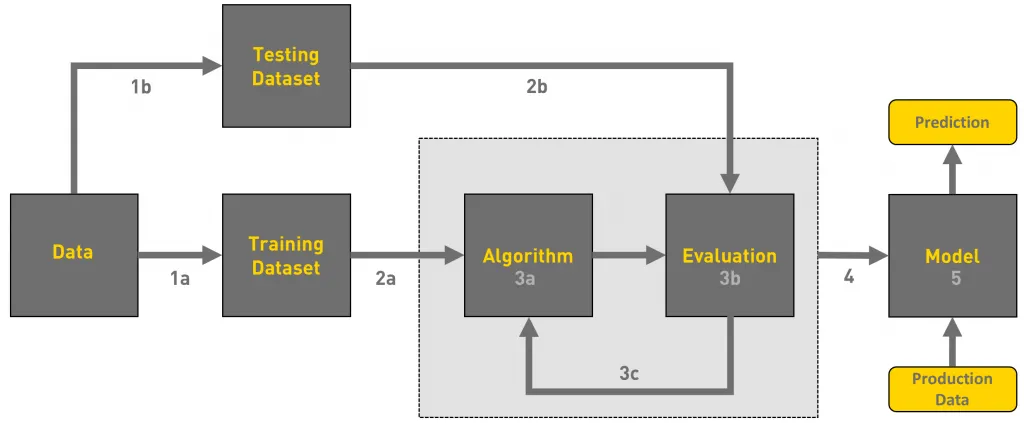
- there could be many iterations (up to reaching satisfactory evaluation)
- the whole workflow may be re-started upon data changes
- updates in the model imply further integration/deployment efforts in downstream systems
Activities in a typical ML workflow
- Problem framing: define the business/technical goal
- Data collection: acquire raw data
- Data preparation: clean, label, and transform data
- Feature engineering: extract useful variables from data
- Model training: apply ML algorithms to produce candidate models
- Experimentation & evaluation: compare models, tune hyperparameters, measure performance
- Model packaging & deployment: turn the best model into a service or product
- Monitoring & feedback: check performance in production, detect drift, gather new data, trigger retraining
These steps are cyclical, not linear → one often revisits data, retrain, or refine features.
Example of ML workflow
Forecast footfall/visits to some office by day/time
- useful for staffing and opening hours planning
- Problem framing: model as a regression task or time-series forecasting task?
- Data collection: gather historical footfall data, calendar events, weather data, etc.
- Data preparation: clean and preprocess data, handle missing values, etc.
- Feature engineering: create relevant features (e.g. day of week, holidays, weather conditions)
- Model training: apply ML algorithms to produce candidate models
- Experimentation & evaluation: compare models, tune hyperparameters, measure performance
- Model packaging & deployment: turn the best model into a service or product
- Monitoring & feedback: monitor performance in production, detect drifts, gather new data, trigger retraining
- new offices or online services may change footfall patterns
How are Machine Learning workflows typically performed?
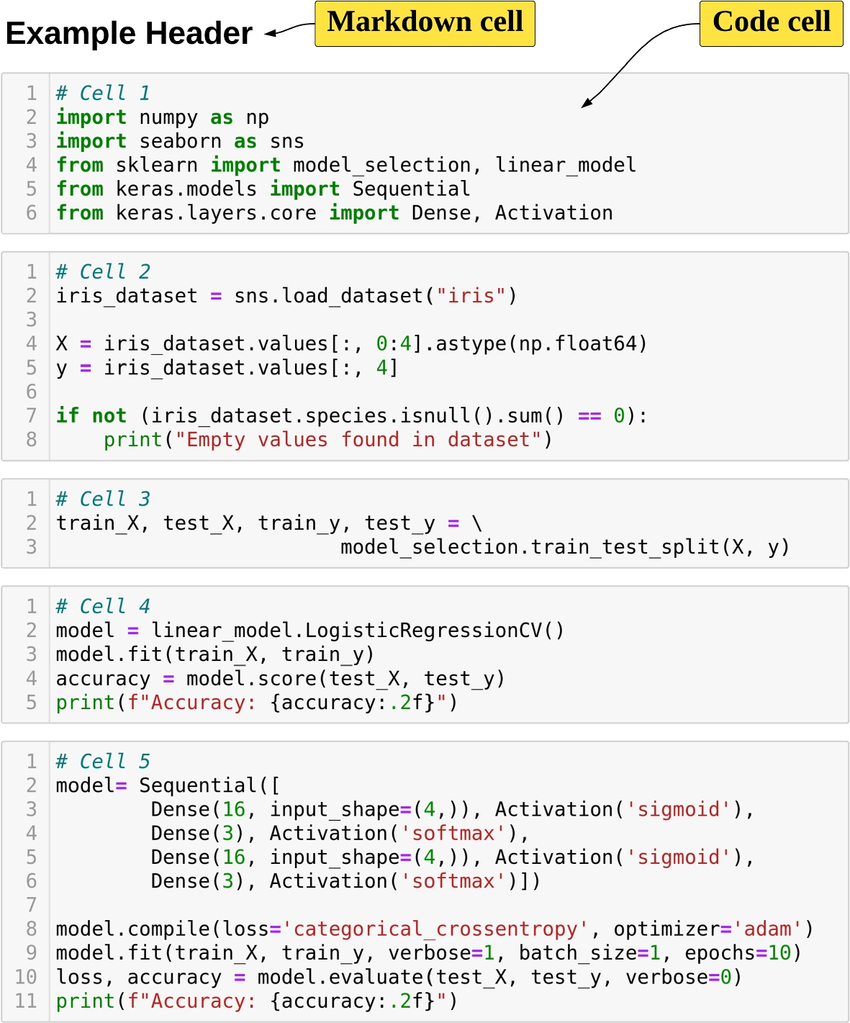
Via Notebooks (e.g. Jupyter)
-
✅ Interleave code, textual description, and visualizations
-
✅ Interactive usage, allowing for real-time feedback and adjustments
-
✅ Uniform & easy interface to workstations
-
✅ Easy to save, restore, and share
-
❌ Incentivises manual activities over automatic ones
Pitfalls of manual work in notebooks
- Non-reproducibility: hidden state, out-of-order execution, forgotten seeds
- Weak provenance: params, code version, data slice, and metrics not logged
- Human-in-the-loop gating: “print accuracy → eyeball → tweak → rerun”
- Fragile artifacts: models overwritten, files named
final_v3.ipynb - Environment drift: “works on my machine” dependencies and data paths
- Collaboration pain: merge conflicts, opaque diffs, reviewability issues
Example: why manual runs mislead
- Run 1: random split → train → print accuracy = 0.82
- Tweak hyperparams → rerun only training cell → accuracy = 0.86
- Forgot to fix seed / re-run split → different data, different metric
- No record of params, code, data; “best” model cannot be justified
Consequences
- Incomparable results, irreproducible models
- Hard to automate, schedule, or roll back
- No trace from model → code → data → metrics
Comparison among ML and ordinary software projects
Analogies
- Both produce software modules in the end
- Both involve iterative processes, where feedback is used to improve the product
- Both are driven by tests/evaluations
- Both may benefit from automation
- … and may lose efficiency when activities are performed manually
Differences
- ML projects depend on data (which changes over time)
- Models need training and retraining, not just coding
- Performance may degrade in production (data drift, bias, new environments)
- Many different expertises are involved (data engineers, software engineers, domain experts, operations)
No structured process $\implies$ ML projects may fail to move from notebooks to real-world use
Machine Learning Operations (MLOps)
The practice of organizing and automating the end-to-end process of building, training, deploying, and maintaining machine-learning models
Expected benefits
- Reproducibility → the same code + same data always gives the same model
- Automation → repetitive steps (training, testing, deployment) are handled by pipelines
- Scalability → easier to scale up the training process to more data, bigger models, or more computing resources
- Monitoring & governance → models are tracked, evaluated, and kept under control
- Collaboration → teams work on shared infrastructure, with clear responsibilities
- Versioning → models, data, and code are versioned and traceable
How does MLOps support ML practitioners
MLOps adds infrastructure + processes + automation to make each step more reliable:
- Data → version control for datasets, metadata, lineage tracking
- Training → automated pipelines that reproduce experiments on demand
- Evaluation → systematic tracking of metrics, logs, and artifacts
- Deployment → continuous integration & delivery (CI/CD) for ML models, often with model registries
- Monitoring → automated checks for performance, drift, fairness, anomalies
- Collaboration → shared repositories, environments, and documentation so teams can work together
What may happen without MLOps
- Data in ad-hoc spreadsheets or local files (no version control)
- Training in personal notebooks (hard to reproduce later)
- Model evaluation is manual and undocumented (hard to compare results)
- Deployment = copy-paste code or manual sharing of a model file
- Monitoring is much harder → models silently degrade
- Collaboration =
“send me your notebook by email”
Consequences
- ❌ Fragile, non-reproducible workflows
- ❌ Long delays when models need updating
- ❌ Difficulty scaling beyond a single researcher
- ❌ Low trust from stakeholders (“why did accuracy drop?”)
What about Generative AI workflows?
What is the goal of a Generative AI workflow?
Engineering prompts, tools, vector stores, and agents to constrain and govern the behavior of pre-trained (foundation) models, in order to:
- generate contents (text, images, code, etc.) for a specific purpose
- e.g. bring unstructured data into a particular format
- e.g. produce summaries, reports, highlights
- interpret unstructured data and grasp information from it
- e.g. extract entities, relations, sentiments
- e.g. answer questions about a document
- automate data-processing tasks which are hard to code explicitly
- e.g. the task is ill-defined (
write an evaluation paragraph for each student's work) - e.g. the task requires mining information from unstructured data (
find the parties involved in this contract) - e.g. the task is complex yet too narrow to allow for general purpose coding (
plan a vacation itinerary based on user preferences)
- e.g. the task is ill-defined (
- interact with users via natural language
- e.g. chatbots, virtual assistants
Let’s explain the nomenclature
-
Pre-trained foundation models (PFM): large neural-networks trained on massive datasets to learn general skills (e.g. ‘understanding’ and generating text, images, code)
- e.g. GPT, PaLM, LLaMA, etc.
-
Prompts: carefully crafted textual inputs that guide some PFM to produce desired outputs
- prompt templates are prompts with named placeholders to be filled with specific data at runtime
- e.g.
Write a summary of the following article: {article_text}
- e.g.
- prompt templates are prompts with named placeholders to be filled with specific data at runtime
-
Tools: external software components (e.g. APIs, databases, search engines) that can be invoked by PFMs to perform specific tasks or retrieve information
- e.g. a calculator API, a weather API, a database query interface
-
Vector stores: specialized databases that store and retrieve high-dimensional vectors (embeddings) for the sake of information retrieval via similarity search
- e.g. to support retrieval-augmented generation (RAG)
-
Agents: software systems that orchestrate the interaction between PFMs and tools, enabling dynamic decision-making and task execution based on the context and user input
- e.g. a chatbot that uses a PFM for conversation and invokes a weather API when asked about the weather
- e.g. an assistant that uses a PFM to understand user requests and a database to fetch relevant information
What are the outcomes of a Generative AI workflow?
-
FM are commonly not produced in-house, but rather accessed via APIs… yet the choice of what model(s) to use is crucial
- must be available, configured, and most commonly imply costs (per call, per token, etc.)
-
A set of prompt templates (text files, or code snippets) that are known to work well for the tasks at hand
- commonly assessed via semi-automatic evaluations on a validation set of inputs
-
A set of tool servers implementing the MCP protocol so that tools can be invoked by PFMs
- these are software modules, somewhat similar to ordinary Web services, offering one endpoint per tool
-
A set of agents, implementing the logic to orchestrate the interaction between PFMs and tools
- these are software modules, commonly implemented via libraries such as LangChain or LlamaIndex
-
A set of vector stores (if needed), populated with relevant data, and accessible by the agents
- there are software modules, somewhat similar to ordinary DBMS, offering CRUD operations on data chunks indexed by their embeddings
What are the phases of a GenAI workflow?
(Similar to the ML workflow in the sense that the goal is to process data, but different in many details e.g. no training is involved)
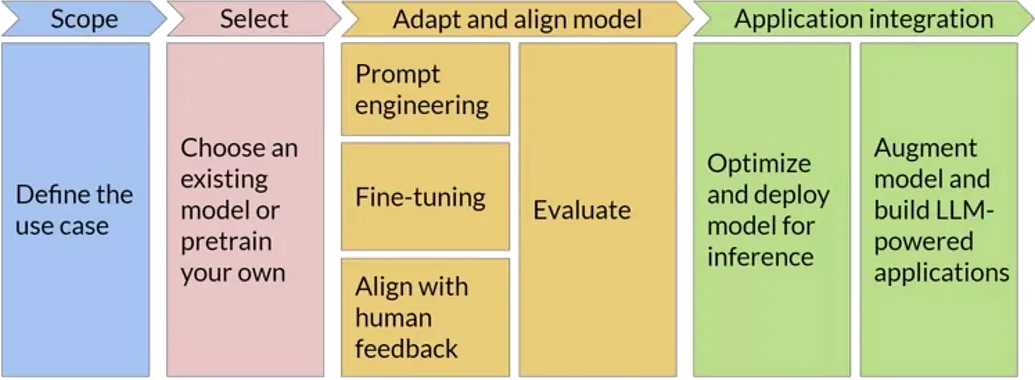
- there could be many iterations (e.g. for PFM selection, and prompt tuning)
- the whole workflow may be re-started upon data changes, or task changes, or new PFM availability
- the interplay between prompts, models, tasks, and data may need to be monitored and adjusted continuously
- the data-flow between components (agents, PFM, tools, vector stores) may need to be tracked for the sake of debugging and monitoring
Peculiar activities in a typical GenAI workflow
-
Foundation model selection: choose the most suitable pre-trained model(s) based on task requirements, performance, cost, data protection, and availability
- implies trying out prompts (even manually) on different models
-
Prompt engineering: design, test, and refine prompt templates to elicit the desired responses
- implies engineering variables, lengths, formats, contents, etc
-
Evaluations: establish assertions and metrics to assess PFM responses to prompts (attained by instantiating templates over actual data)
- somewhat similar to unit tests in ordinary software
- important when automatic, as they allow quick evaluations on prompt/model combinations
-
Tracking the data-flow between components (agents, PFM, tools, vector stores) to monitor costs, latency, and to debug unexpected behaviors
- also useful for the sake of auditing and governance
Example of GenAI workflow (pt. 1)
Support public officers in managing tenders through a GenAI assistant that understands and compares procurement decisions transparently.
-
Problem Framing:
- Content Generation: draft and justify comparisons among suppliers’ offers vs. technical specs
- Interpretation: understand regulatory documents and technical language
- Automation: retrieve relevant laws, norms, and prior tender examples
- Interaction: enable officers to query and validate results through natural language
-
Data Collection: past tenders’ technical specifications, acts, etc; regulatory documents, etc.
-
Data Preparation:
- devise useful data schema & extract relevant data from documents
- anonymize sensitive info (suppliers, personal data)
- segment documents and index by topic (law, SLA, price table, etc.)
Example of GenAI workflow (pt. 2)
-
Prompt Engineering:
- design prompt templates for comparison, justification, and Q&A
- use role-based system prompts (
You are a procurement evaluator…)
- use role-based system prompts (
- allocate placeholders for RAG-retrieved data chunks
- iterate on template design based on manual tests
- design prompt templates for comparison, justification, and Q&A
-
Foundation Model Selection: multi-lingual? specialized in legal/technical text? cost constraints? support for tools?
-
Vector stores: storing embeddings for tender documents & specs, legal texts & guidelines, previous evaluation, templates
- choose embedding model, chunking strategy, and populate vector store
- engineer retrieval strategies to fetch relevant chunks
-
Tools:
- regulation lookup API + tender database query API
- report generation out of document templates
- automate scoring calculations via spreadsheet or Python scripts generation
-
Agents:
- exploit LLM to extract structured check-lists out of technical specs
- orchestrate RAG, tool invocations, and prompt templates to score each offer
- generate comparison reports
- …
LLM Operations (LLMOps)
The practice of organizing and automating the end-to-end process of building, evaluating, deploying, and maintaining GenAI applications
In a nutshell: MLOps for GenAI
Expected benefits
- Systematicity → structured processes to manage prompts, tools, and agents
- Efficiency → reuse of components, templates, and evaluations
- Scalability → easier to test, and update individual components (prompt templates, tools, agents)
- Monitoring & governance → components are tracked, evaluated, and kept under control
How does LLMOps support GenAI practitioners
LLMOps adds infrastructure + processes + automation to make each step more reliable:
- Foundation models → catalogs of available models, with metadata on capabilities, costs, and usage policies
- Provider Gateways → standardized APIs to access different PFM providers (e.g. OpenAI, HuggingFace) uniformly, without code rewrites
- Prompt engineering → version control for prompt templates, systematic testing frameworks
- Tool integration → standardized protocols (e.g. MCP) and libraries to connect tools with PFMs + gateway technologies to aggregate multiple tools
- Agents → provider-agnostic libraries and frameworks (e.g. LangChain) to build, manage, and orchestrate agents
- Vector stores → standardized interfaces to store and retrieve data chunks via embeddings, with support for multiple backend DBMS
- Evaluation & monitoring → automated frameworks to run evaluations, track performance, and monitor costs
What may happen without LLMOps
-
Foundation models are hard-coded in the application
- making it difficult to switch providers or models
-
Prompt templates are scattered in code or documents
- making it hard to track changes or reuse them
-
Tools are manually integrated, leading to:
- brittle connections,
- lack of observability,
- maintenance challenges
-
Agents are ad-hoc scripts that mix logic, PFM calls, and tool invocations
- making them hard to debug, extend or compose
-
Vector stores are tightly coupled with specific DBMS
- making it hard to migrate or scale
-
Evaluation & monitoring are manual and sporadic leading to undetected issues, cost overruns, and loss of trust
MLOps and LLMOps with MLflow
What is MLflow? https://mlflow.org/
![]()
An open-source Python framework for MLOps and (most recently) LLMOps
- usable either in-cloud (e.g. via Databricks) or on-premises (self-hosted)
- we’ll see the latter setup
Outline
- First, we focus on how to use MLflow for the sake of MLOps
- Then, we show how MLflow can be used for LLMOps as well
MLflow for MLOps: main components pt. 1

Provides
- UI to visualize and monitor experiments
- Facilities to evaluate ML models (metrics and charts)
- Python API and command-line support for ML operations
How
- by tracking metadata about datasets, experiments, and models
- by serializing and storing models, charts, predictions, metrics, etc.
- by facilitating deployment of models as services
MLflow for MLOps: main components pt. 2
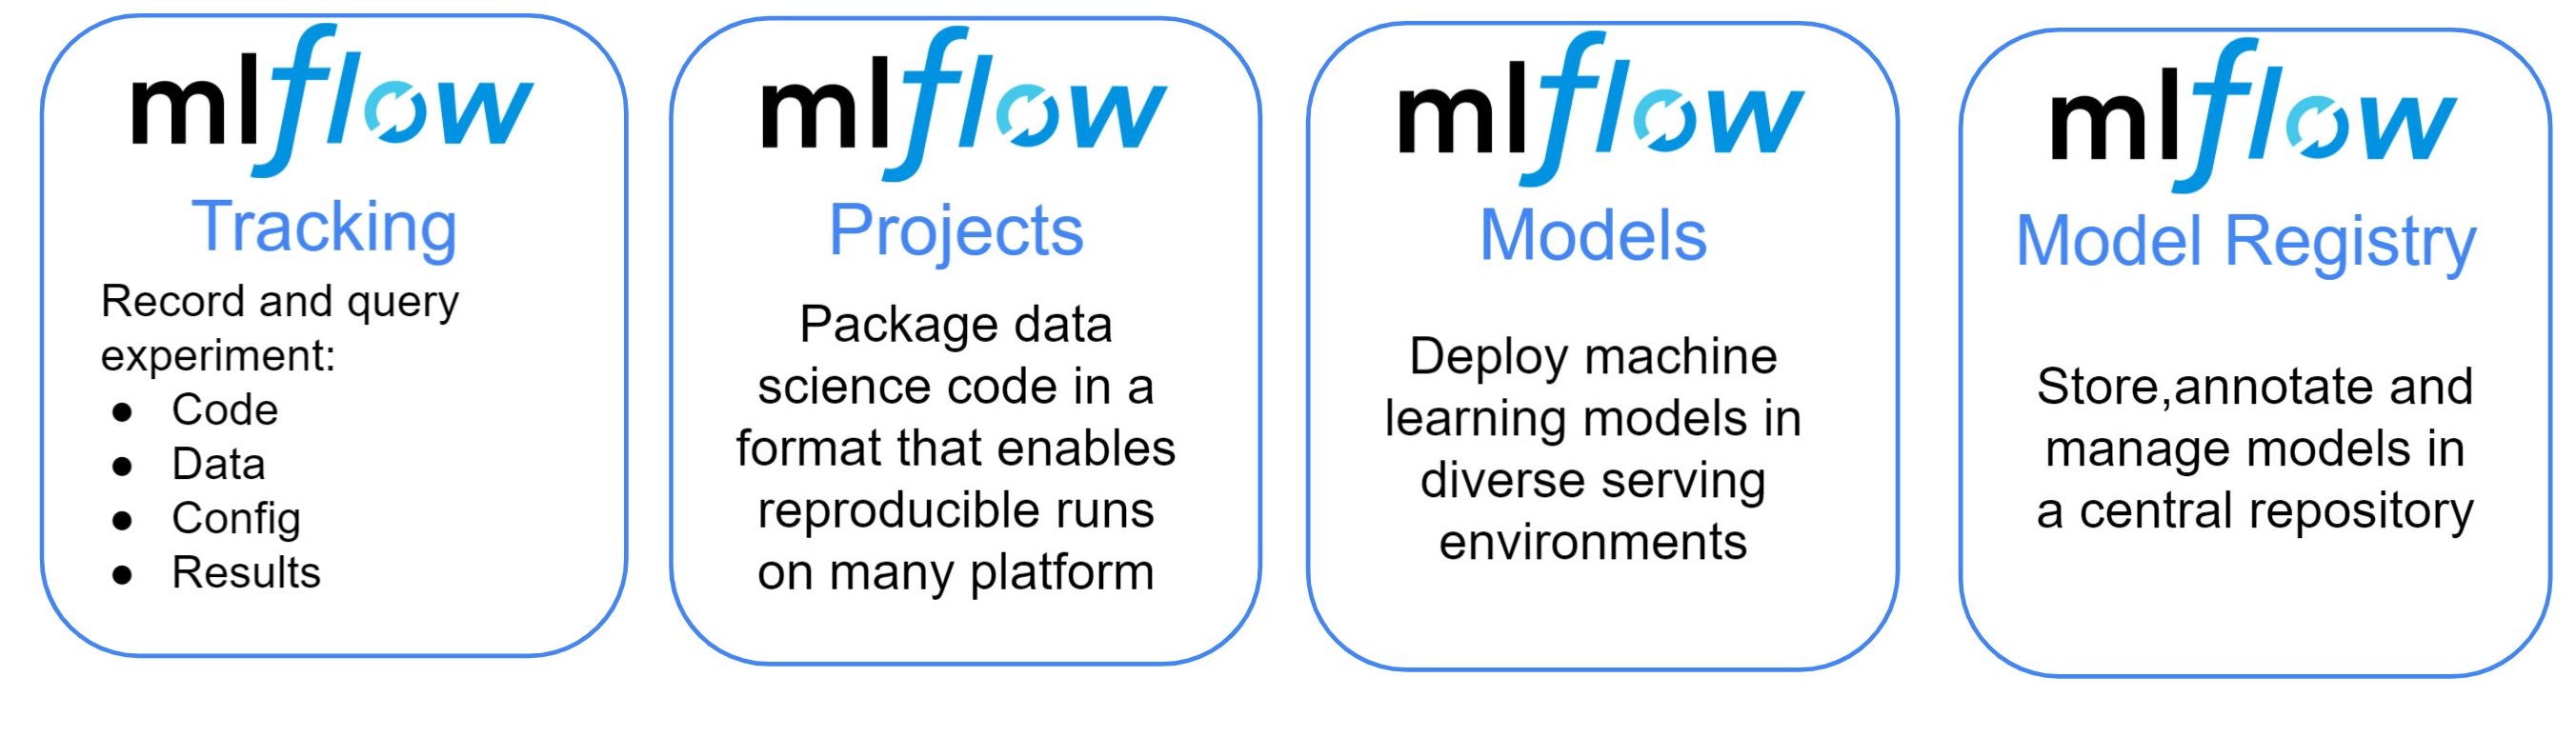
MLflow’s common set-ups
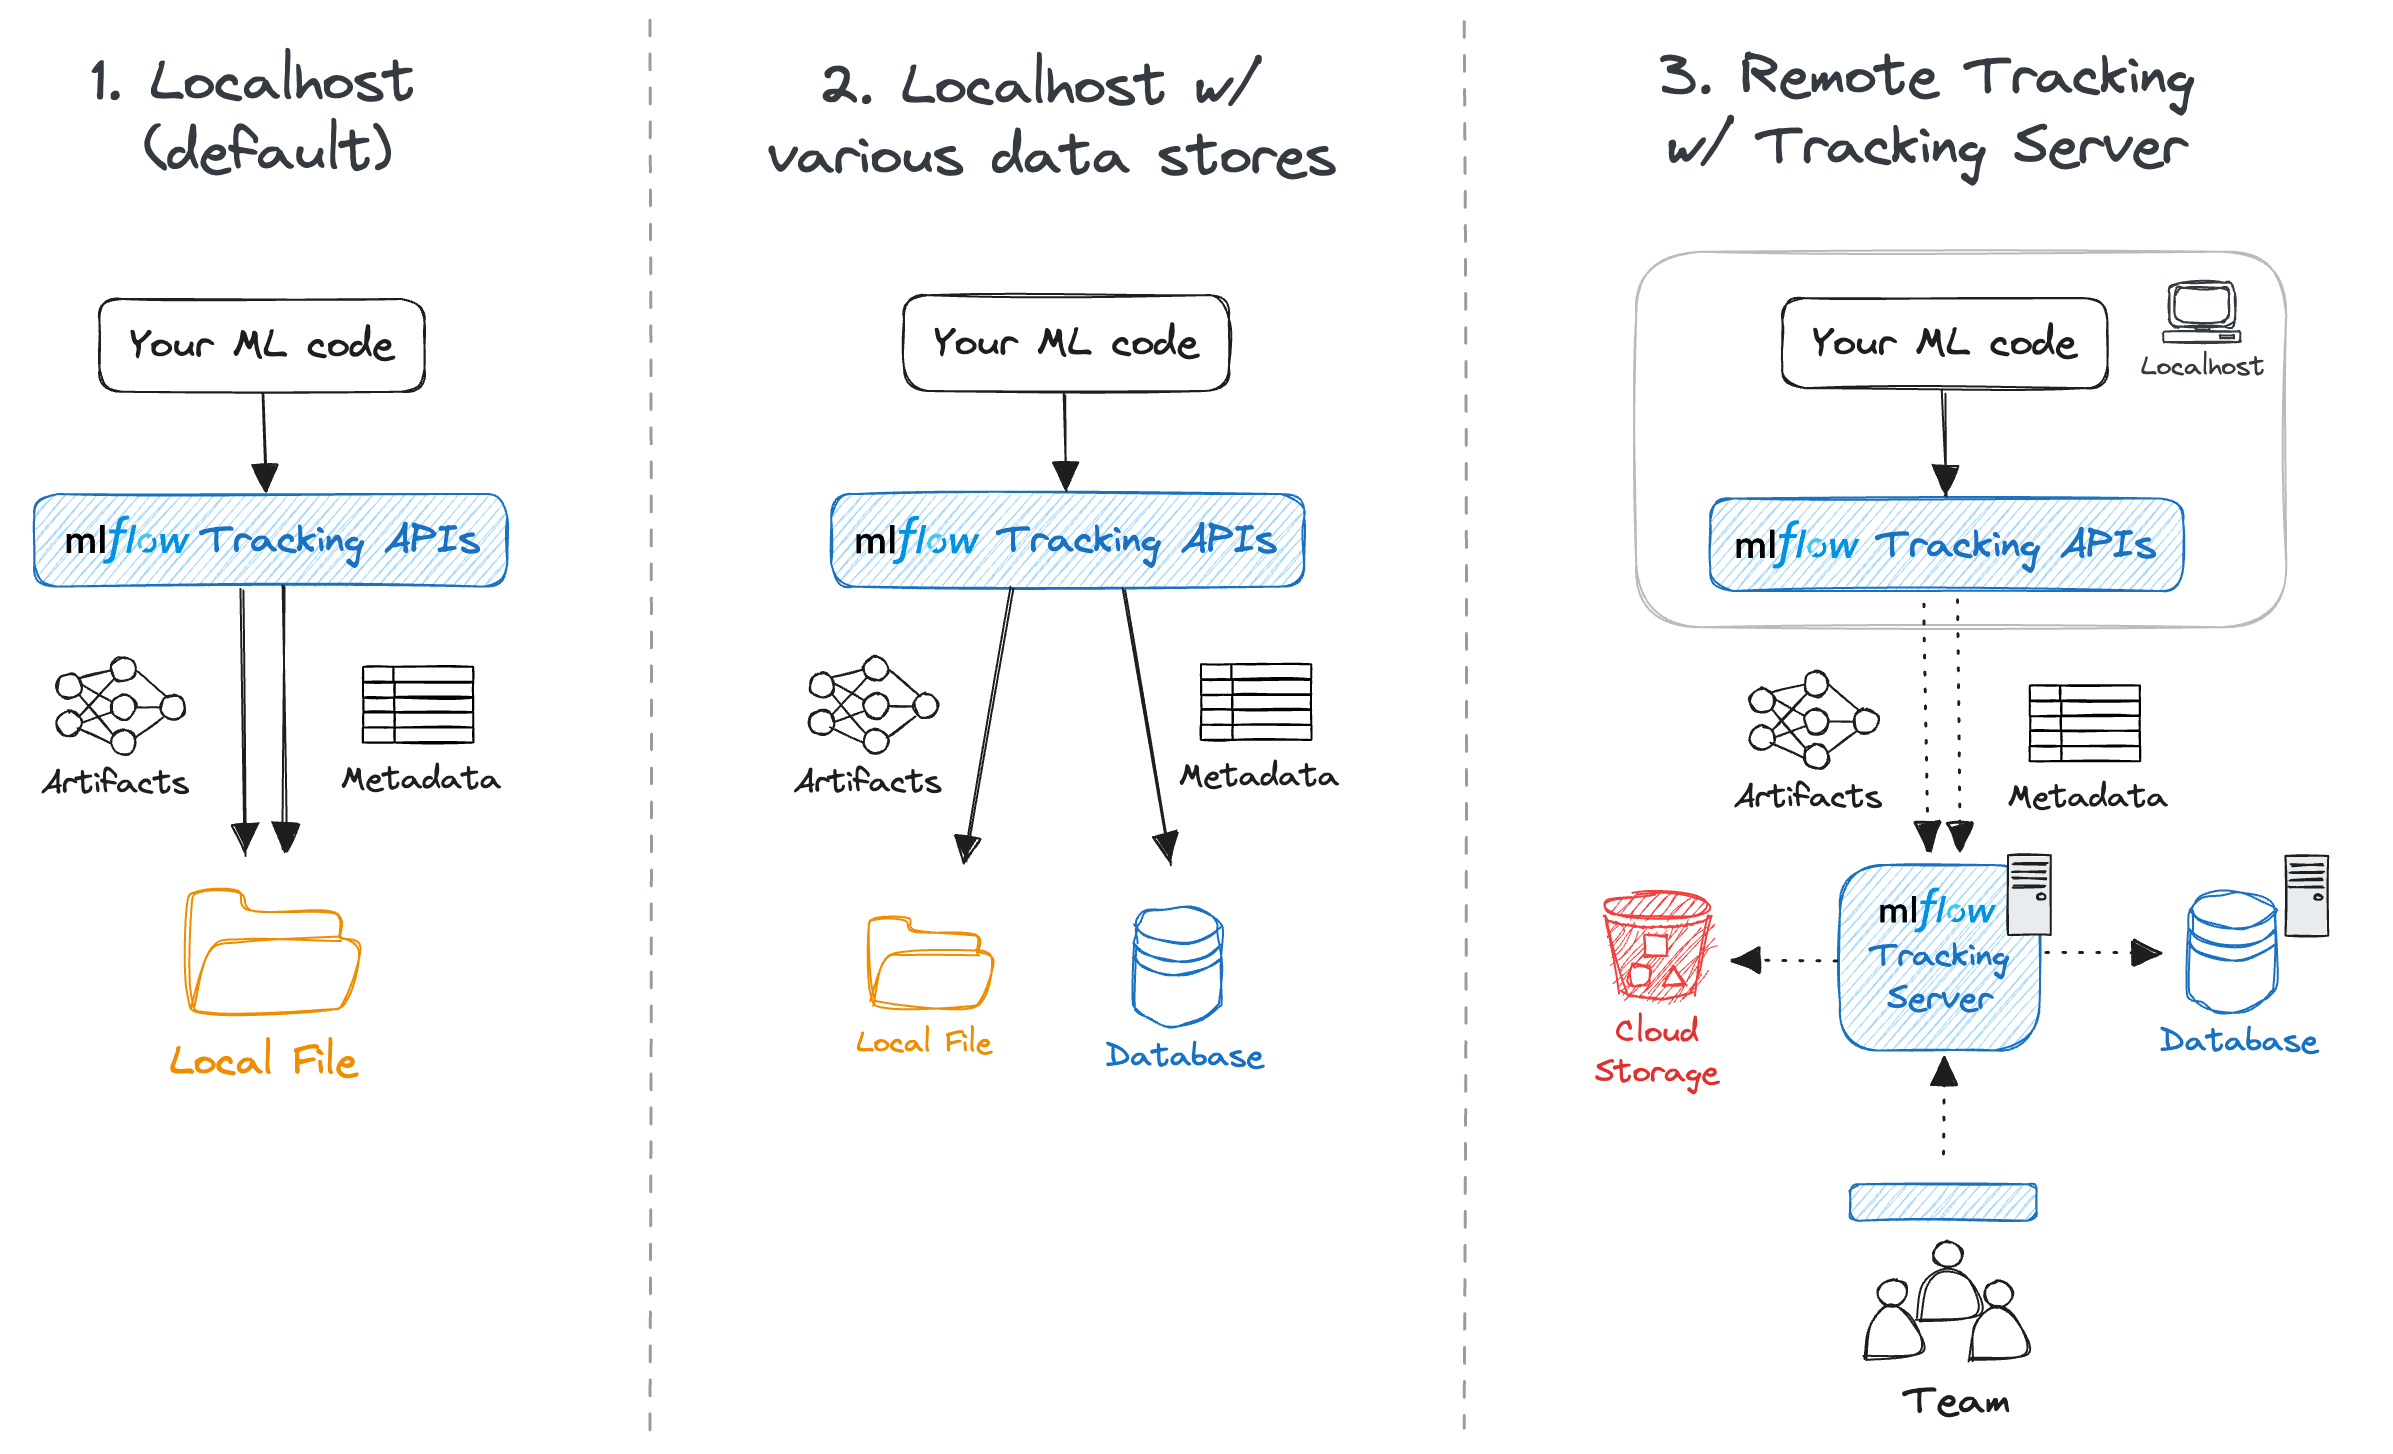
- Solo development (serverless)
- Solo development (local server + remote store)
- Team work (remote server)
MLflow’s complex set-up
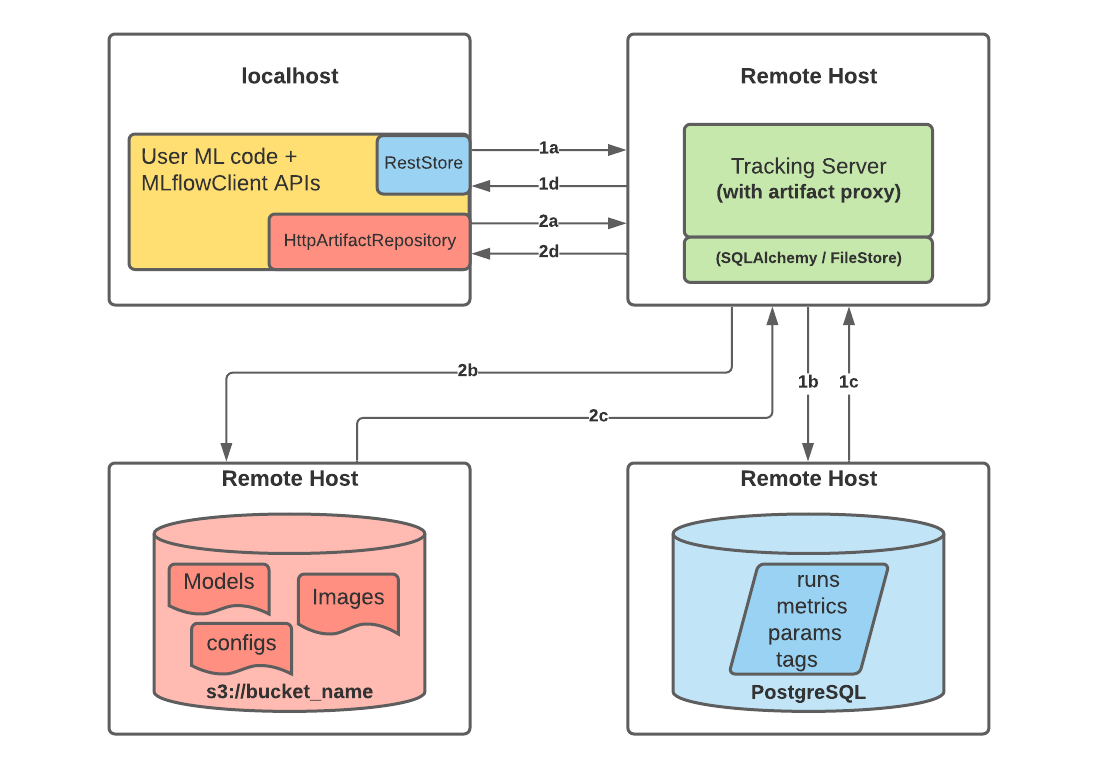
Notice that, in set-up 3, there could be up to three servers involved:
- the Backend Store server (a relational DBMS, e.g. PostgreSQL, MySQL, SQLite, etc.) to store metadata
- the Artifact Store server (e.g. S3, Azure Blob Storage, etc.) to store artifacts via some file-system interface
- the MLflow Tracking Server to provide the UI and API endpoints
- this is mediating the interaction between users and the two stores
MLflow’s functioning overview
Assumptions
- Some Python code is in place to perform ML tasks (via common libraries such as
scikit-learn,TensorFlow,PyTorch, etc.) - The code is using MLflow’s Python API to log metadata about experiments, datasets, models, metrics, etc.
Workflow
-
Start the Python code
-
MLflow’s Python API invoked in the code will actually log all relevant metadata and artifacts as the code runs
- metadata $\approx$ experiment id, run id, timings, data schemas, input parameters, hyper-parameters, metric values, etc.
- artifact $\approx$ dataset, model, chart, etc.
-
Metadata and artifacts may be stored (depending on the configuration):
- on the local file system
- on a remote backend and artifact store
MLflow usage remarks
-
Assumption 2 may require additional effort from the developer(s)
- this is kept minimal via auto-logging available for most common ML libraries
-
No big constraint on how to organize the Python code it-self…
-
… but many benefits (automation, reproducibility) may come from organizing the code as an MLflow Project
- $\implies$ decomposing the code into multiple scripts
- $\implies$ thinking about the parametric aspects of the experiment, and account for command-line arguments accordingly
- $\implies$ thinking about the environment where the code will run (e.g. dependencies, libraries, etc.)
- we’ll see this aspect later
A taste of MLflow’s Tracking API (pt. 1)
-
Install MLflow into your Python environment
pip install mlflow -
Consider the following dummy script:
import sys # to read command-line arguments
import tempfile # to save generated files into temporary directories
import mlflow # to use MLflow functionalities
from random import Random # to generate random numbers with controlled seed

# Set the experiment name (creates it if it does not exist)
mlflow.set_experiment(experiment_name="logging_example")
# Read a seed from command-line arguments (default: 42)
seed = int(sys.argv[1]) if len(sys.argv) > 1 else 42
rand = Random(seed)
# Start an MLflow run, naming it "example_run" (otherwise random name is generated)
with mlflow.start_run(run_name="example_run") as run:
    # notice that experiments are runs are identified by their numeric IDs
    print(f"Started MLflow run with ID: {run.info.run_id} in experiment ID: {run.info.experiment_id}")
    # Log a parameter "seed" with the given seed value
    mlflow.log_param("seed", seed)
    # Let's simulate 5 different metric scores to be logged
    for i in range(5):
        mlflow.log_metric(f"random_{i}", rand.random())
    mlflow.log_metric("random_4", rand.randint(1, 10)) # overwrite last metric
    # Create and log an example artifact (a text file, generated inside temporaty directory)
    with tempfile.TemporaryDirectory() as tmpdir:
        file_path = f"{tmpdir}/example.txt"
        with open(file_path, "w") as f:
            f.write("This is an example artifact.")
        mlflow.log_artifact(file_path, artifact_path="examples")
    # Simulate an error in the run if the seed parameter is odd
    if seed % 2 == 1:
        raise ValueError("Let the run fail for odd seeds!")
    print("Run completed successfully.")
A taste of MLflow’s Tracking API (pt. 2)
-
Let’s run the experiment twice, with different seeds:
python logging_example.py 42 python logging_example.py 43 -
The 1st successful run shall output something like:
2025/11/10 11:44:49 INFO mlflow.tracking.fluent: Experiment with name 'logging_example' does not exist. Creating a new experiment. Started MLflow run with ID: 378f18735f6d4abd8abeba76f4029bea in experiment ID: 931233098002846893 -
The 2nd failing run shall output something like:
Started MLflow run with ID: 9b52b7b7416e423ca9c878fba9b5c667 in experiment ID: 931233098002846893 Traceback (most recent call last): File "/home/gciatto/Work/Code/example-mlops/mlflow_tracking.py", line 28, in <module> raise ValueError("Let the run fail for odd seeds!") ValueError: Let the run fail for odd seeds! -
Look at your file system, notice that a new
mlruns/folder has appeared next to Python script:mlruns ├── 931233098002846893 │ ├── 378f18735f6d4abd8abeba76f4029bea │ │ ├── artifacts │ │ │ └── examples │ │ │ └── example.txt │ │ ├── meta.yaml │ │ ├── metrics │ │ │ ├── random_0 │ │ │ ├── random_1 │ │ │ ├── random_2 │ │ │ ├── random_3 │ │ │ └── random_4 │ │ ├── params │ │ │ └── seed │ │ └── tags │ │ ├── mlflow.runName │ │ ├── mlflow.source.git.commit │ │ ├── mlflow.source.name │ │ ├── mlflow.source.type │ │ └── mlflow.user │ ├── 9b52b7b7416e423ca9c878fba9b5c667 │ │ ├── artifacts │ │ │ └── examples │ │ │ └── example.txt │ │ ├── meta.yaml │ │ ├── metrics │ │ │ ├── random_0 │ │ │ ├── random_1 │ │ │ ├── random_2 │ │ │ ├── random_3 │ │ │ └── random_4 │ │ ├── params │ │ │ └── seed │ │ └── tags │ │ ├── mlflow.runName │ │ ├── mlflow.source.git.commit │ │ ├── mlflow.source.name │ │ ├── mlflow.source.type │ │ └── mlflow.user │ ├── meta.yaml │ └── tags │ └── mlflow.experimentKind └── models
A taste of MLflow’s Tracking API (pt. 3)
-
Let’s now start the MLflow Web UI via the following command, to visualize the experiment runs:
mlflow uithen browse to http://127.0.0.1:5000 in your favorite browser
-
You should see something like the following:

A taste of MLflow’s Tracking API (pt. 4)
- Click on the experiment name (
logging_example) to see the two runs: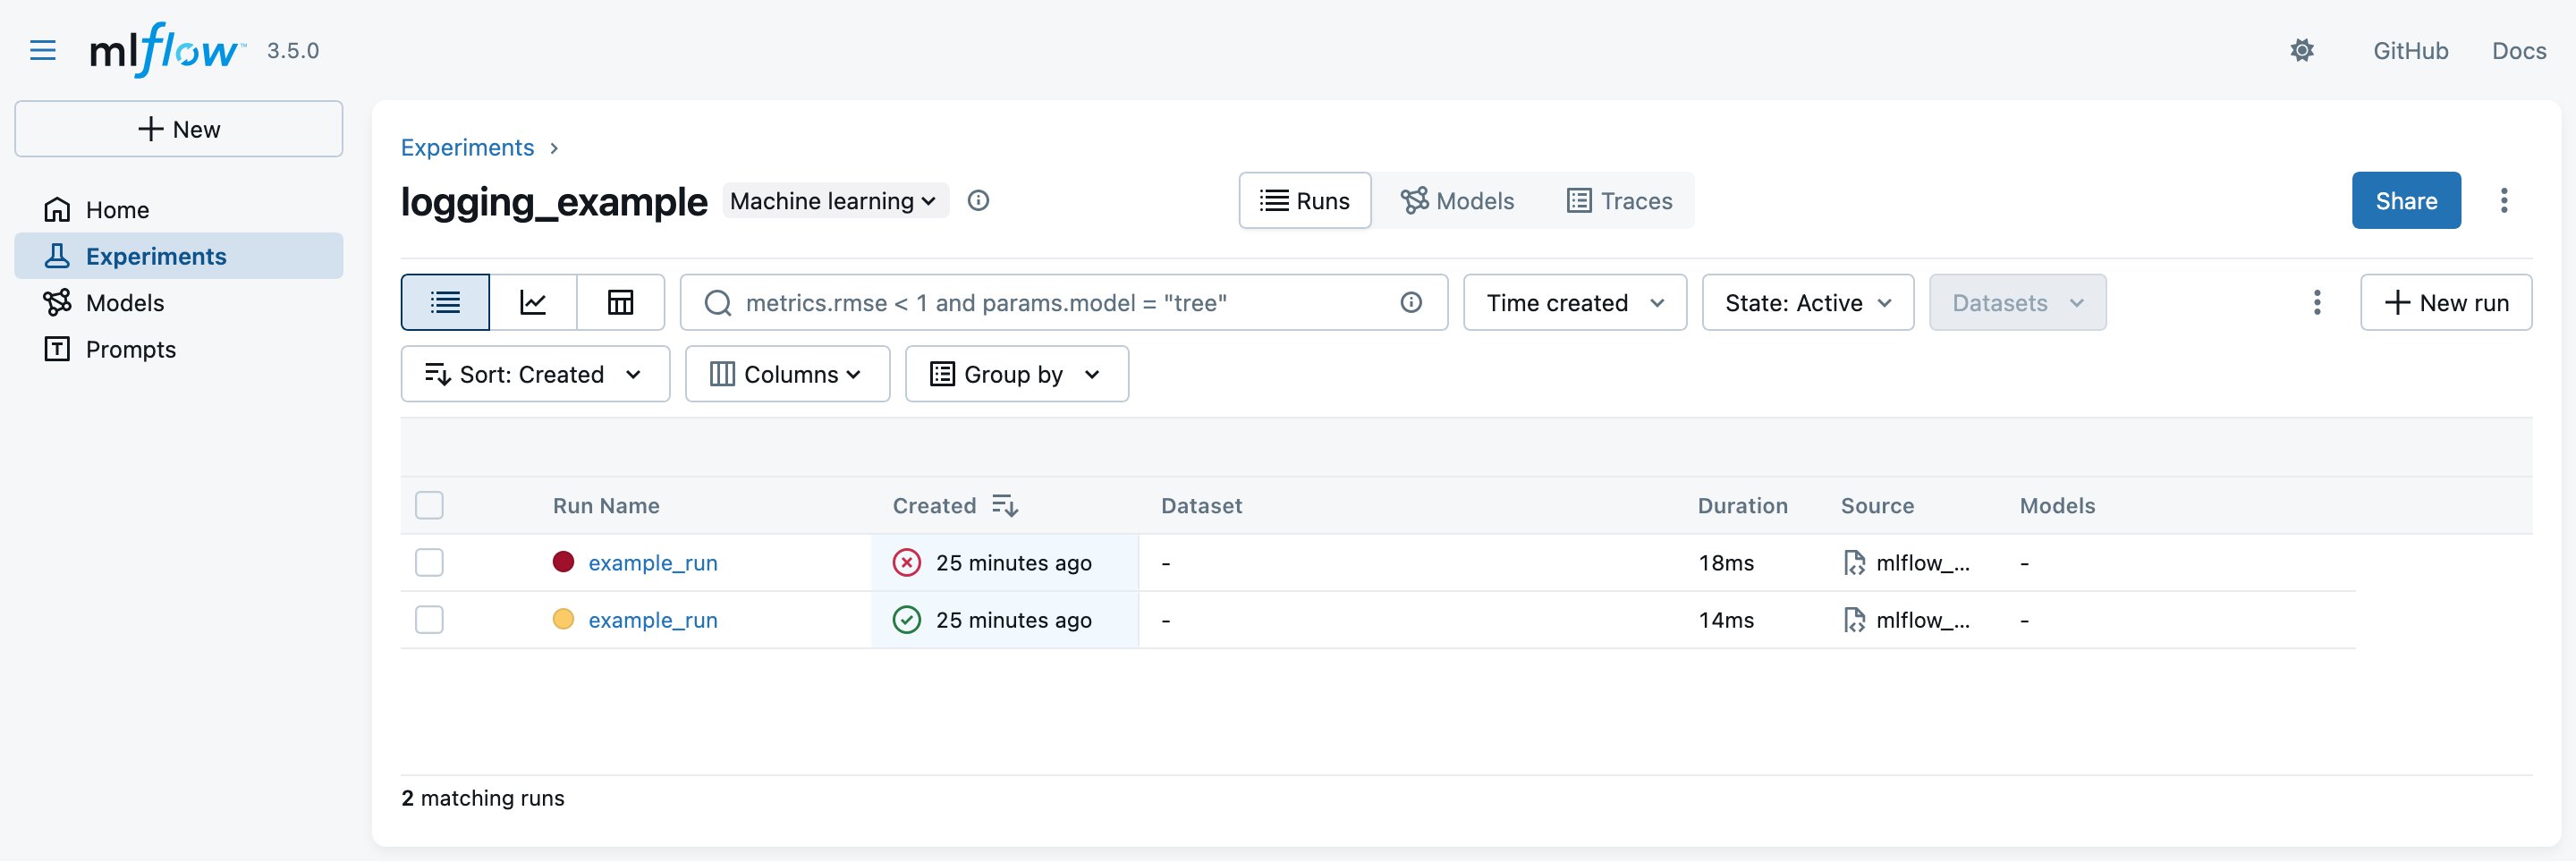
- notice that the latest run is marked as failing while the earliest one is successful
- the exit code of the run is registered automatically
- notice that the latest run is marked as failing while the earliest one is successful
A taste of MLflow’s Tracking API (pt. 5)
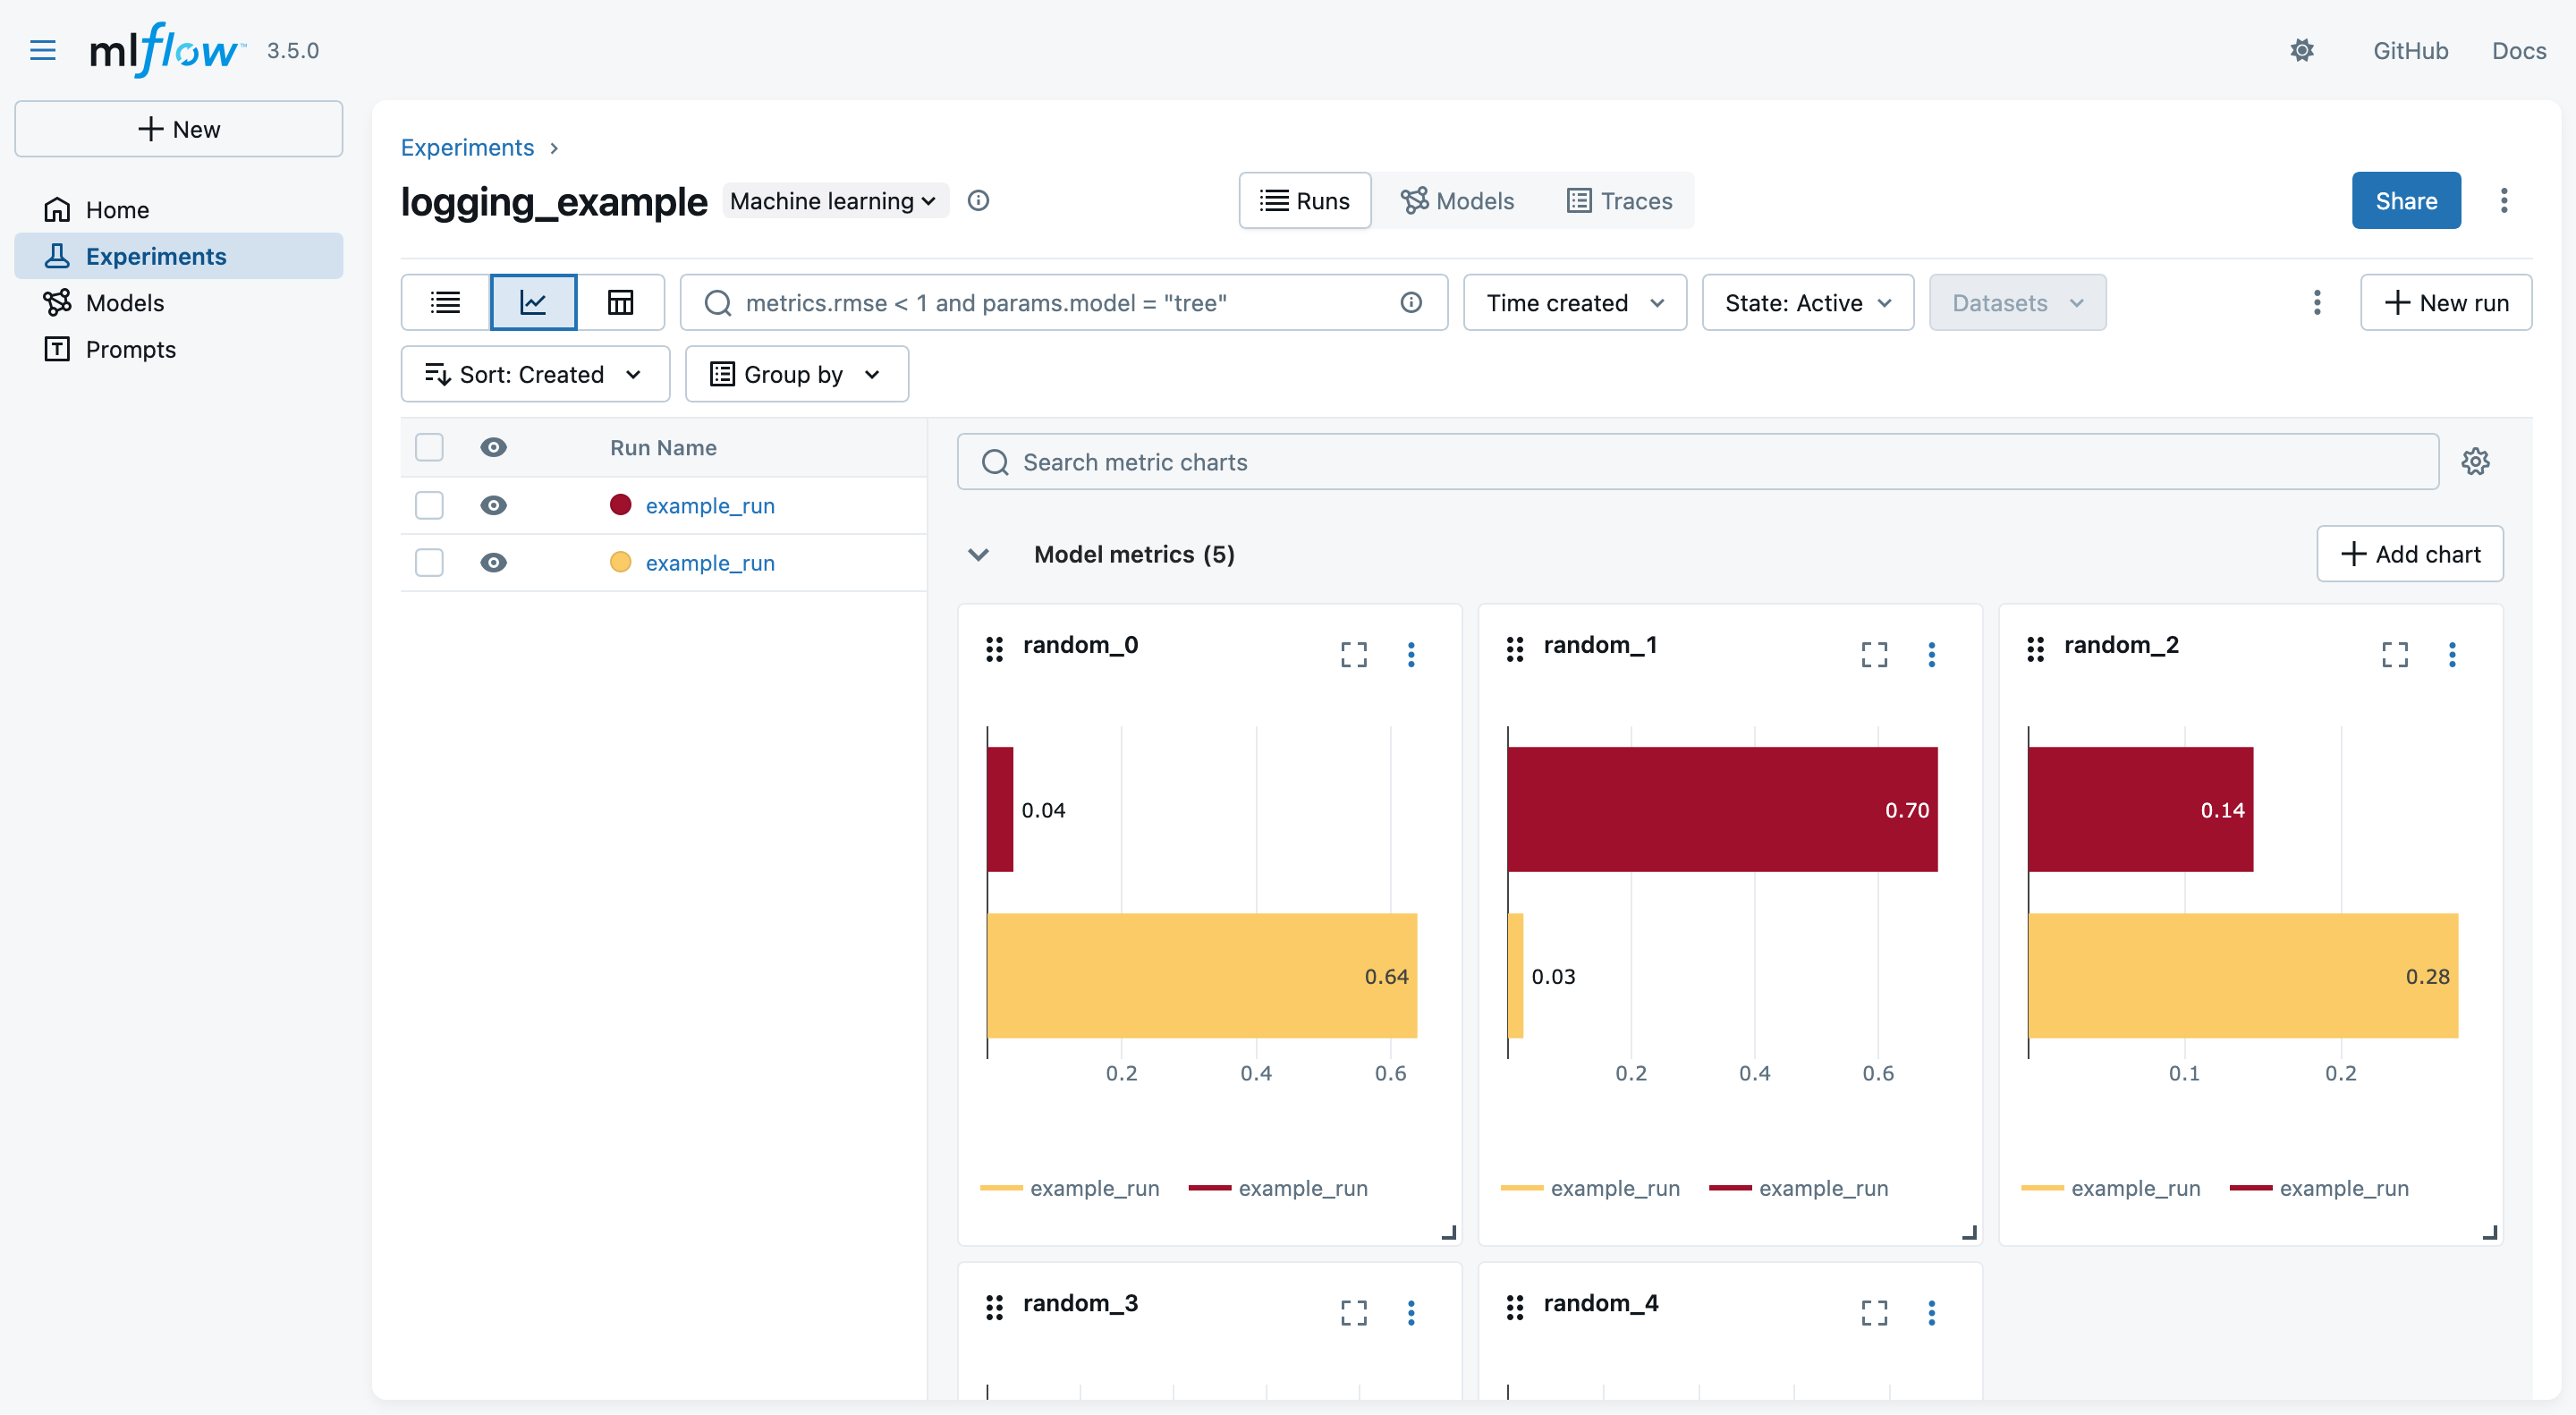
- You may switch to the “Chart view” to see a comparison among the logged metrics (across all runs):
A taste of MLflow’s Tracking API (pt. 6)
- You may click on one run name to see details about that run
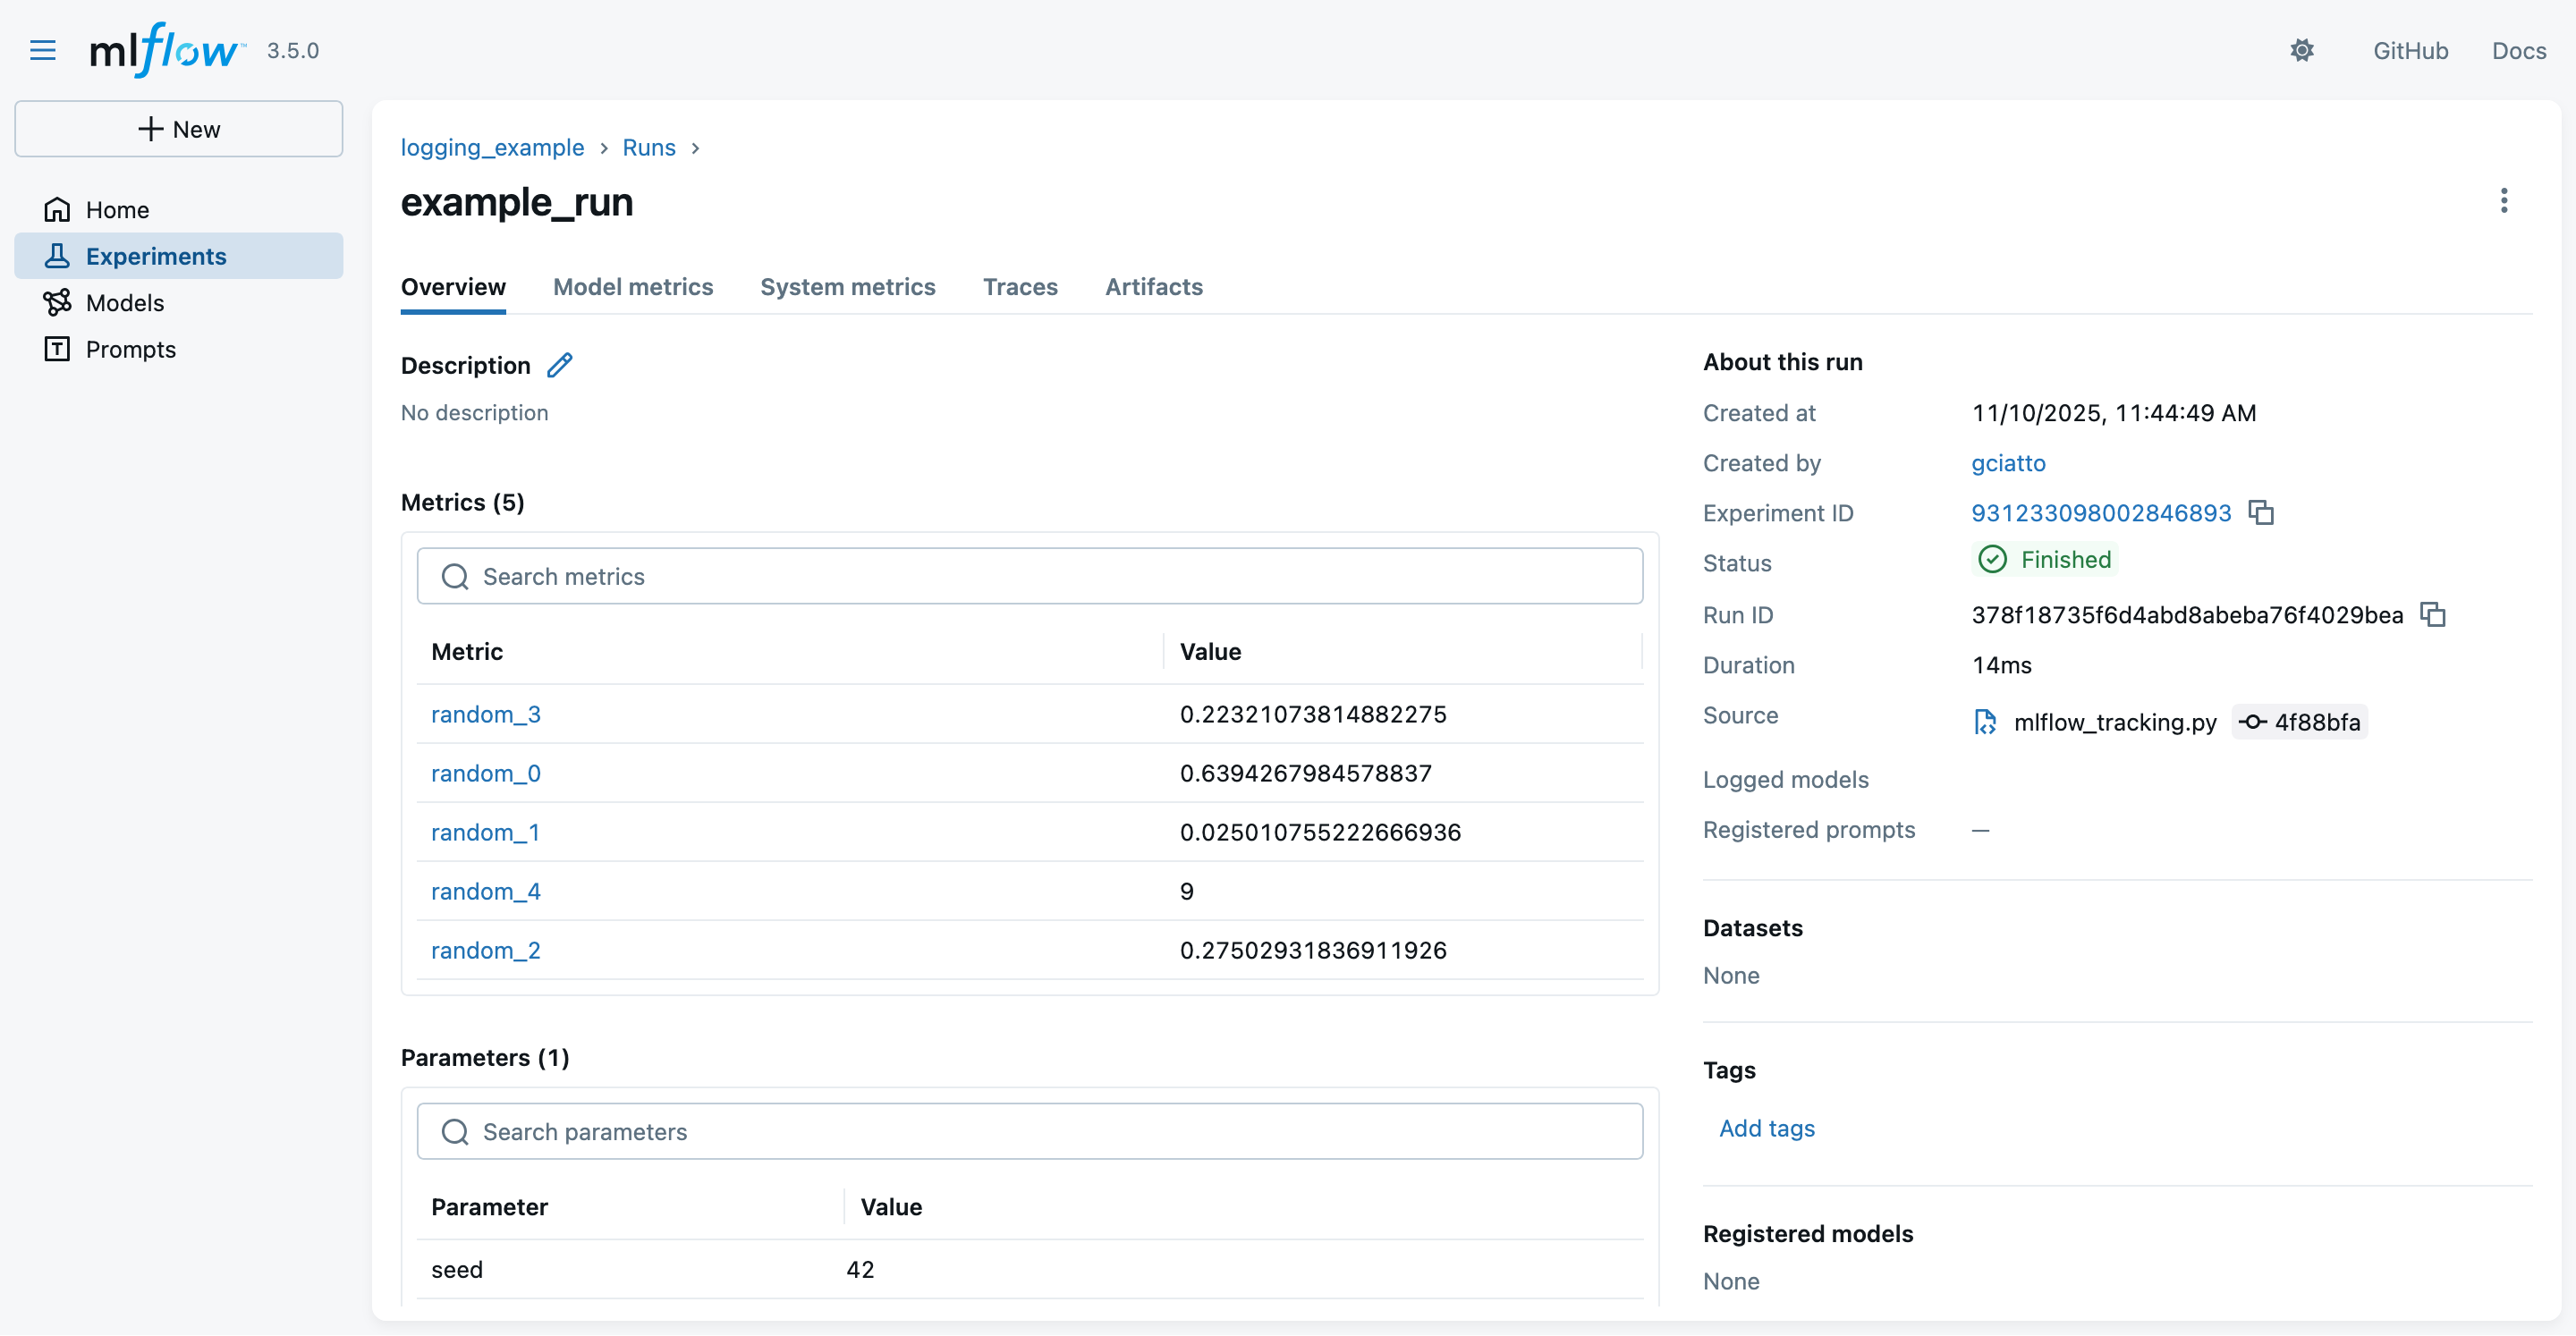
- notice the logged parameters, metrics, and metadata
- notice that these are the same information we logged via the MLflow Python API + some automatically-inferred metadata
- notice that these data are the same one stored on the file system, in
mlruns/
- notice the logged parameters, metrics, and metadata
A taste of MLflow’s Tracking API (pt. 7)
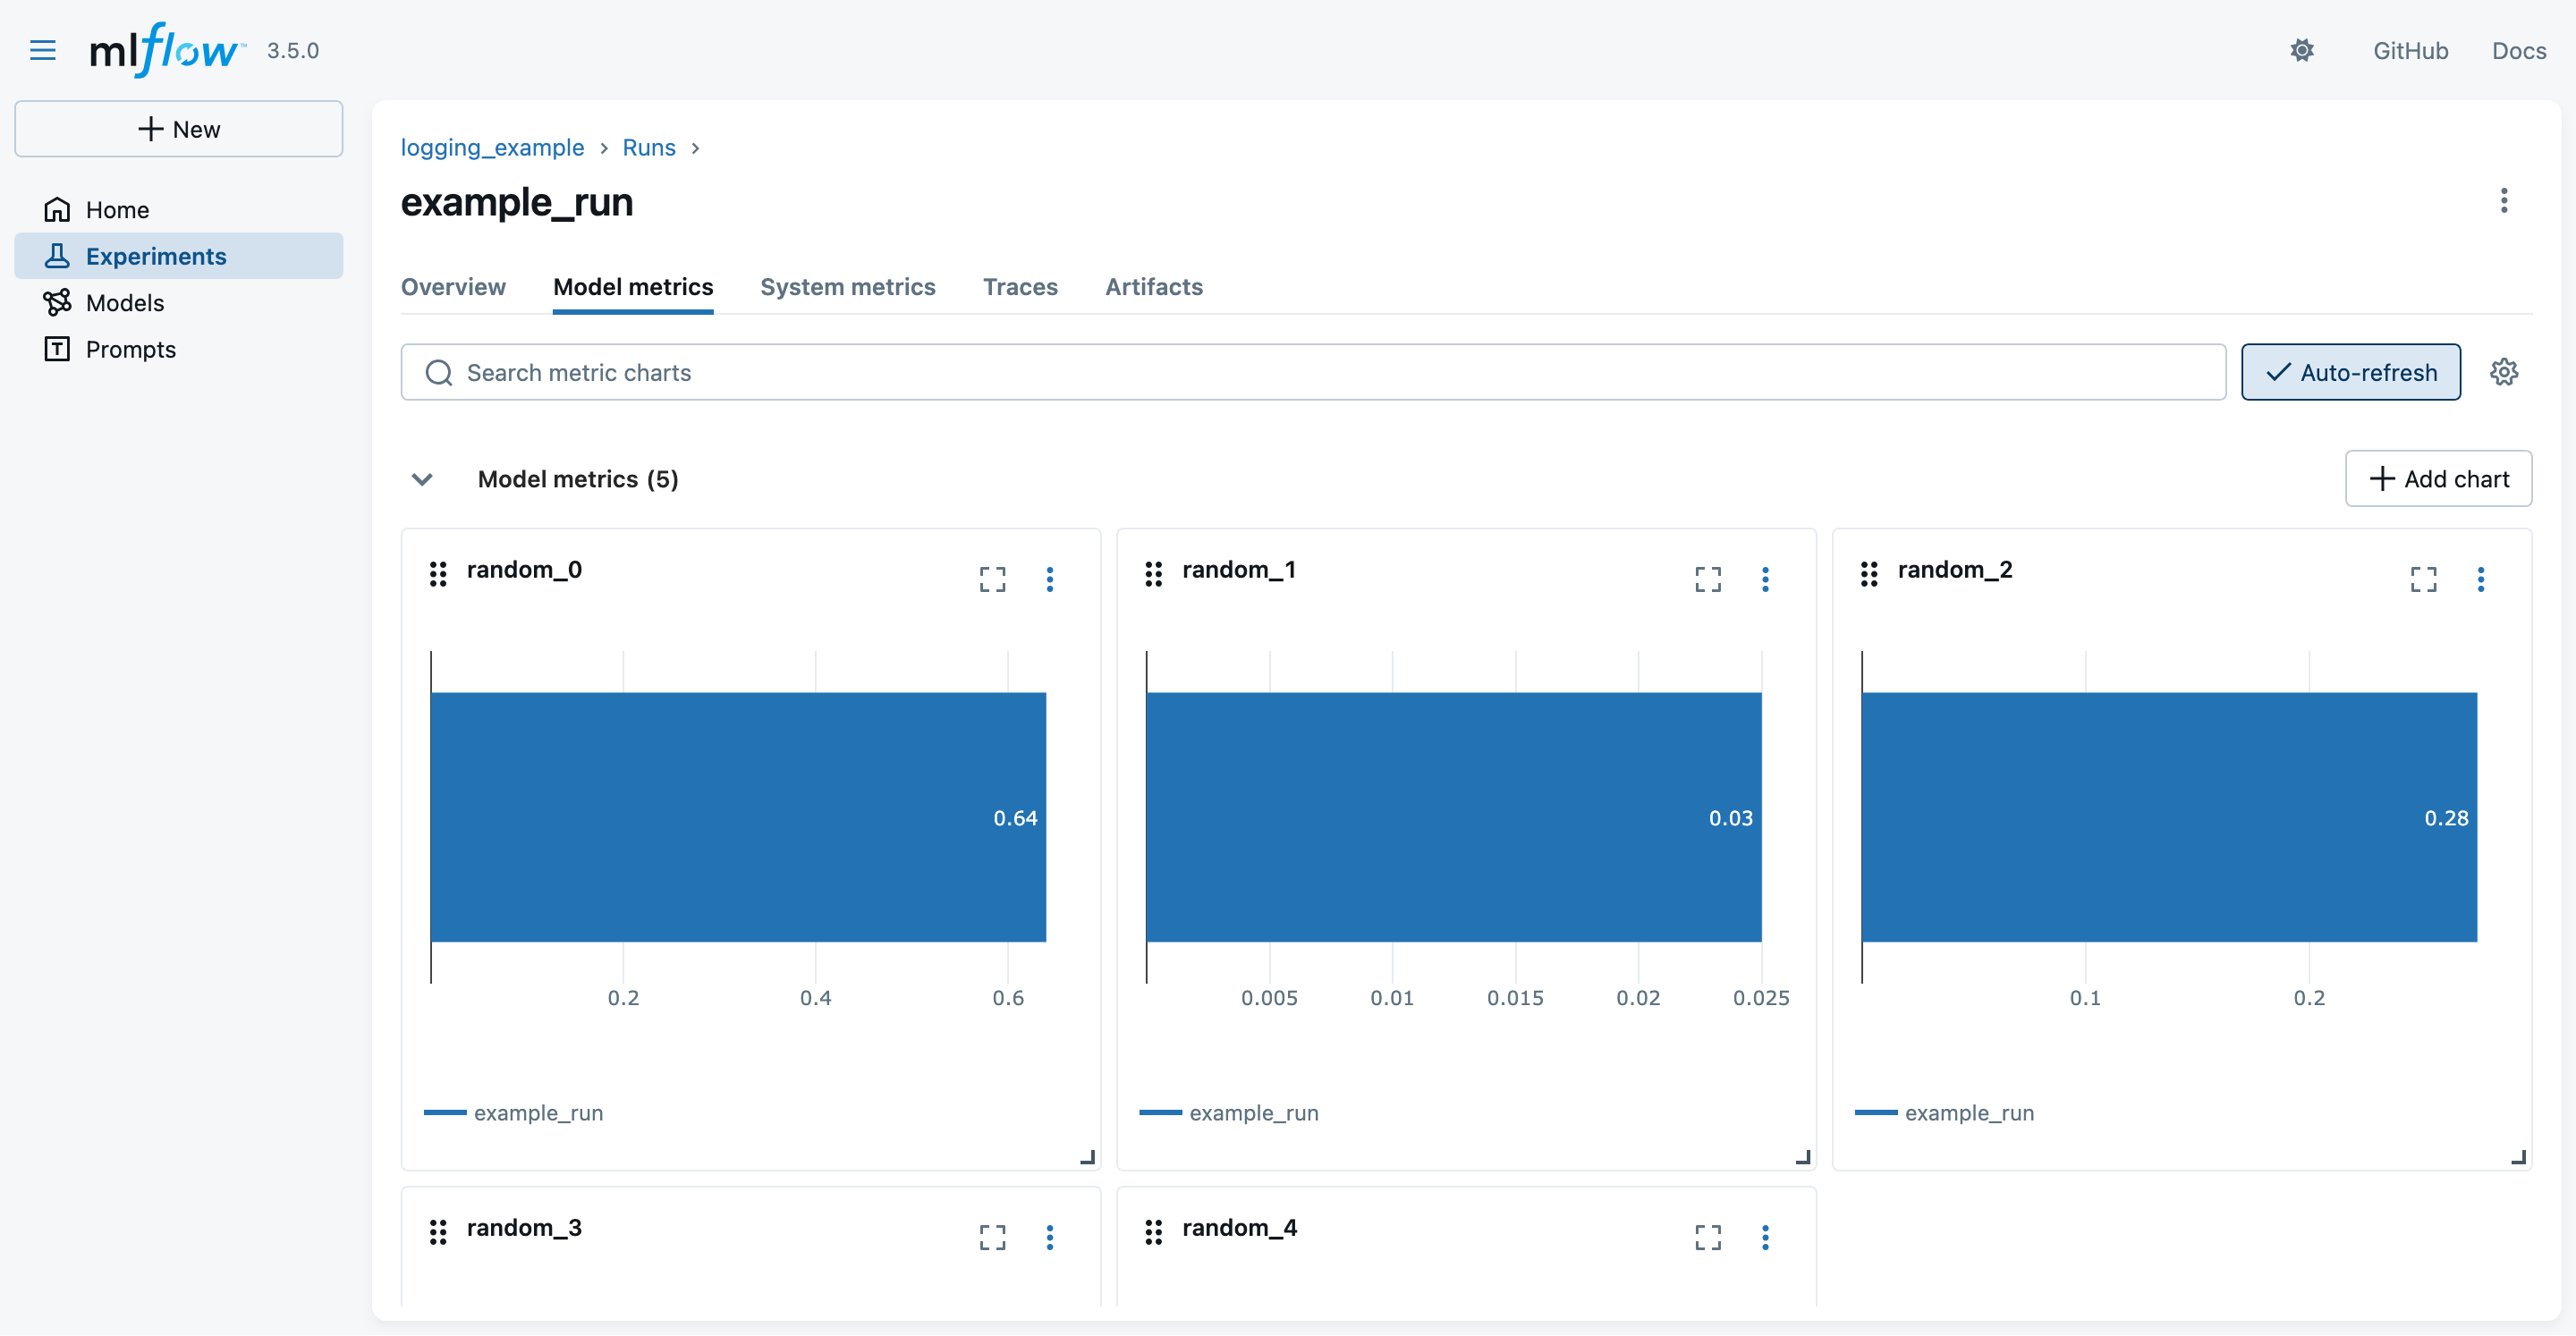
- You may switch to the “Modal metrics” tab to see the logged metrics in graphical form:
A taste of MLflow’s Tracking API (pt. 8)
- You may switch to the “Artifacts” tab to see the logged artifacts:
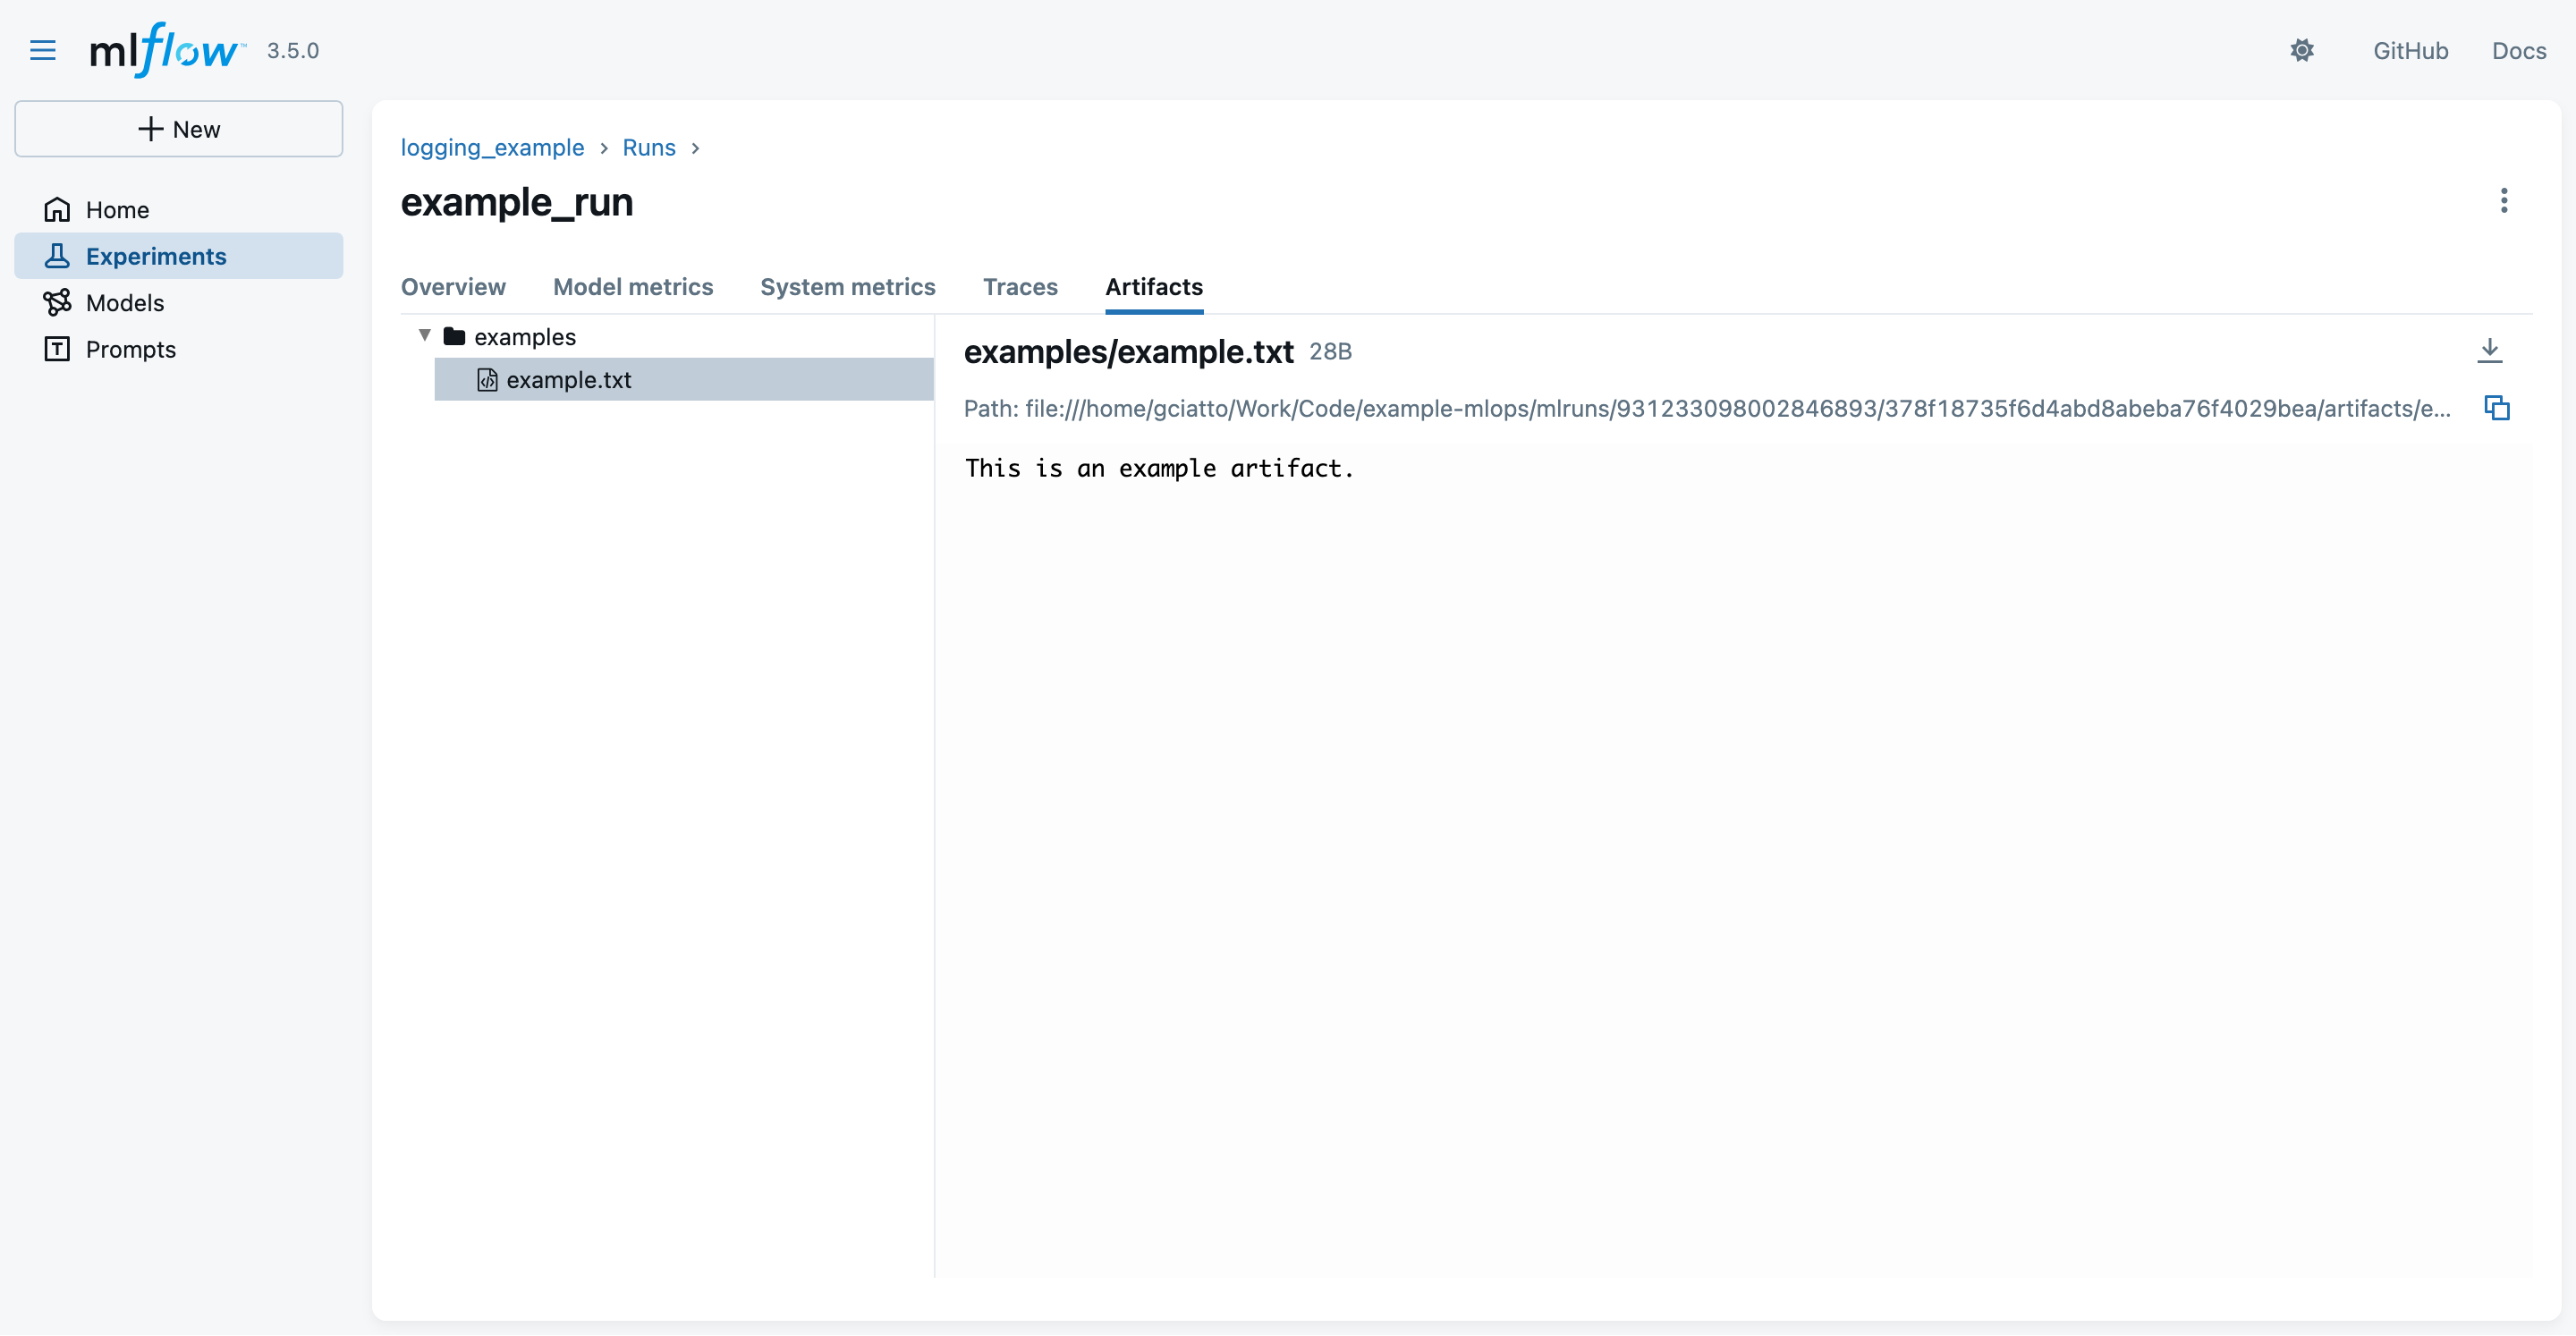
- notice that the
example.txtartifact is inside some “virtual”examples/folder- as we asked explicitly in the Python code
- notice that the
Autologging APIs (pt. 1)
- Consider the following script, aimed at training a decision tree classifier for the Iris dataset, via SciKit-Learn library
from sklearn.datasets import load_iris # to load the iris dataset
from sklearn.tree import DecisionTreeClassifier # to use decision tree classifier
import mlflow # to use MLflow functionalities
import sys # to read command-line arguments
# Set the experiment name (creates it if it does not exist)
mlflow.set_experiment("autologging-example")
# Enable autologging for scikit-learn (and other ML libraries in general)
mlflow.autolog(log_datasets=True, log_models=True, log_model_signatures=True, log_input_examples=True)
# Read a seed from command-line arguments (default: 42)
seed = int(sys.argv[1]) if len(sys.argv) > 1 else 42
# Start an MLflow run, naming it "autologging_run"
with mlflow.start_run(run_name="autologging_run"):
    # Load full iris dataset
    X, y = load_iris(return_X_y=True)
    # Train model on the entire dataset (using the given seed)
    model = DecisionTreeClassifier(random_state=seed)
    model.fit(X, y)
    # Evaluate model on the entire dataset (training accuracy)
    training_score = model.score(X, y)
    print("Training accuracy:", training_score)
    # Raise an error if training accuracy is below 90%
    if training_score < 0.9:
        raise ValueError("Training accuracy is too low: " + str(training_score))
Autologging APIs (pt. 2)
-
Let’s run the experiment once, with default seed:
python autologging_example.py -
The run shall output something like:
2025/11/11 16:27:49 INFO mlflow.tracking.fluent: Experiment with name 'autologging-example' does not exist. Creating a new experiment. 2025/11/11 16:27:50 INFO mlflow.tracking.fluent: Autologging successfully enabled for sklearn. Training accuracy: 1.0 -
Let’s now look at the MLflow UI again (via
mlflow uicommand) to see the new experiment:
Autologging APIs (pt. 3)
- Click on the experiment name (
autologging-example) to see the run: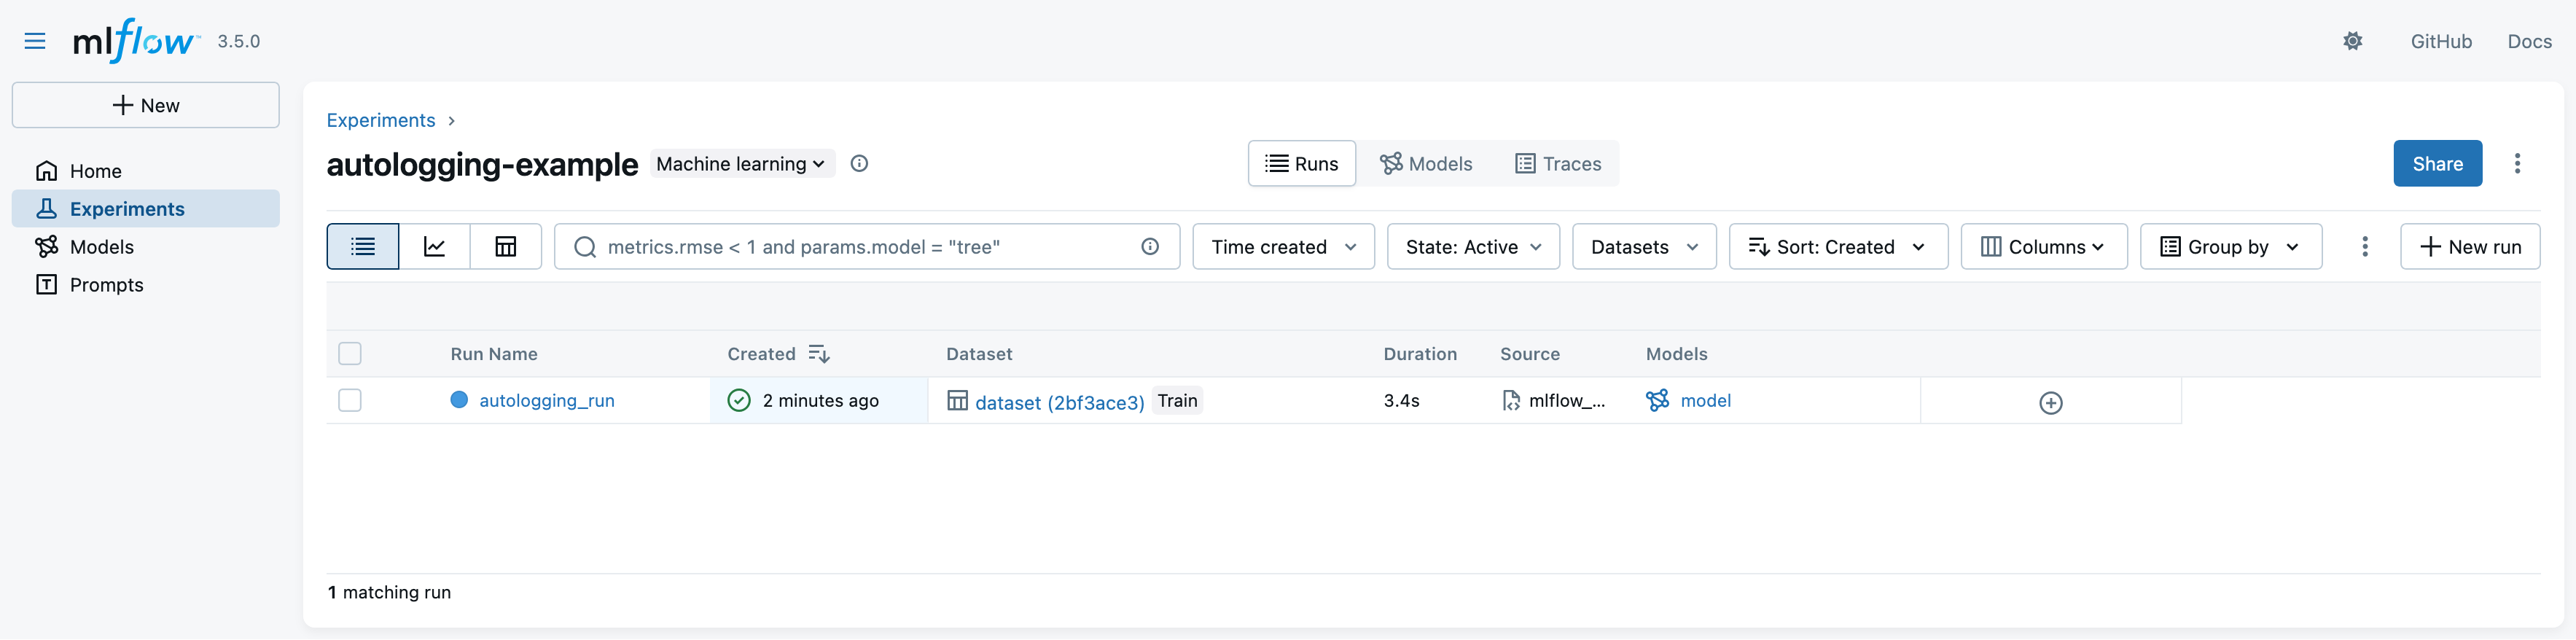
- notice that the run logged many more information automatically (e.g. dataset, model, etc.)
- notice that the green tick indicates that the run was successful (training score is above 90%)
Autologging APIs (pt. 4)
-
Click on the run name to see details about that run
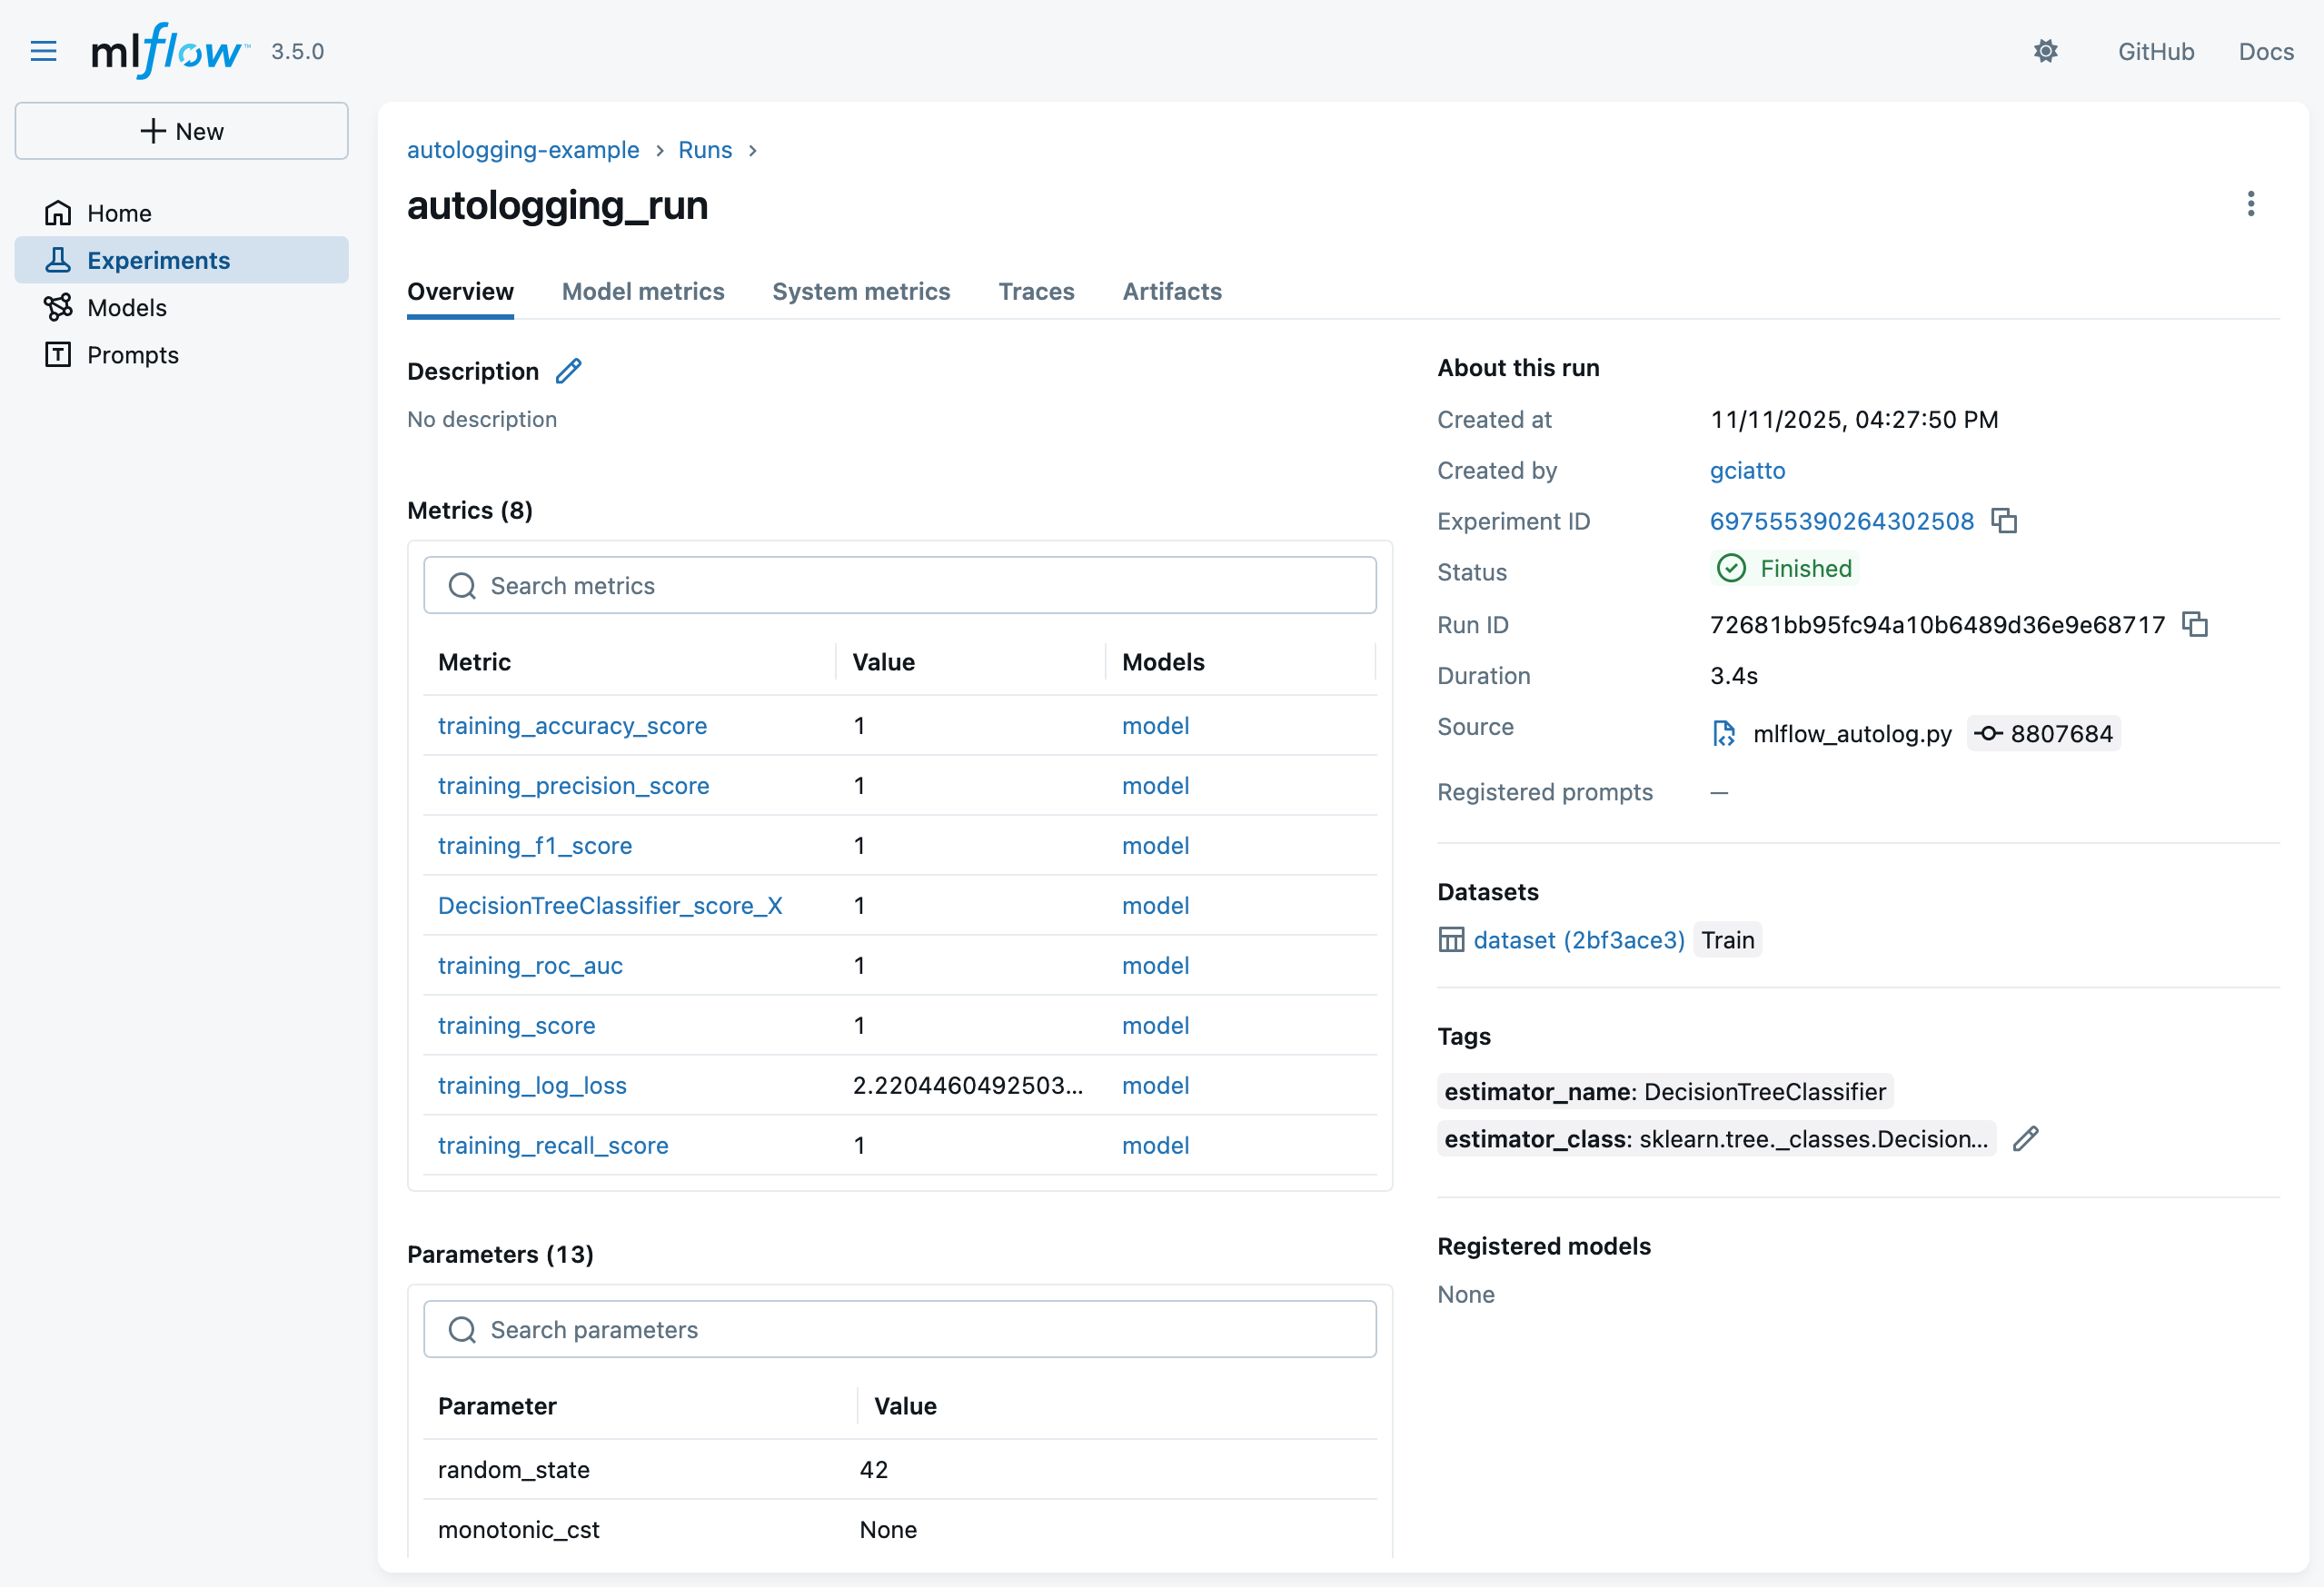
- notice the logged parameters, metrics, and metadata
- recall that we didin’t log any of these explicitly in the Python code!
- notice the logged parameters, metrics, and metadata
Autologging APIs (pt. 4)
-
Click on the run name to see details about that run
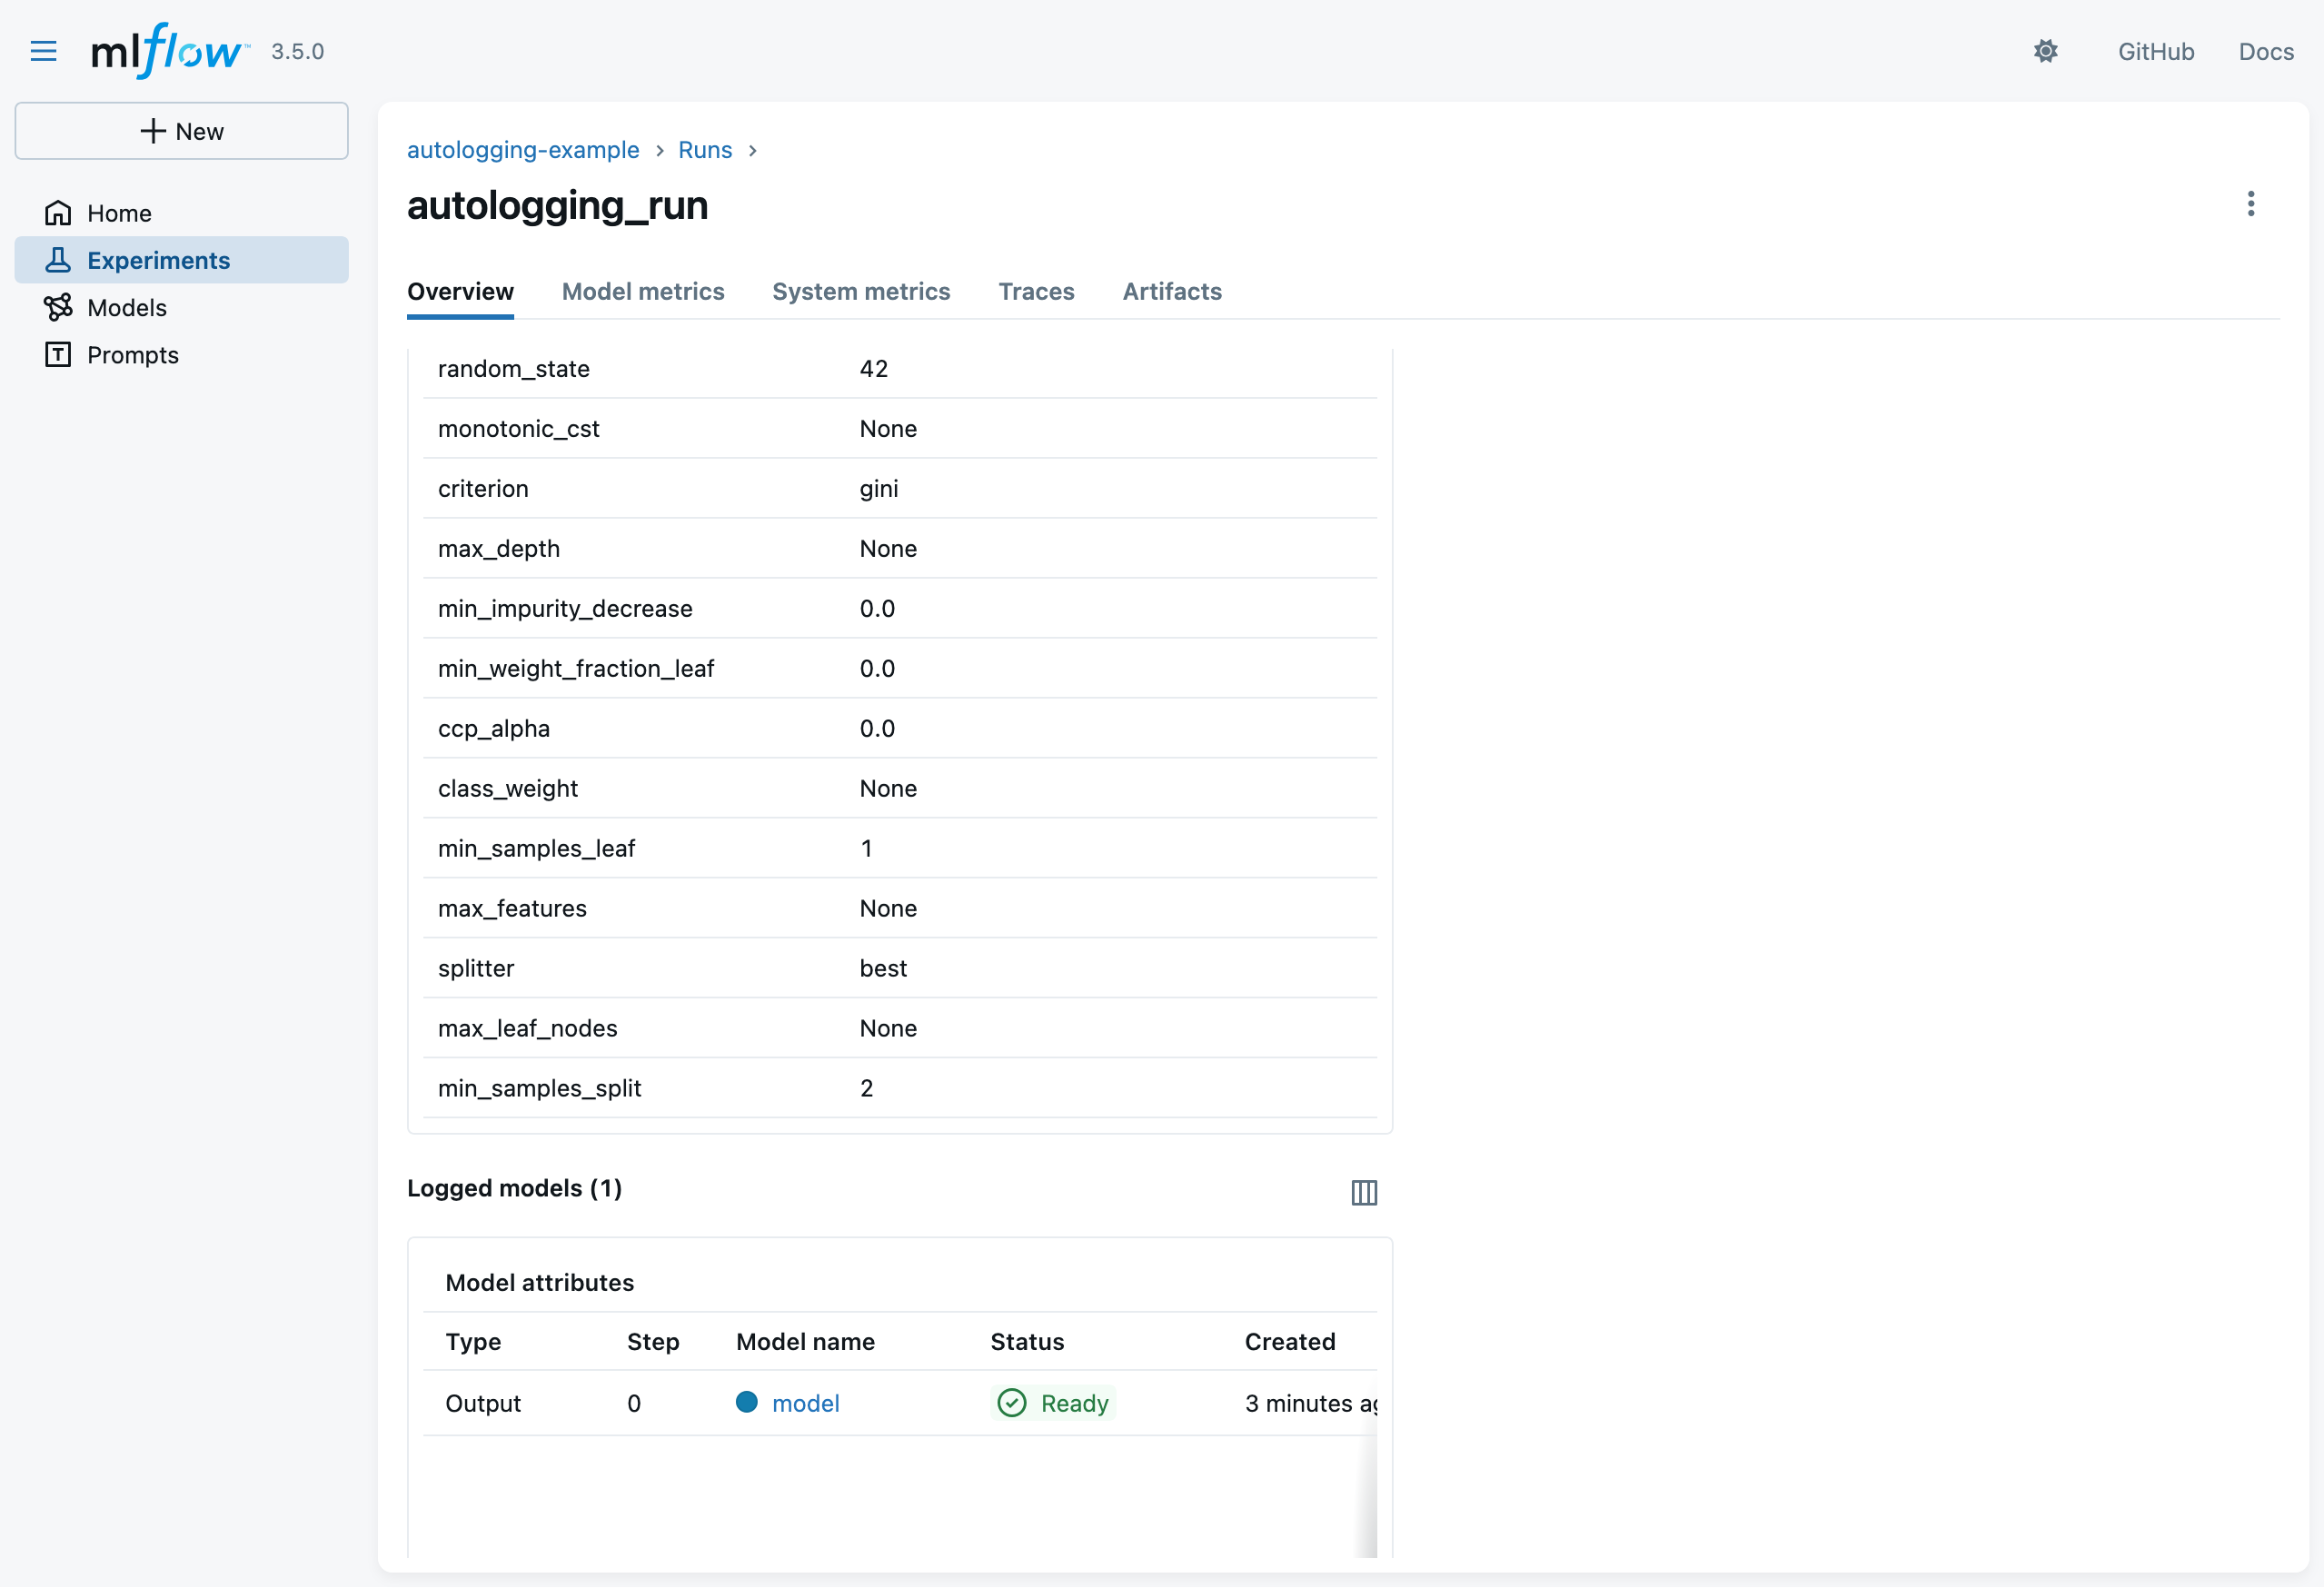
- notice the logged model
- recall that we didin’t log it explicitly in the Python code!
- notice the logged model
Autologging APIs (pt. 5)
- Click on the “Artifacts” tab to see the automatically-logged artifacts:
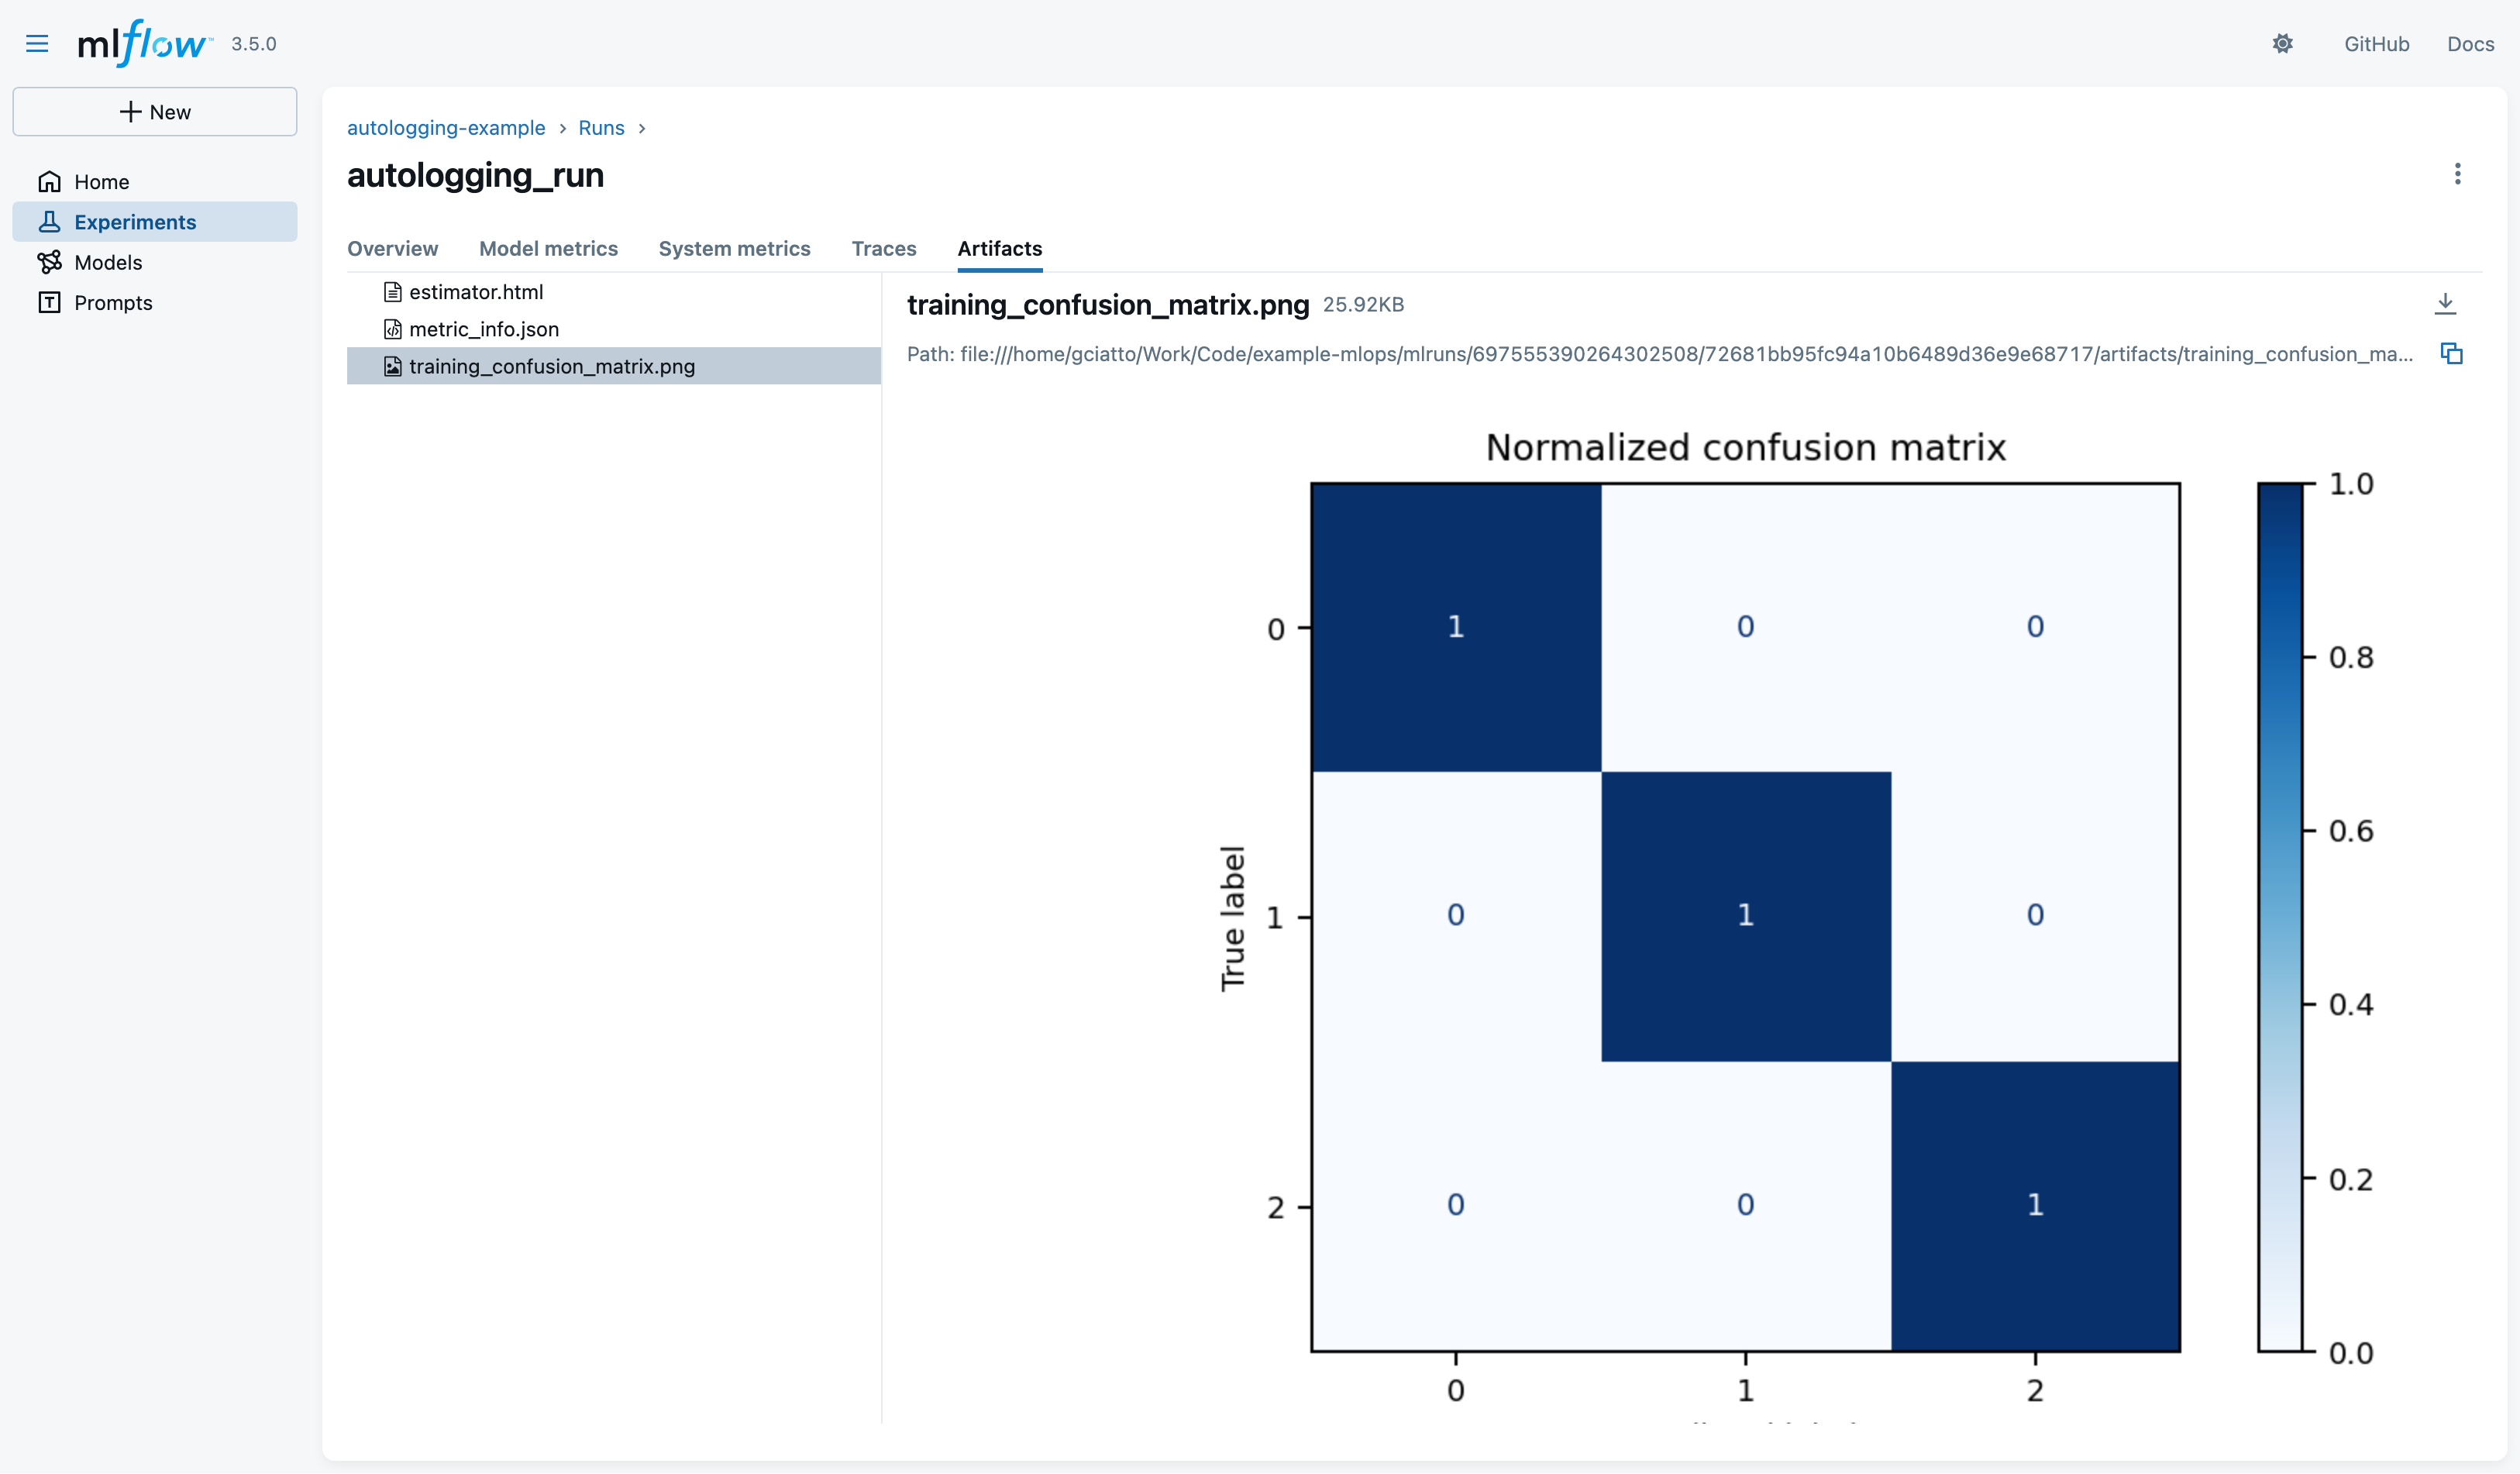
- notice the file
estimator.html(HTML representation of the SciKit-Learn processing pipeline) - notice the file
metric_info.json(details about automatically-logged metrics) - notice the file
training_confusion_matrix.png(confusion matrix picture on training data)
- notice the file
Autologging APIs (pt. 6)
-
Click on the logged model to see its details:
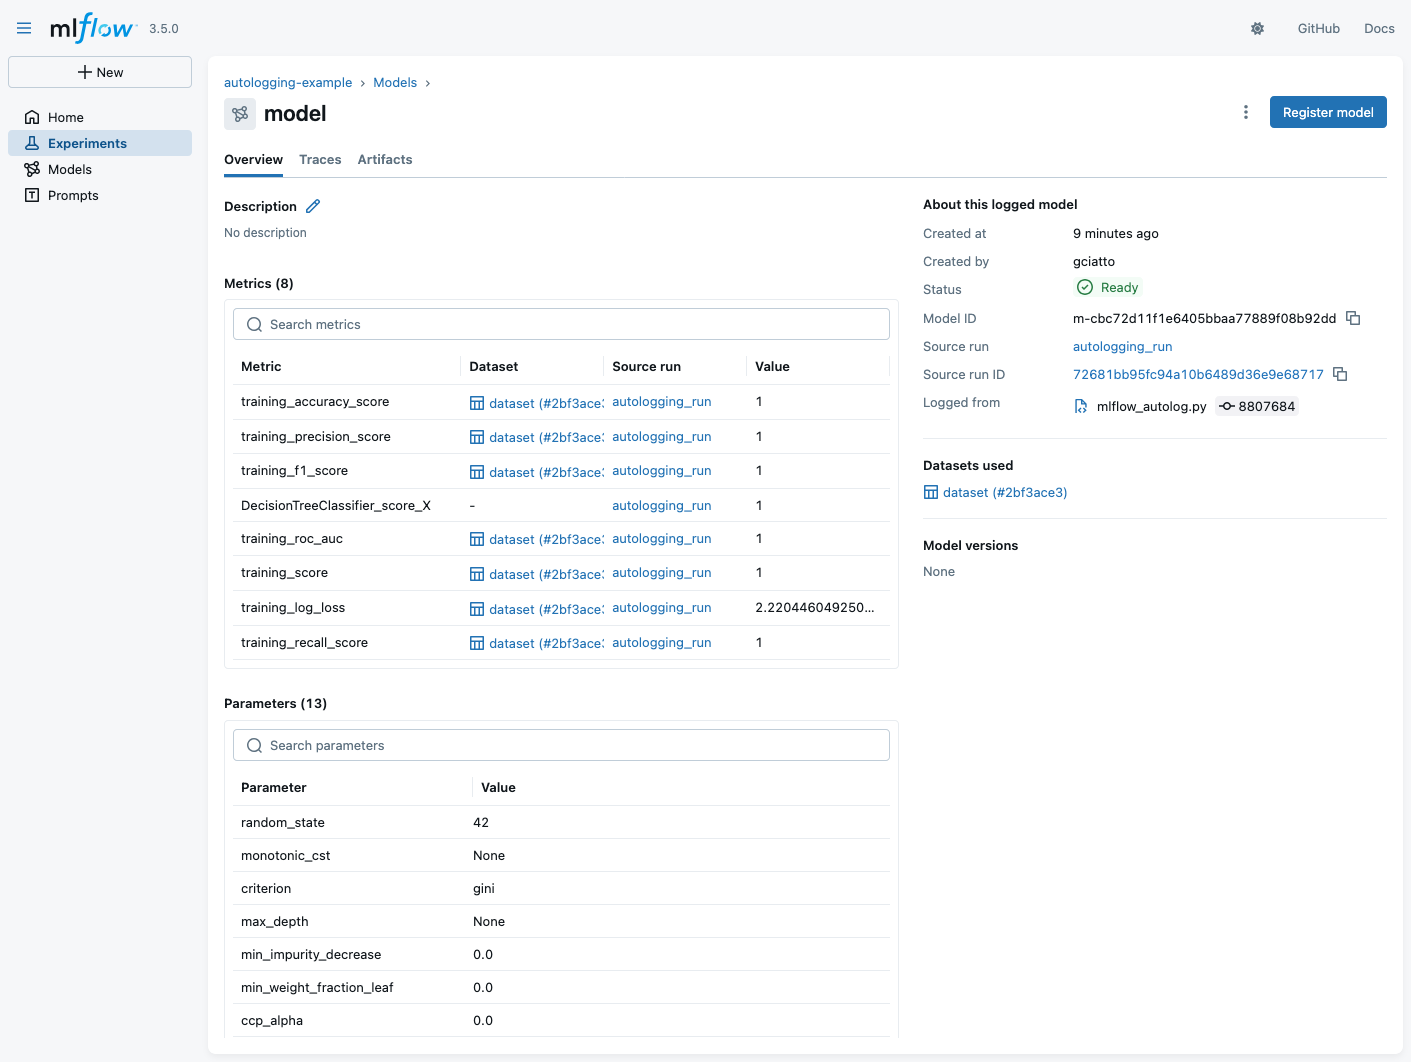
- notice that some metrics are automatically computed on training data (accuracy, f1-score, precision, AUC ROC, etc.)
- notice the logged parameters (these are the actual parameters of the SciKit-Learn class)
- notice that the training dataset schema is logged as well (this is the input schema expected by the model)
- notice the ID of the model:
m-cbc72d11f1e6405bbaa77889f08b92dd- meaning that the URI of the model will be mlflow://m-cbc72d11f1e6405bbaa77889f08b92dd
Autologging APIs (pt. 7)
- Click on the “Artifacts” tab of the model view to see automatically-logged artifacts for the model:
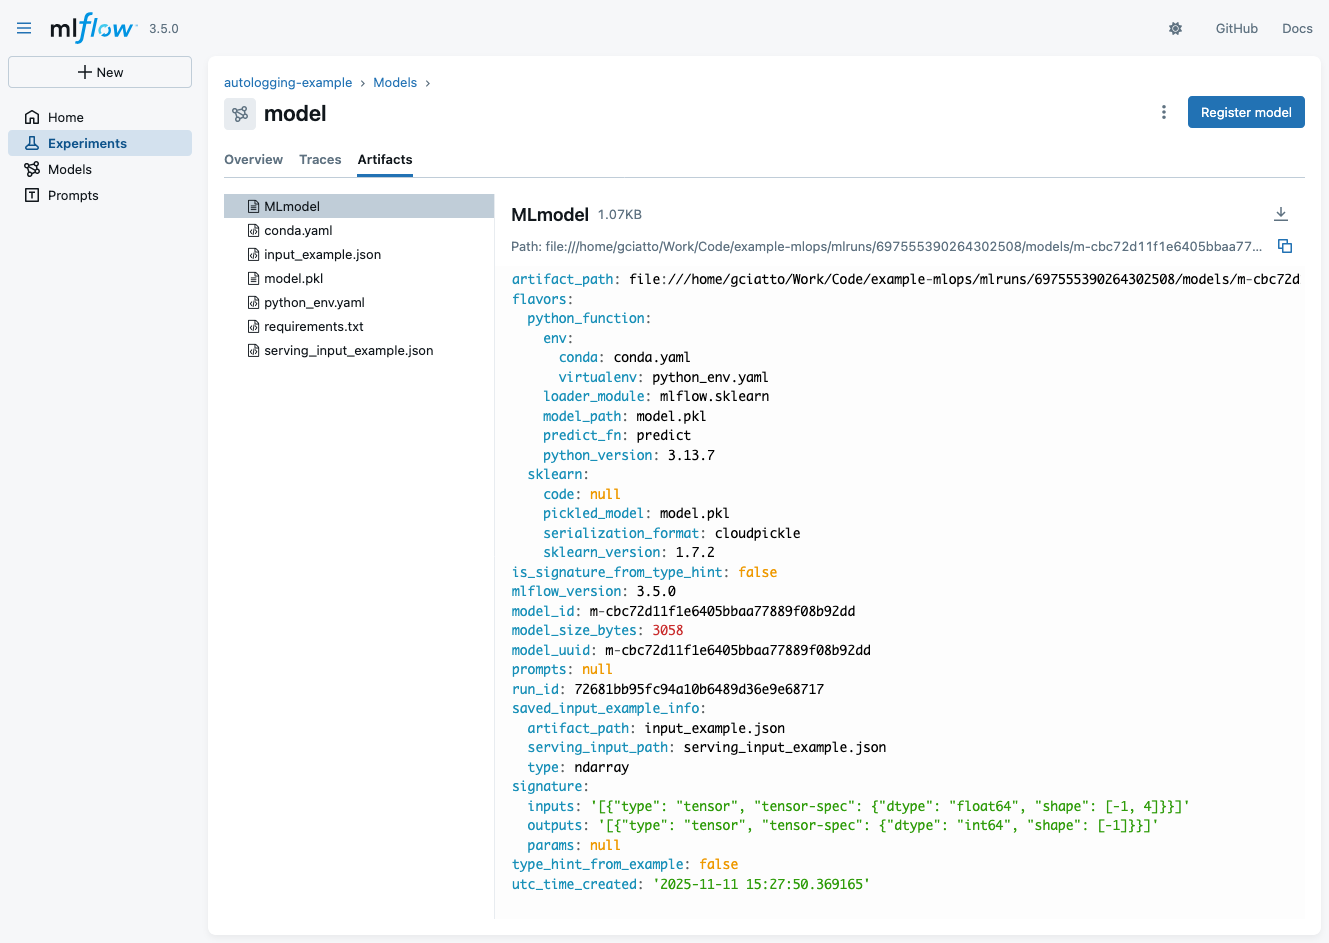
- notice file
MLmodel(YAML description of the model) - notice file
model.pkl(the actual serialized model, in Pythonpickleformat) - notice file
requirements.txt(Python environment to run the model, inpipformat) - notice file
serving_input_example.json(example input data for model serving via MLflow)
- notice file
Model deployment and serving via MLflow
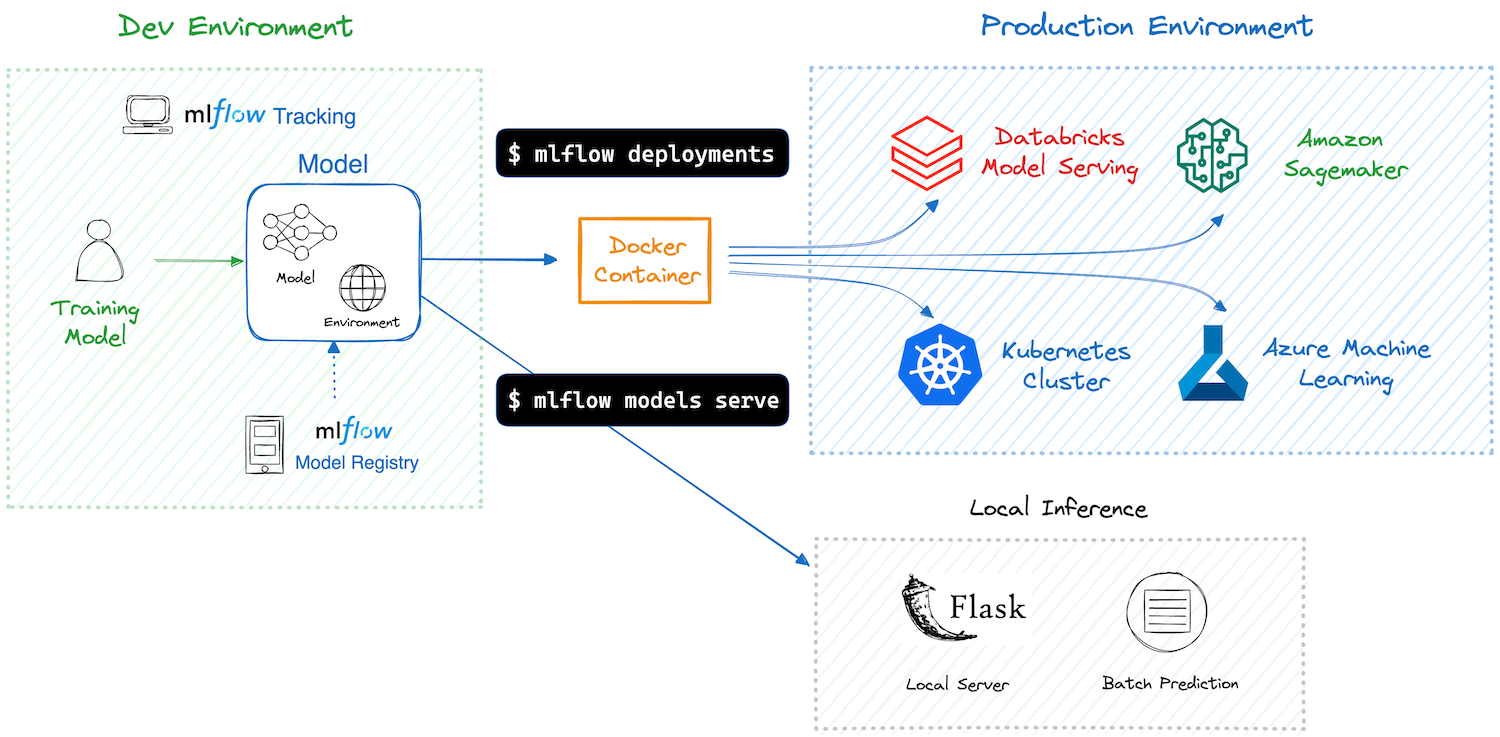
-
MLflow assists in model deployment by mediating the interaction between logged models and their clients
- clients are assumed to use the models in inference mode (i.e. for prediction serving)
- clients may be either command-line tools or Web API consumers
-
MLflow automates the creation of container images for the sake of model deployment
- these images may be deployed on common cloud platforms (e.g. AWS SageMaker, Azure ML, Google Cloud AI Platform, etc.)
- these images may be deployed on-premises as well (e.g. via Docker or Kubernetes)
Model serving via MLflow (pt. 1)
Saved models can be easily used via MLflow’s command-line interface (CLI) or Web API for prediction serving
CLI Example
-
Download the file
serving_input_example.jsonlocally{ "inputs": [ [5.1, 3.5, 1.4, 0.2], [7.0, 3.2, 4.7, 1.4], [6.3, 3.3, 6.0, 2.5] ] } -
Run
mlflow models predict --env-manager local -m "models:/m-1abbea58e1cf442ab9412b7eae572523" -i path/to/serving_input_example.json -
Observe the predictions output:
{"predictions": [0, 1, 2]}
Model serving via MLflow (pt. 2)
Saved models can be easily used via MLflow’s command-line interface (CLI) or Web API for prediction serving
Web Example
-
Start the MLflow model serving endpoint:
mlflow models serve --env-manager local -m "models:/m-1abbea58e1cf442ab9412b7eae572523" -p 1234 -
Send a prediction request via
curl:curl http://localhost:1234/invocations -H "Content-Type:application/json" --data '{ "inputs": [ [5.1, 3.5, 1.4, 0.2], [7.0, 3.2, 4.7, 1.4], [6.3, 3.3, 6.0, 2.5] ] }' -
Observe the predictions output:
{"predictions": [0, 1, 2]}
Model containerization via MLflow
-
Build a Docker image for the model:
mlflow models build-docker -m "models:/m-1abbea58e1cf442ab9412b7eae572523" -n iris-classifier-dt:latest -
This should output something like:
2025/11/12 16:50:16 INFO mlflow.models.flavor_backend_registry: Selected backend for flavor 'python_function' 2025/11/12 16:50:16 INFO mlflow.pyfunc.backend: Building docker image with name mlflow-pyfunc-servable [+] Building 254.3s (14/14) FINISHED docker:default => [internal] load build definition from Dockerfile 0.5s => => transferring dockerfile: 1.00kB 0.0s => [internal] load metadata for docker.io/library/python:3.13.7-slim 6.2s => [auth] library/python:pull token for registry-1.docker.io 0.0s => [internal] load .dockerignore 0.3s => => transferring context: 2B 0.0s => [internal] load build context 0.4s => => transferring context: 5.14kB 0.0s => [1/8] FROM docker.io/library/python:3.13.7-slim@sha256:5f55cdf0c5d9dc1a415637a5ccc4a9e18663ad203673173b8cda8f8dcacef689 6.5s => => resolve docker.io/library/python:3.13.7-slim@sha256:5f55cdf0c5d9dc1a415637a5ccc4a9e18663ad203673173b8cda8f8dcacef689 0.1s => => sha256:5f55cdf0c5d9dc1a415637a5ccc4a9e18663ad203673173b8cda8f8dcacef689 10.37kB / 10.37kB 0.0s => => sha256:2be5d3cb08aa616c6e38d922bd7072975166b2de772004f79ee1bae59fe983dc 1.75kB / 1.75kB 0.0s => => sha256:7b444340715da1bb14bdb39c8557e0195455f5f281297723c693a51bc38a2c4a 5.44kB / 5.44kB 0.0s => => sha256:8c7716127147648c1751940b9709b6325f2256290d3201662eca2701cadb2cdf 29.78MB / 29.78MB 2.1s => => sha256:31fd2a94d72338ac6bbe103da6448d7e4cb7e7a29b9f56fa61d307b4395edf86 1.29MB / 1.29MB 0.7s => => sha256:66b685f2f76ba4e1e04b26b98a2aca385ea829c3b1ec637fbd82df8755973a60 11.74MB / 11.74MB 2.5s => => sha256:7d456e82f89bfe09aec396e93d830ba74fe0257fe2454506902adf46fb4377b3 250B / 250B 1.3s => => extracting sha256:8c7716127147648c1751940b9709b6325f2256290d3201662eca2701cadb2cdf 0.8s => => extracting sha256:31fd2a94d72338ac6bbe103da6448d7e4cb7e7a29b9f56fa61d307b4395edf86 0.2s => => extracting sha256:66b685f2f76ba4e1e04b26b98a2aca385ea829c3b1ec637fbd82df8755973a60 0.6s => => extracting sha256:7d456e82f89bfe09aec396e93d830ba74fe0257fe2454506902adf46fb4377b3 0.0s => [2/8] RUN apt-get -y update && apt-get install -y --no-install-recommends nginx 20.5s => [3/8] WORKDIR /opt/mlflow 0.3s => [4/8] RUN pip install mlflow==3.5.0 162.1s => [5/8] COPY model_dir /opt/ml/model 0.9s => [6/8] RUN python -c "from mlflow.models import container as C; C._install_pyfunc_deps('/opt/ml/model', install_mlflow=False, enable_mlserver=False, env_manager='loca 27.6s => [7/8] RUN chmod o+rwX /opt/mlflow/ 0.9s => [8/8] RUN rm -rf /var/lib/apt/lists/* 1.7s => exporting to image 25.4s => => exporting layers 24.9s => => writing image sha256:7b41a8c6bd049022abc8aeaaa41b7b60008c242fbc59c41073fc61daec05952d 0.1s => => naming to docker.io/library/iris-classifier-dt -
Run the Docker container:
docker run --rm -it --network host iris-classifier-dt:latest -
Send a prediction request via
curl:curl http://localhost:8000/invocations -H "Content-Type:application/json" --data '{ "inputs": [[5.1, 3.5, 1.4, 0.2], [7.0, 3.2, 4.7, 1.4], [6.3, 3.3, 6.0, 2.5]] }' -
Observe the predictions output:
{"predictions": [0, 1, 2]}
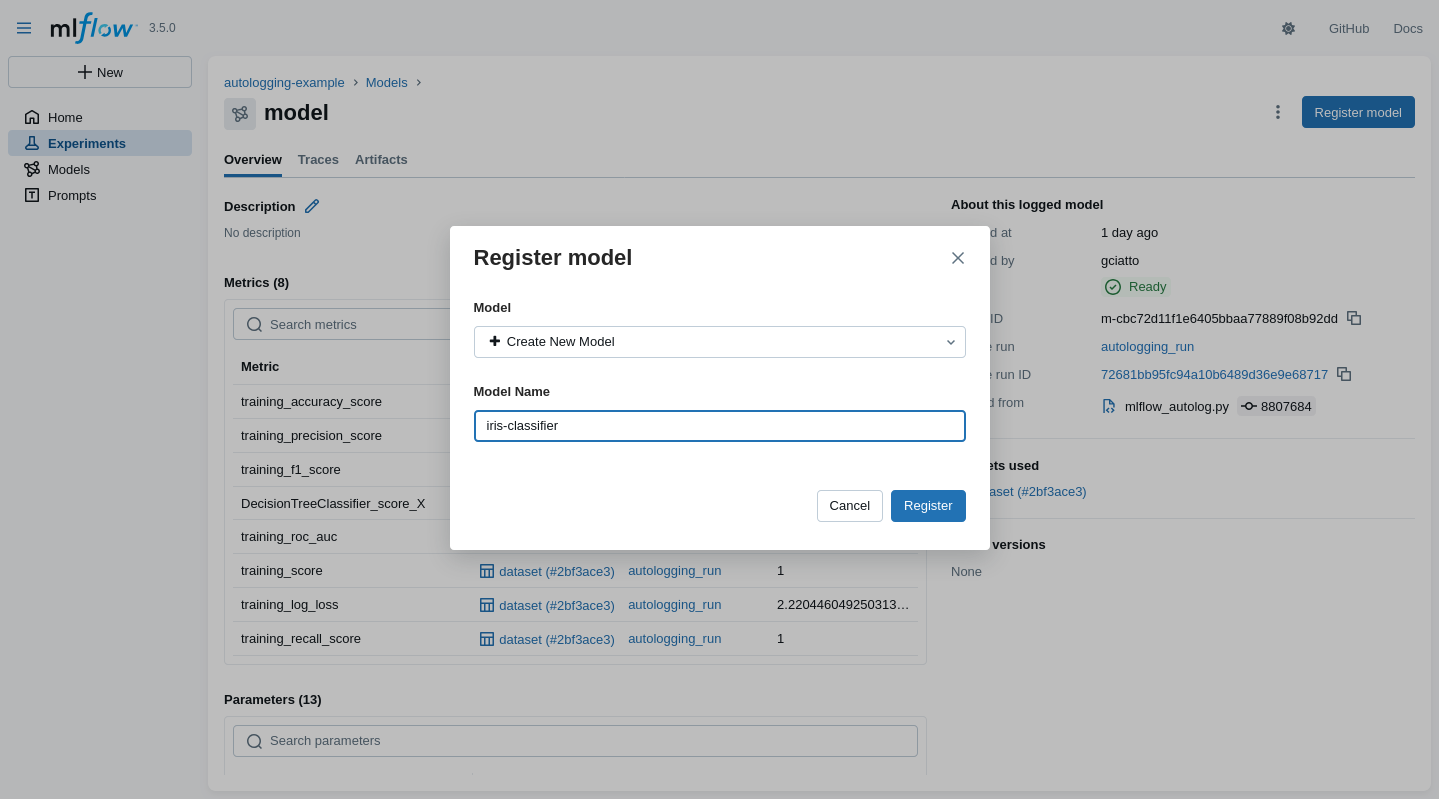
Model registration via MLflow (pt. 1)
One may register a model $\approx$ give it a human-friendly name + versioning
- In the MLflow UI, go visit some logged model’s page, then click on the “Register” button
Model registration via MLflow (pt. 2)
- The model will now appears in the “Models” section of the MLflow UI, with its symbolic name
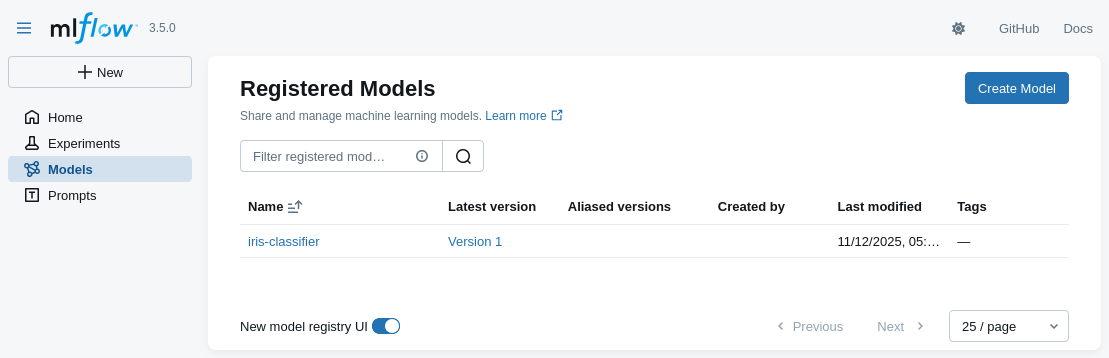
Model registration via MLflow (pt. 3)
-
Click on the model name to see its available versions
- multiple versions of the same model may coexist
- each model’s version may be referred via the URI:
models:/<model-name>/<version>- e.g. try to re-run the commands for predictions with model URI: models:/iris-classifier/1
- one may reference the last version of the model via the URI:
models:/<model-name>@latest
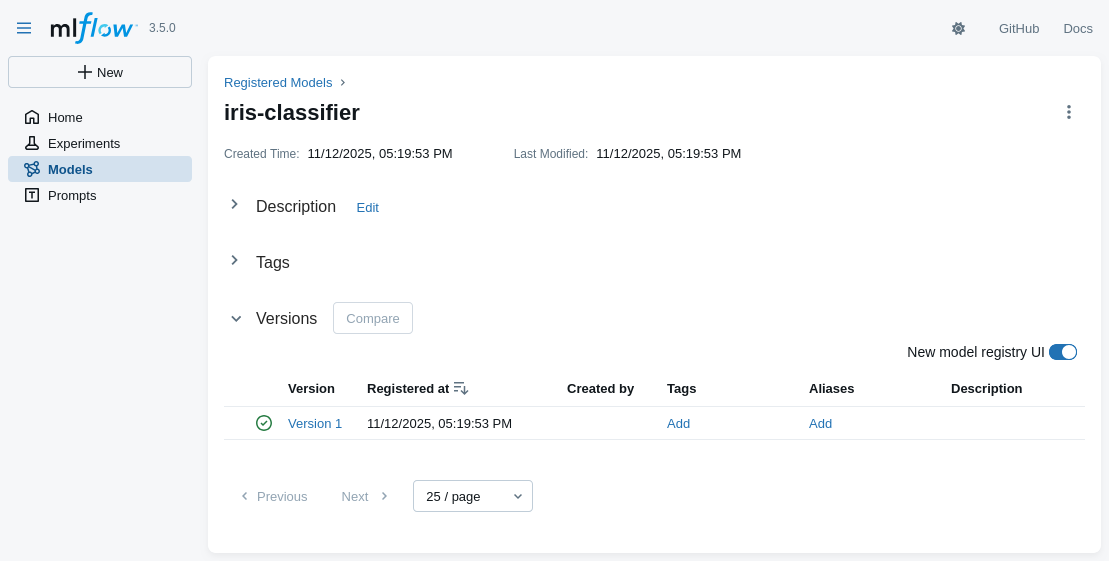
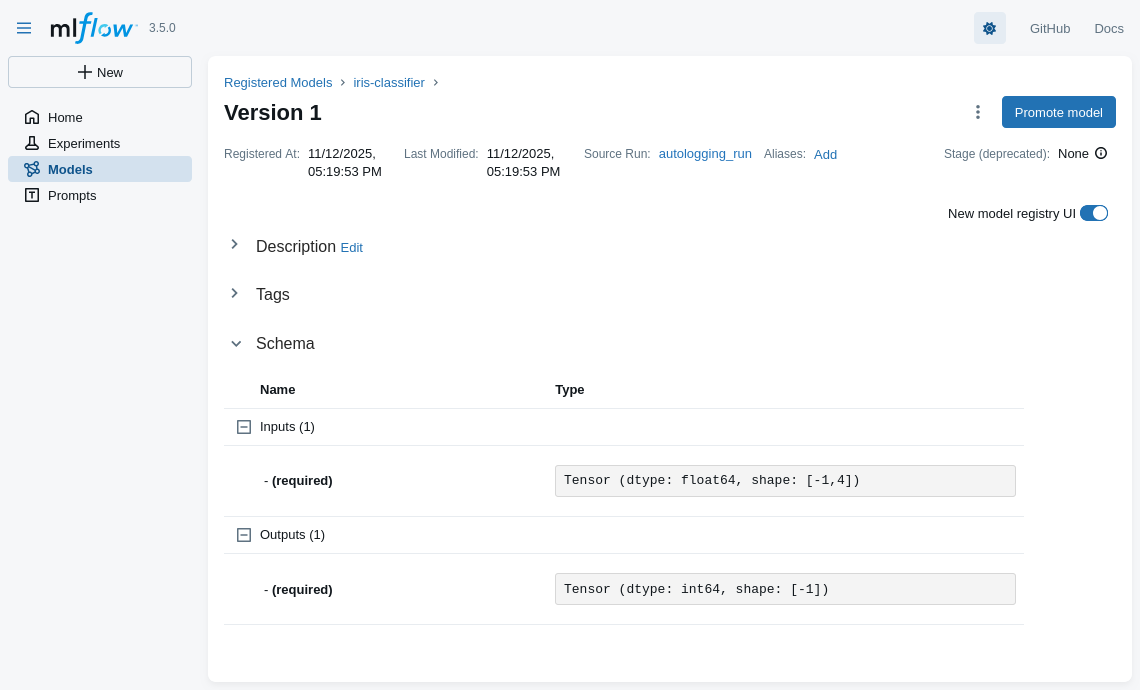
Model registration via MLflow (pt. 4)
- Details about some model’s version are inspectable in the UI as well
A realistic MLOps scenario with MLflow (pt. 1)
-
A ML workflow aimed at creating a classifier for the Adult Income dataset via SciKit-Learn pipeline
- goal: predict whether a person makes over $50K a year based on census data
- full-fledged data pre-processing:
- test-train split
- missing values imputation
- categorical features encoding
- feature scaling
- model selection via CV
- among logistic regression and random forests
- hyper-parameter tuning via grid search
- etc.
-
Implemented as a Jupyter notebook + MLflow
- to discuss shortcomings and possible improvements
-
Jupyter notebook available at: https://github.com/gciatto/example-mlops/blob/master/mlflow_census_demo.ipynb
A realistic MLOps scenario with MLflow (pt. 2)
-
UI overview (metadata)
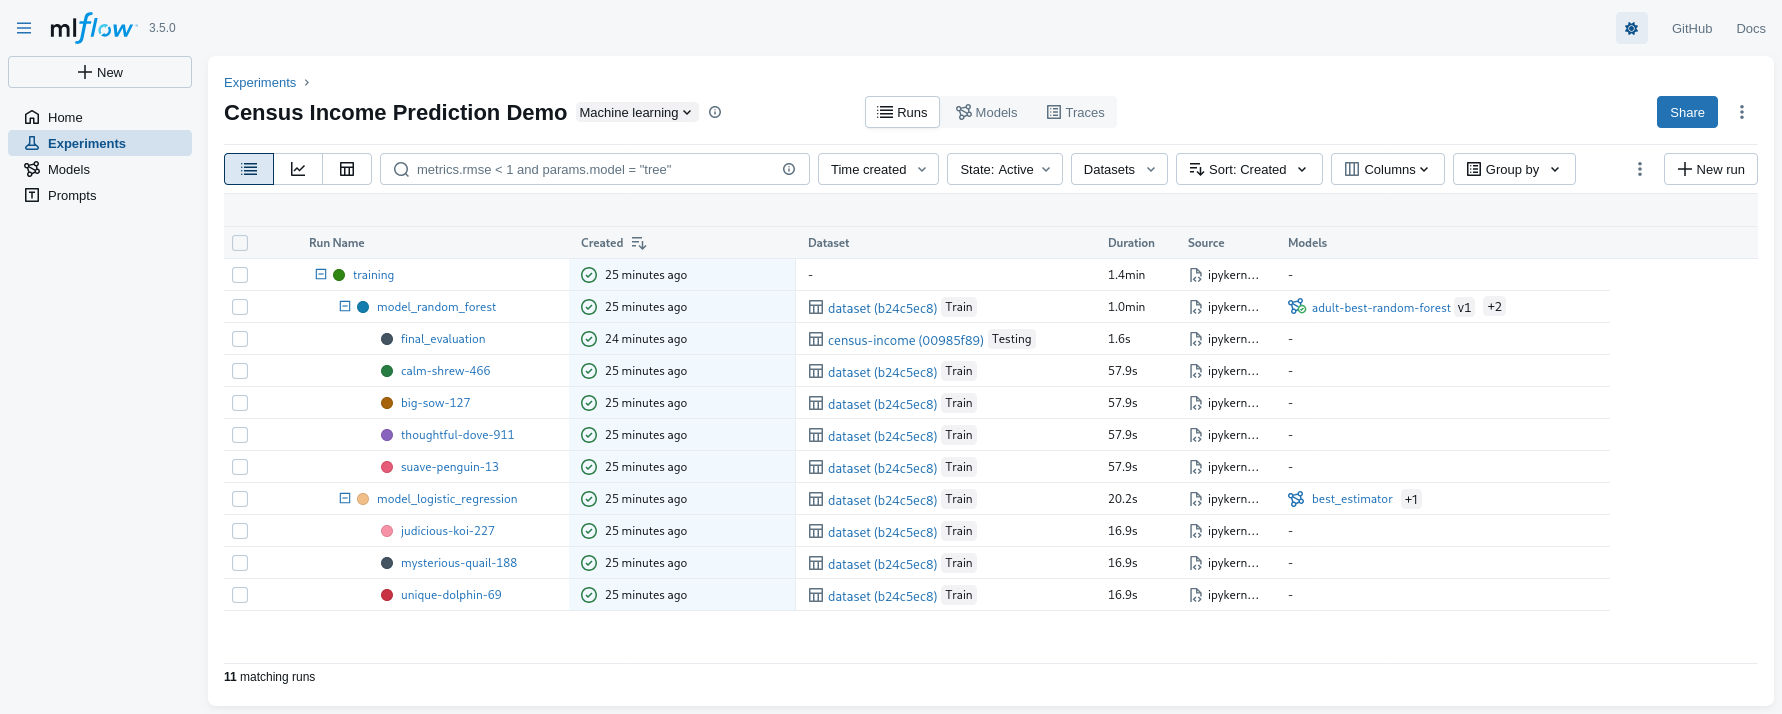
- notice the nesting of runs
A realistic MLOps scenario with MLflow (pt. 2)
-
Comparing metrics across multiple runs
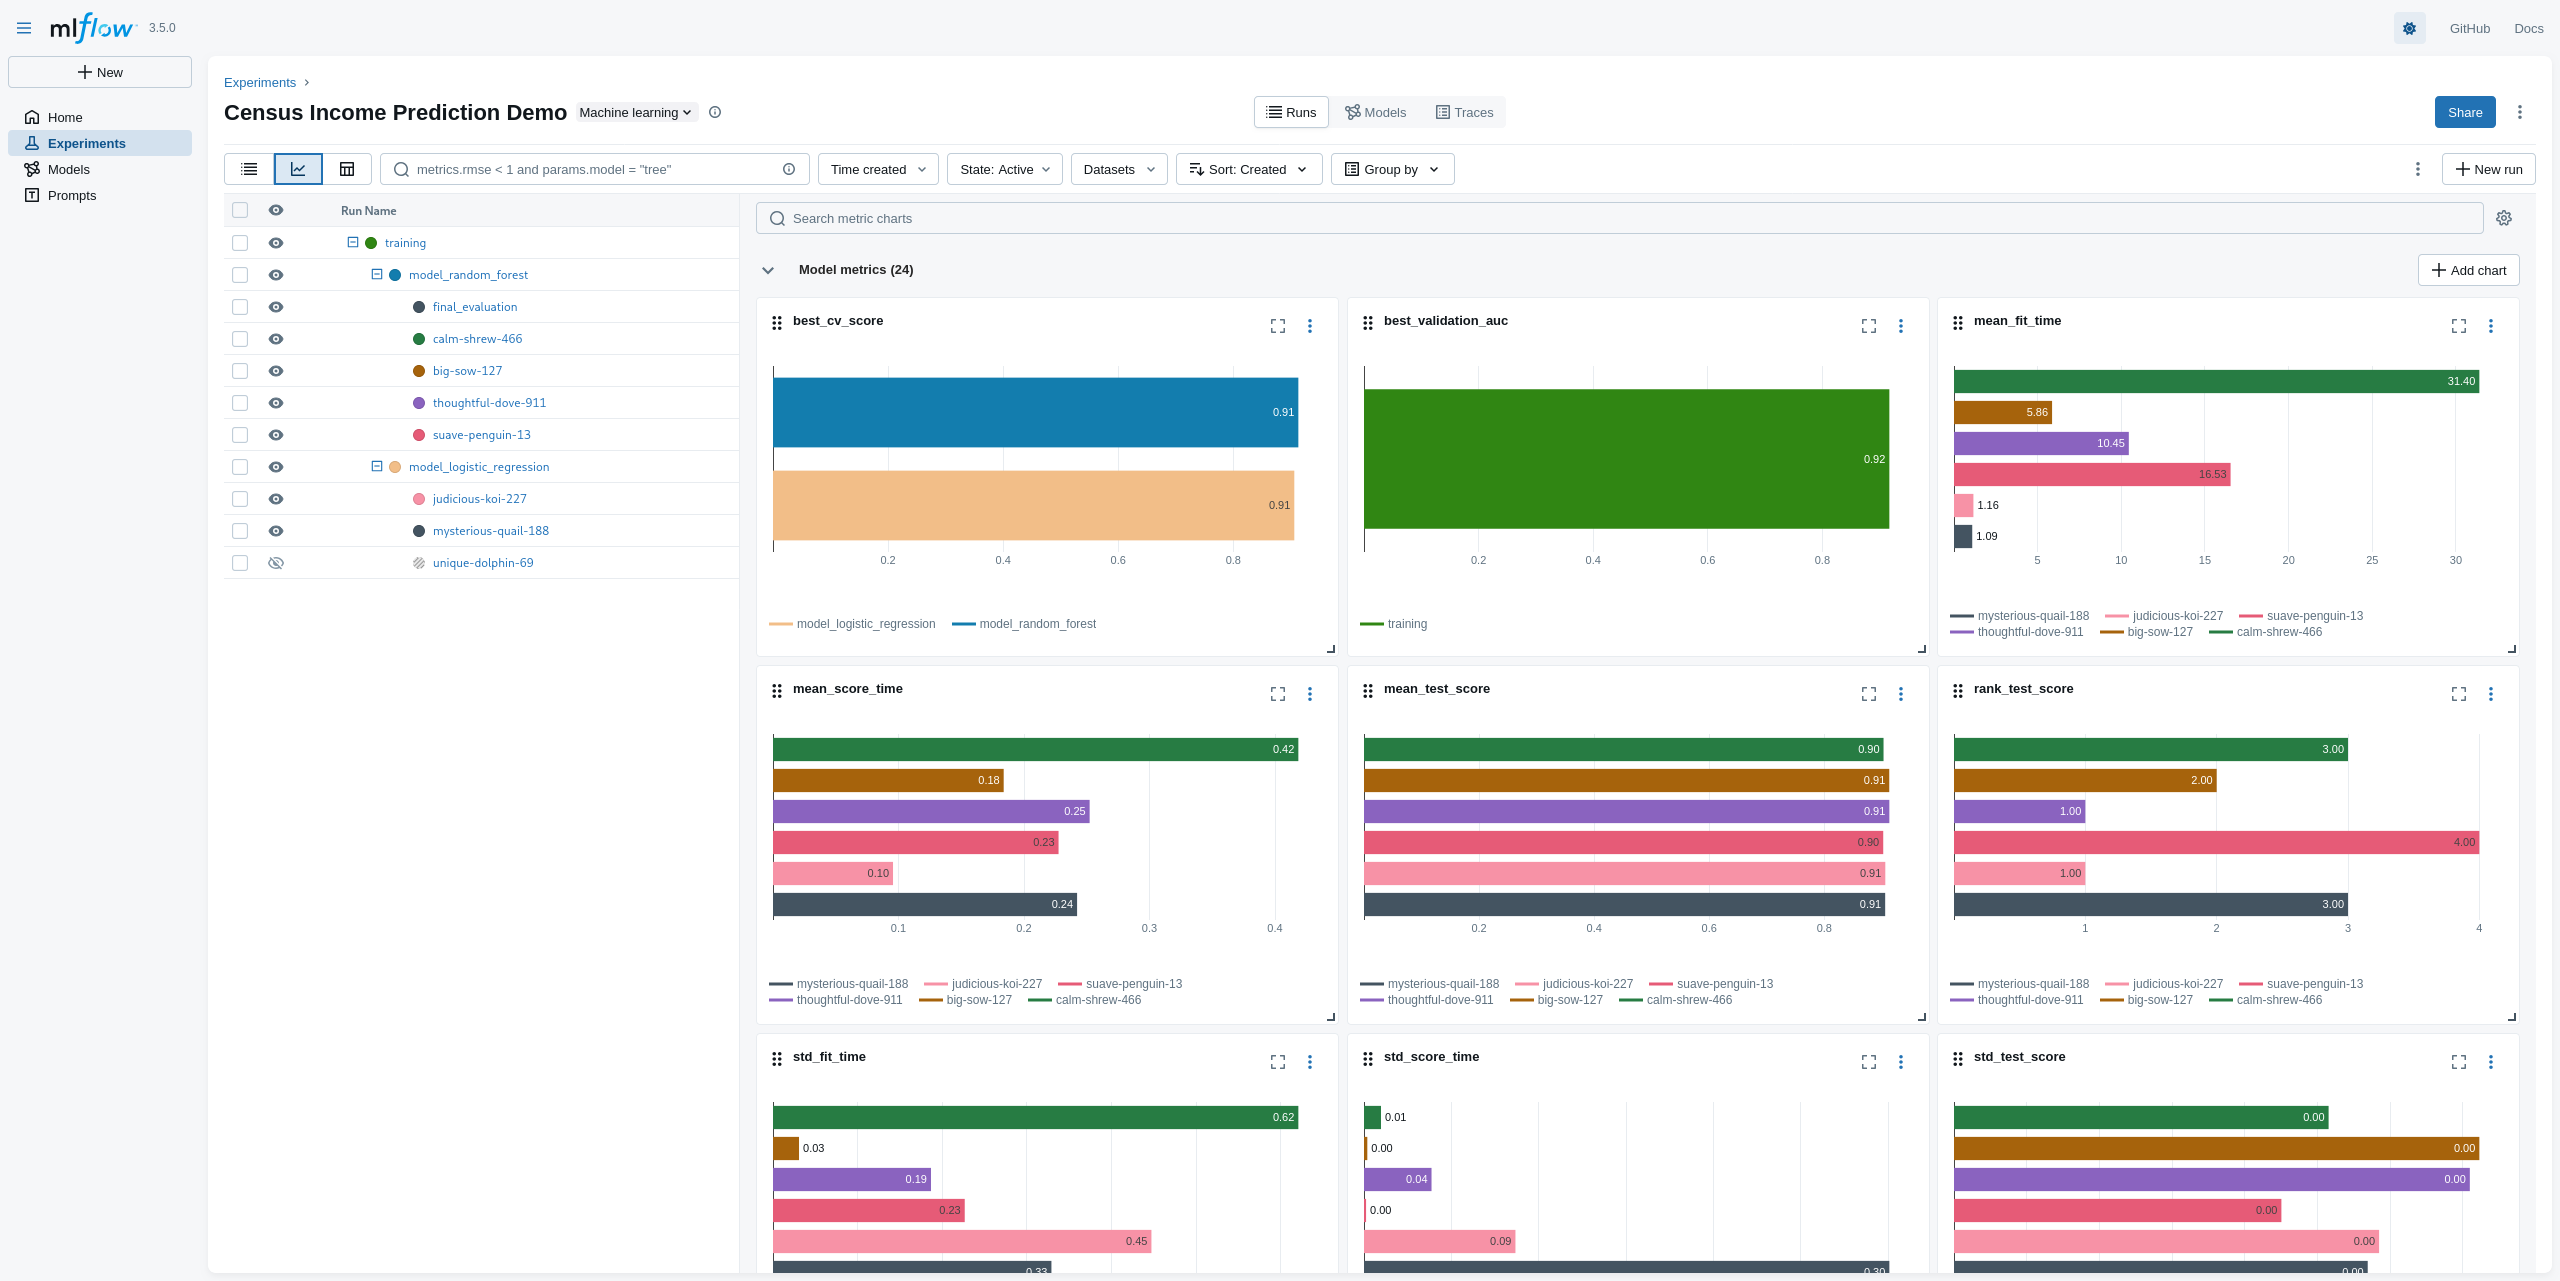
- notice the many comparative charts available
A realistic MLOps scenario with MLflow (pt. 3)
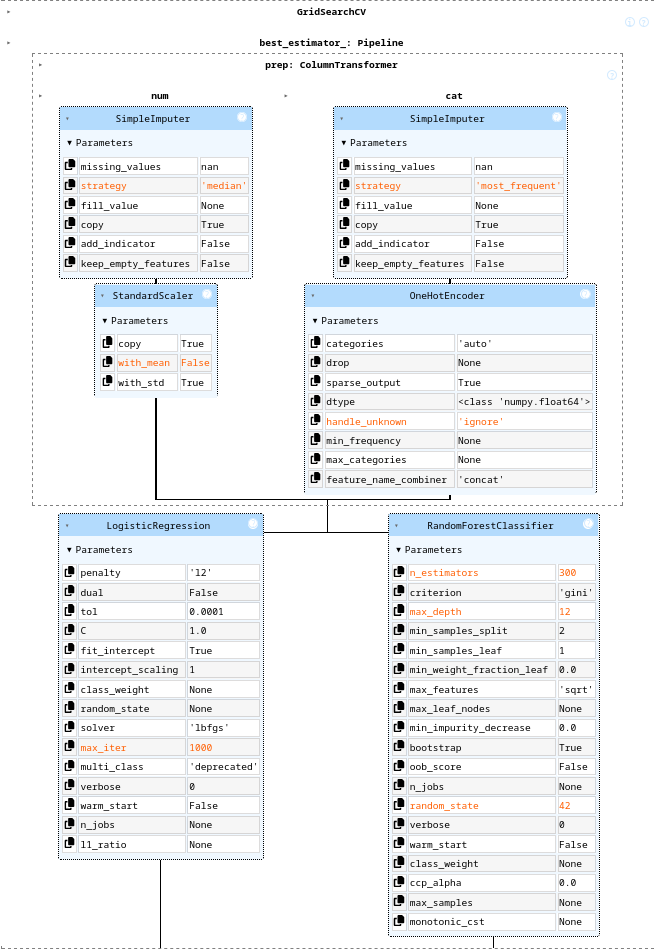
-
Inspecting the winner model
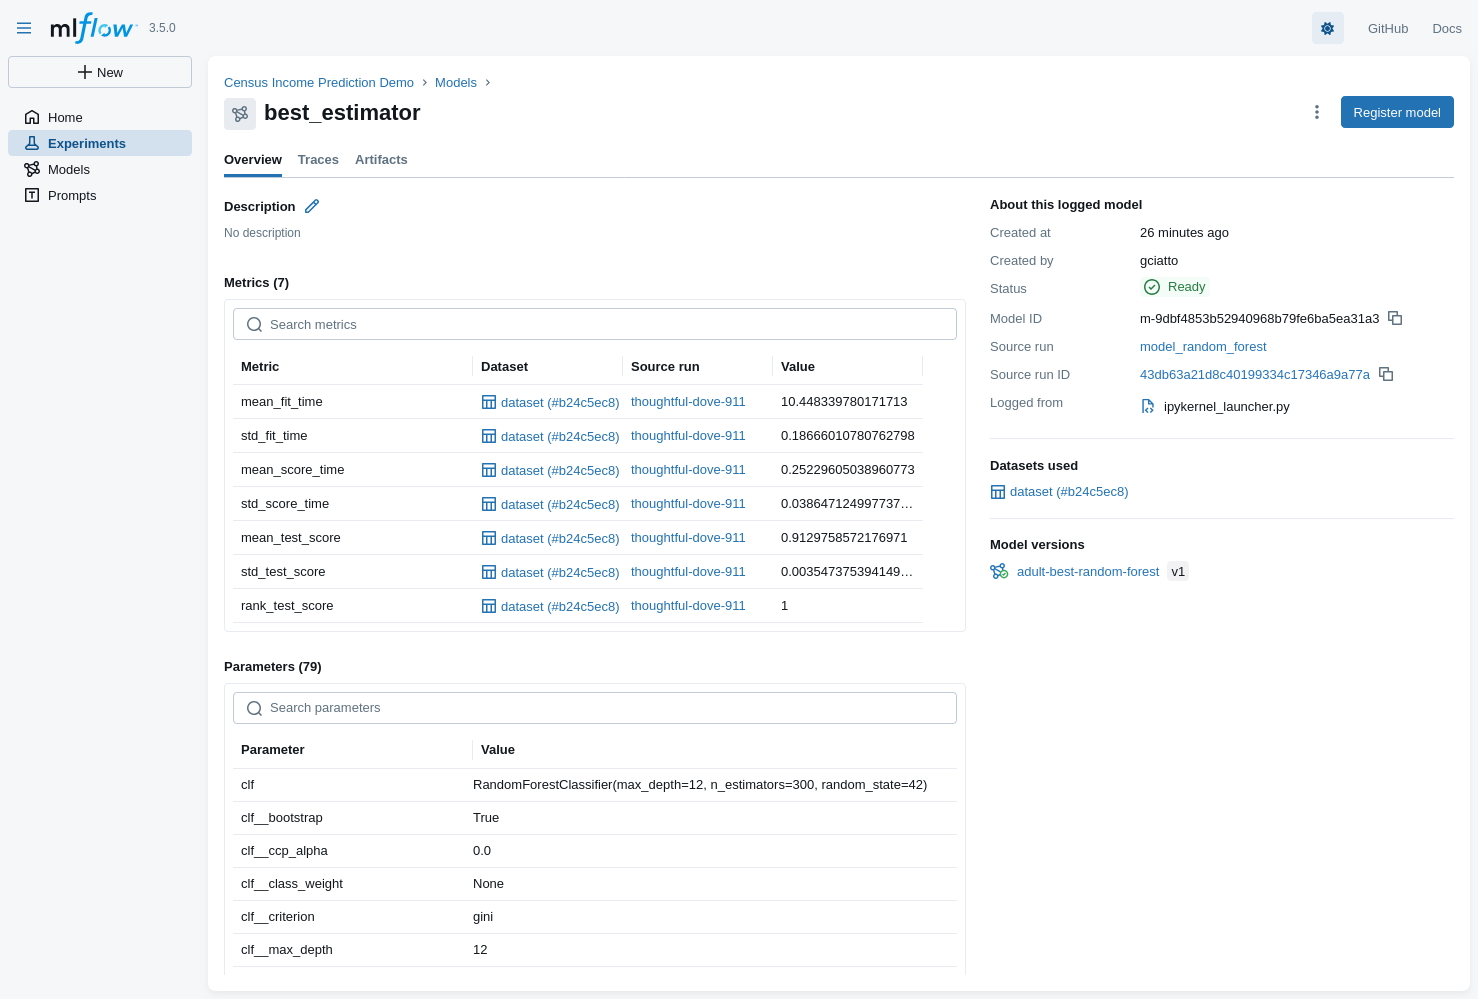
- selected model: Random Forest Classifier (registered as
adult-best-random-forest)
- selected model: Random Forest Classifier (registered as
A realistic MLOps scenario with MLflow (pt. 4)
Problems
-
Jupyter notebooks are interactive by nature
- making it hard to automate the workflow execution
-
Executing the code is time-consuming: it requires a human operator to start the notebook and run all cells
- making it hard to schedule periodic runs (e.g. for model retraining)
-
Pictures (if any) are commonly embedded in the notebook itself
- (not really the case in this example TBH, but a common practice)
-
No code decomposition, poor version control
- making it hard to maintain and extend the code
-
[Critical] Parameters are hard-coded in the notebook itself
- making it hard to tune the workflow behavior without modifying the code
- making it hard to reproduce past runs with different parameter settings
Solution: organize the code as an MLflow Project (see next slide)
MLflow Projects (pt. 1)
MLflow Projects provide a standard format for packaging and sharing reproducible data science code
-
Assumption 1: files are structured in a specific way (decomposition of code into multiple scripts)
root-directory-name/ ├── MLproject # Project descriptor file ├── train.py # Training script ├── test.py # Test script ├── conda.yaml # Optional: Conda environment (dependencies) ├── python_env.yaml # Optional: Python environment (alternative to Conda) └── data/ # Optional: project data and assets- notice that
train.pyandtest.pyare two separate scripts- each script is responsible for a specific task in the ML workflow
- each script may be invoked independently of the others
- notice that
MLflow Projects (pt. 2)
- Assumption 2: enviromental dependencies are declared in the
python_env.yamlfile (or inconda.yaml)python: "^3.13.7" dependencies: - mlflow - scikit-learn - pandas - matplotlib - numpy - requests - jupyter - seaborn
MLflow Projects (pt. 3)
-
Assumption 3: ML tasks and their parameters are declared via the
MLprojectfilename: My ML Project # Environment specification (choose one) python_env: python_env.yaml # conda_env: conda.yaml # docker_env: # image: python:3.9 entry_points: main: parameters: param_file: path param_num: {type: float, default: 0.1} param_int: {type: int, default: 100} command: "python train.py --num {param_num} --int {param_int} {param_file}" test: parameters: param_str: {type: str, default: "hello"} param_uri: uri command: "python test.py --uri {param_uri} {param_str}"- so that one can start training via:
mlflow run . -P param_file=data/input.csv -P param_num=0.2 -P param_int=200 # if no -e <entry-point> is given, "main" is assumed by default - so that one can start testing via:
mlflow run . -e test -P param_str="world" -P param_uri="models:/my-model/1"
- so that one can start training via:
MLflow Projects (pt. 4)
-
Assumption 4: entry-point scripts (
train.py, etc.) are implemented to read all relevant parameters from command-line# train.py import argparse parser = argparse.ArgumentParser() parser.add_argument("file", type=str, help="Path to input data file") parser.add_argument("--num", type=float, default=0.1, help="A numeric parameter") parser.add_argument("--int", type=int, default=100, help="An integer parameter") args = parser.parse_args() print(f"Training with data from: {args.file}") print(f"Numeric parameter: {args.num}") print(f"Integer parameter: {args.int}") # ... rest of the training code ... -
Assumption 5: entry-point scripts use MLflow’s Tracking API accordingly
- similar to what we saw in previous examples
MLflow Project Example (pt. 1)
(We also exemplify the usage of a remote MLflow Tracking Server)
-
On machine with DNS name
my.mlflow.server.it, clone the repository, and start MLflow server via Docker Compose# git clone https://github.com/gciatto/example-mlops.git # cd example-mlops docker compose up -d --wait- you may run Docker Compose on your local machine as well, hence using http://localhost:5000 as tracking server
-
On your local machine, clone the repository as well, then set the MLflow Tracking URI accordingly
# git clone https://github.com/gciatto/example-mlops.git # cd example-mlops export MLFLOW_TRACKING_URI="http://my.mlflow.server.it:5000 # or, on Windows (cmd): # set MLFLOW_TRACKING_URI=http://my.mlflow.server.it:5000 # or, on Windows (PowerShell): # $env:MLFLOW_TRACKING_URI="http://my.mlflow.server.it:5000"- in the example, I’ll be using http://pc-ciatto-area40.duckdns.org:5000 as tracking server
- not working outside VPN, sorry :)
- in the example, I’ll be using http://pc-ciatto-area40.duckdns.org:5000 as tracking server
-
Again on your local machine, you may need to re-create the Python environment to run experiments
python -m venv .venv
source .venv/bin/activate # on Windows: .venv\Scripts\activate
pip install -r requirements.txt
MLflow Project Example (pt. 2)
-
Notice the
MLprojectfile in the repository root, paying attention to the entry points defined therein, and their parameters:name: Census Income Prediction Demo python_env: python.yaml entry_points: train: parameters: model_type: {type: string, default: "both"} test_size: {type: float, default: 0.2} cv_splits: {type: int, default: 3} random_state: {type: int, default: 42} numeric_imputation_strategy: {type: string, default: "median"} numeric_scaling_with_mean: {type: boolean, default: true} categorical_imputation_strategy: {type: string, default: "most_frequent"} ohe_handle_unknown: {type: string, default: "ignore"} sparse_threshold: {type: float, default: 0.3} lr_max_iter: {type: int, default: 1000} lr_C_values: {type: string, default: '[0.1, 1.0, 10.0]'} lr_solvers: {type: string, default: '["lbfgs"]'} rf_n_estimators: {type: string, default: '[150, 300]'} rf_max_depths: {type: string, default: '[null, 12]'} command: | python train.py \ --model-type {model_type} \ --test-size {test_size} \ --cv-splits {cv_splits} \ --random-state {random_state} \ --numeric-imputation-strategy {numeric_imputation_strategy} \ --numeric-scaling-with-mean {numeric_scaling_with_mean} \ --categorical-imputation-strategy {categorical_imputation_strategy} \ --ohe-handle-unknown {ohe_handle_unknown} \ --sparse-threshold {sparse_threshold} \ --lr-max-iter {lr_max_iter} \ --lr-C-values {lr_C_values} \ --lr-solvers {lr_solvers} \ --rf-n-estimators {rf_n_estimators} \ --rf-max-depths {rf_max_depths} test: parameters: run_id: {type: string} model_uri: {type: string} command: "python test.py --run-id {run_id} --model-uri {model_uri}"- use
python train.py --helpto see details about training script parameters - use
python test.py --helpto see details about testing script parameters - notice the default values for each parameter
- use
MLflow Project Example (pt. 3)
-
Still on your local machine, you may now run the training via MLflow Project API
EXPERIMENT_NAME="adult-classifier-$(date +'%Y-%m-%d-%H-%M')" mlflow run -e train --env-manager=local --experiment-name "$EXPERIMENT_NAME" . -P model_type=both-
this may take some minutes, as the full model selection is performed via CV + grid search
- you may run multiple times with different
model_typeparameter (eitherlogistic,random_forest, instead ofboth)
- you may run multiple times with different
-
the logs of the training script will tell you which command to use for testing the best model:
mlflow run -e test --env-manager=local --experiment-name $EXPERIMENT_NAME . -P run_id=<TRAINING_RUN_ID> -P model_uri=models:/<BEST_MODEL_ID>
-
MLflow Project Example (pt. 4)
-
You may access the MLflow UI via the URL of the remote tracking server: http://my.mlflow.server.it:5000
- in our case: http://pc-ciatto-area40.duckdns.org:5000
MLflow Project Example (pt. 5)
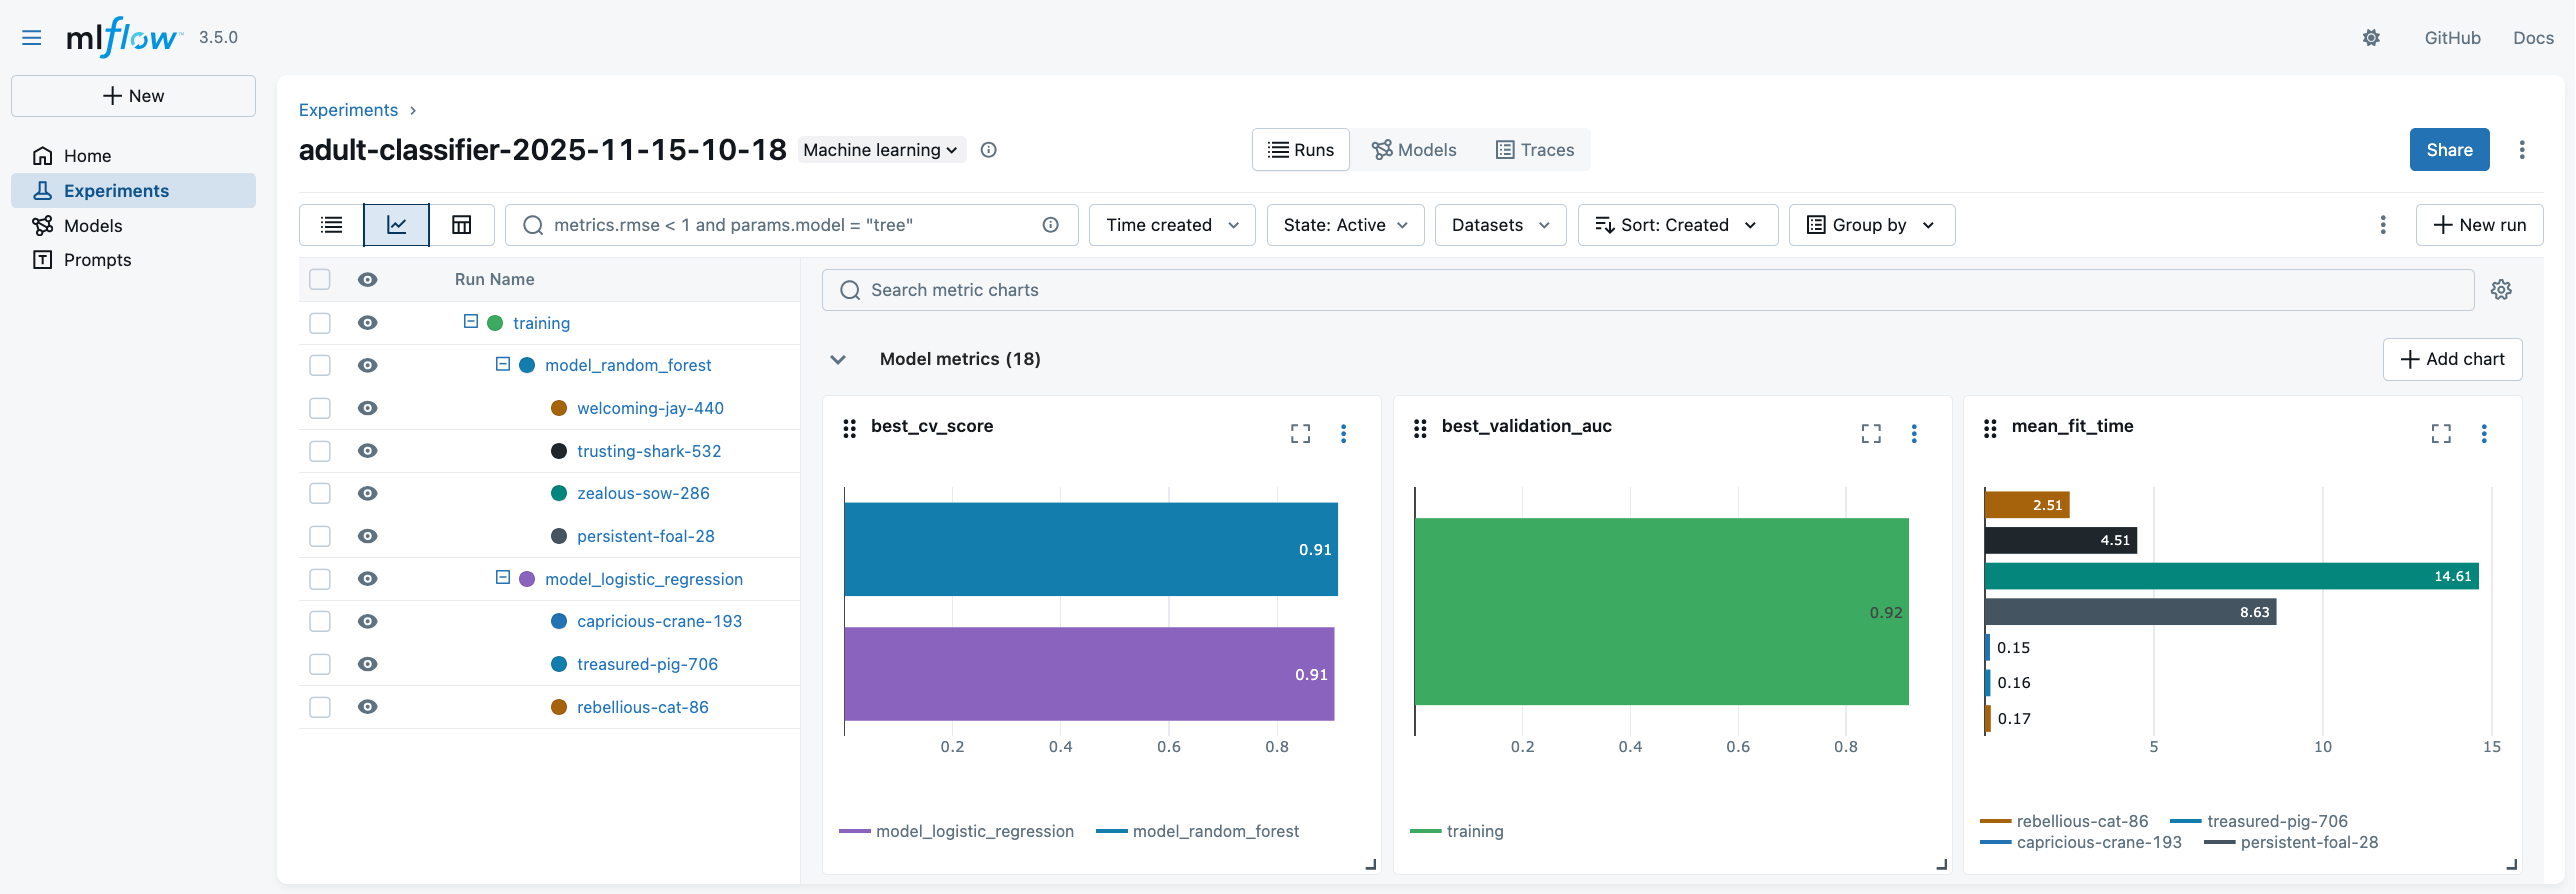
- You may decide to re-run the experiment with different parameters, e.g.:
# to update the date-time in the experiment name, do:
# EXPERIMENT_NAME="adult-classifier-$(date +'%Y-%m-%d-%H-%M')"
mlflow run -e train --env-manager=local --experiment-name "$EXPERIMENT_NAME" . \
    -P model_type=random_forest \
    -P test_size=0.25 \
    -P cv_splits=5 \
    -P random_state=123
MLflow Project Example (pt. 6)
-
You may test the best model on the test set via:
# reuse same EXPERIMENT_NAME as in training step
mlflow run -e test --env-manager=local --experiment-name $EXPERIMENT_NAME . \
    -P run_id=<TRAINING_RUN_ID> \
    -P model_uri=models:/<BEST_MODEL_ID>
(look at the training script logs to find the exact command)
- this will result in a new run under the same experiment, with test metrics logged and charts generated accordingly:
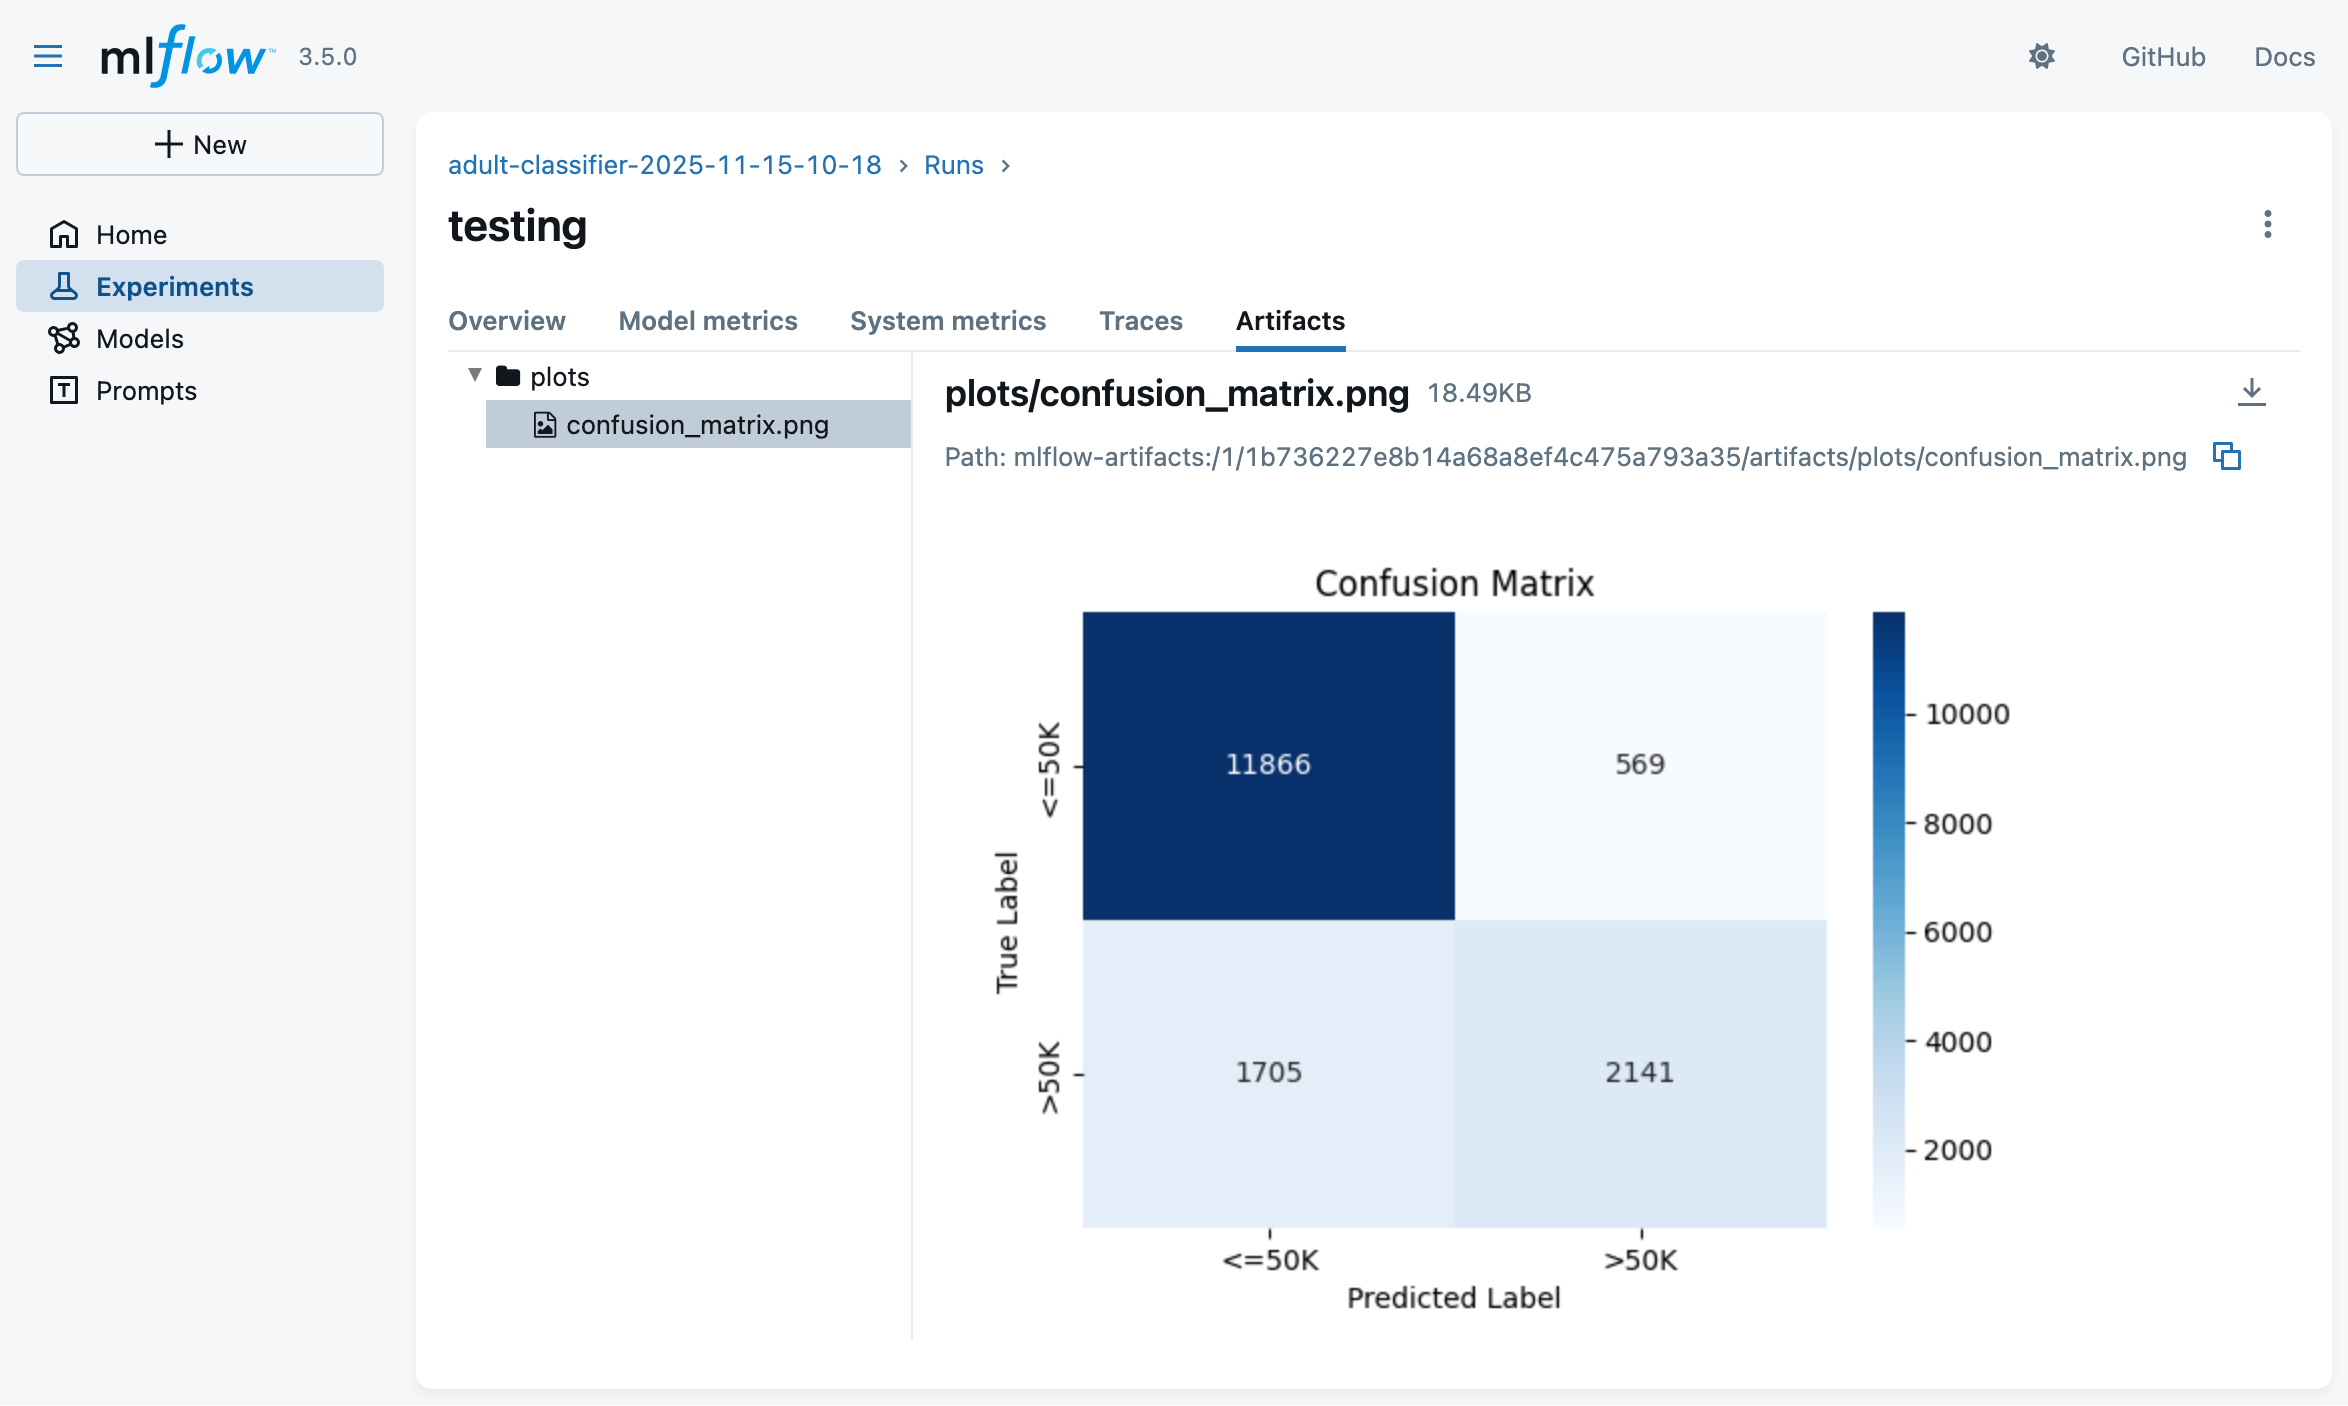
- this will result in a new run under the same experiment, with test metrics logged and charts generated accordingly:
LLMOps with MLflow
MLflow may be used to track experiments involving Large Language Models (LLMs)
-
MLflow’s Tracking API may be used to log:
- prompts used for LLM queries
- responses obtained from LLMs
- metrics (e.g. tokens used, latency, etc.)
- artifacts (e.g. generated text files, images, etc.)
- metadata (e.g. model name, version, etc.)
- parameters (e.g. temperature, max tokens, etc.)
-
Ad-hoc API is provided to Python programmers to express evaluation metrics for LLM-responses
- e.g. LLM-as-a-Judge for correctness scoring
- e.g. other custom, user-defined metrics (Python functions)
-
Support for multiple LLM providers, and their client libraries
- there including auto-logging capabilities for some of them
- e.g. OpenAI, LangChain, HuggingFace, etc.
-
Support for annotating LLM-responses with human feedback
-
Support for profiling data-flow back-and-forth between clients and LLM providers
- there including agents using tools as well
- e.g. to monitor costs, latency, etc.
Main idea behind LLM-as-a-Judge
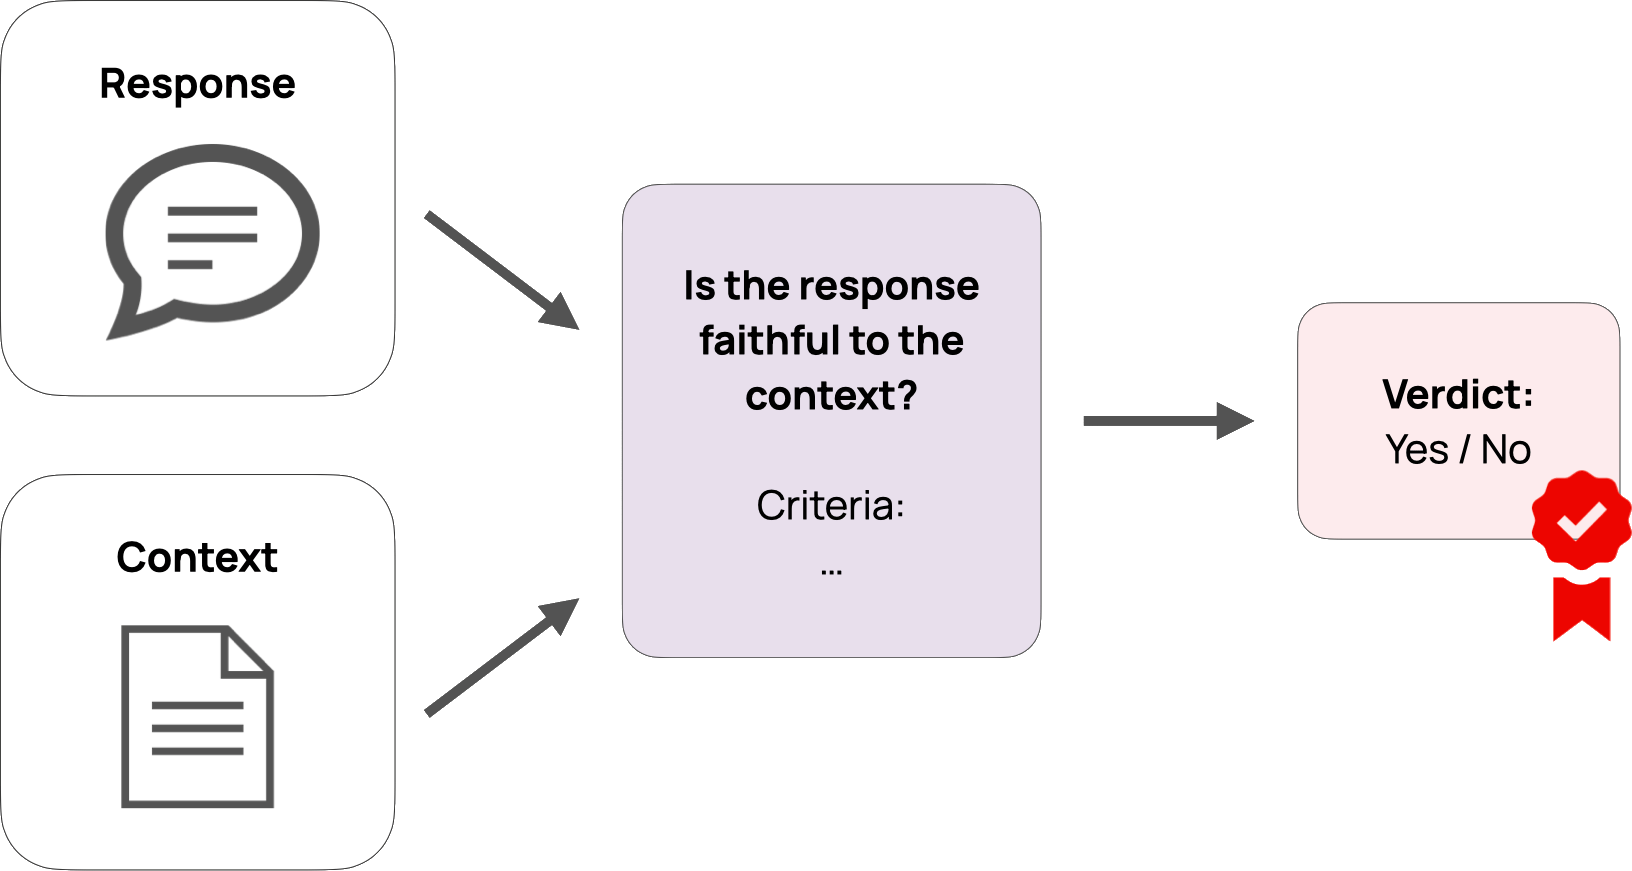
-
Use an LLM to evaluate the quality of responses generated by another LLM
- possibly via some custom criteria defined by the user
- where the criteria are expressed in natural language
-
Think of criteria as unit tests for LLMs’ prompt–responses pairs
- such as: correctness, relevance, completeness, conciseness, formatting, etc.
-
Examples:
The response must be in EnglishThe response must contain at least 3 examples- If
user question is asking for sensitive code, thenresponse must kindly decline to answer
Running example for LLM-based Application (pt. 1)
- For the final exam of a Software Engineering course, students must answer open questions about the course topics
CATEGORY, QUESTION TEXT, WEIGHT (DIFFICULTY) ############################################################################ Definition, What is computer science?, 1 Definition, What is an algorithm?, 1 Definition, "Difference among information, data, and representation",1 Definition, What is software?, 1 Definition, What is software engineering?, 1 History, What were software crises?, 1 Commonsense, What makes software development costs rise?,1 Commonsense, What may delay software development?, 1- questions are known, but students are missing examples of good answers
Idea! Let’s generate examples of good answers via LLMs and provide students with them
- possibly enhanced with RAG techniques, out of the course’s teaching material, to guarantee coherence with it
- ! not shown in the example !
- possibly enhanced with search-engine tools to enrich the answers with up-to-date references
MLflow may help in 1. selecting the best models and 2. prompts, assuming that 3. evaluation metrics are defined for generated answers
Running example for LLM-based Application (pt. 2)
Many different prompt templates to be tried for answer generation
- system prompt:
You are a university professor preparing model answers for a software engineering examination.
- user prompt 1 (basic):
Category: {category}

Question: {question}

Difficulty: {weight}/4

Provide a clear and accurate answer suitable for an exam context.
Be concise but comprehensive.
- user prompt 2 (concise):
Category: {category}

Question: {question}

Weight: {weight}/4

Answer the question above.
- user prompt 3 (practical):
Category: {category}

Question: {question}

Difficulty: {weight}/4

Provide an answer that:
1. Explains the concept clearly
2. Includes at least one concrete example or use case
3. Relates to real-world software development scenarios
4. Is easy to understand for someone learning the subject
- user prompt 4 (academic):
Category: {category}

Difficulty: {weight}/4 (higher means more complex)

Question: {question}

Instructions:
- Provide a rigorous, academically sound answer
- Include relevant technical terminology
- Reference key concepts and principles where appropriate
- Structure your answer clearly with proper explanations
- Aim for a comprehensive yet focused response suitable for academic evaluation
- system prompt addendum for tools:
Always use the provided web search tool to complement your answers with relevant and up-to-date links or references.
In calling the tool, you should automatically infer the most relevant query based on the conversation so far.
Running example for LLM-based Application (pt. 3)
Many different evaluation criteria to be tried for answer assessment
General criteria:
- [Guideline]
english: The answer should be in English. - [Guideline]
software_engineering_related: The answer is correctly contextualizing the question within the domain of software engineering. - [Guideline]
reference_to_definition: The answer should reference and/or quote relevant definitions for the concepts mentioned in the question. - [Guideline]
relevance_to_query: The answer should be relevant to the question asked. - [Custom Score]
enough_words: More than 10 words in the answer. - [Custom Score]
not_too_many_words: Less than 1000 words in the answer.
Question-specific correctness criteria:
- For questions 1 (
What is computer science?)- should mention “study of computation”, “algorithms”, “data structures”, “software”, “hardware”
- should not argue that “computer science is the study of computers”
- For question 2 (
What is an algorithm?)- should mention that:
- “an algorithm is a finite sequence of steps/instructions”
- “algorithms accept inputs”
- “algorithms produce outputs”
- should not confuse algorithms with “programs” or “software”
- should mention that:
- etc. for other questions
Running example for LLM-based Application (pt. 4)
Example: Question 1, with prompt 1 and all criteria, on model gpt-4.1-mini
-
Question 1:
What is computer science?(weight:1, category:Definition) -
Prompt 1 (basic):
You are a university professor preparing model answers for a software engineering examination.Category: Definition Question: What is computer science? Difficulty: 1/4 Provide a clear and accurate answer suitable for an exam context. Be concise but comprehensive. -
Generated answer:
Computer science is the systematic study of computers and computational systems. It involves understanding algorithms, data structures, software design, programming languages, and the theoretical foundations of computation, as well as the practical aspects of developing and applying software and hardware solutions to solve problems. -
Evaluation results:
english: passed ✅software_engineering_related: failed ❌ (does not mention “software engineering”)reference_to_definition: failed ❌ (does not quote any definition)relevance_to_query: passed ✅enough_words: passed ✅not_too_many_words: passed ✅- Correctness (custom for question 1): passed ✅
Running example for LLM-based Application (pt. 5)
Example: Question 2, with prompt 1, on model gpt-5-mini, with agents & tools
-
Question 2:
What is an algorithm?(weight:1, category:Definition) -
Prompt 1 (basic) + tools addendum:
You are a university professor preparing model answers for a software engineering examination.Always use the provided web search tool to complement your answers with relevant and up-to-date links or references. In calling the tool, you should automatically infer the most relevant query based on the conversation so far.Category: Definition Question: What is an algorithm? Difficulty: 1/4 Provide a clear and accurate answer suitable for an exam context. Be concise but comprehensive. -
The tool:
@tool
def web_search_tool(query: str, max_results: int = 3) -> str:
    """
    Tool function for LLM to search the web and get formatted results.
    This combines search_web and format_search_results into a single tool.

    Args:
        query: Search query string
        max_results: Maximum number of results to return (default: 3)

    Returns:
        Markdown-formatted enumeration of search results where,
        for each result, the first line is the title of a Web page with an hyper-ref to the page's URL,
        and the second line is a snippet/summary of the content.
    """
    results = search_web(query, max_results=max_results)
    return format_search_results(results)
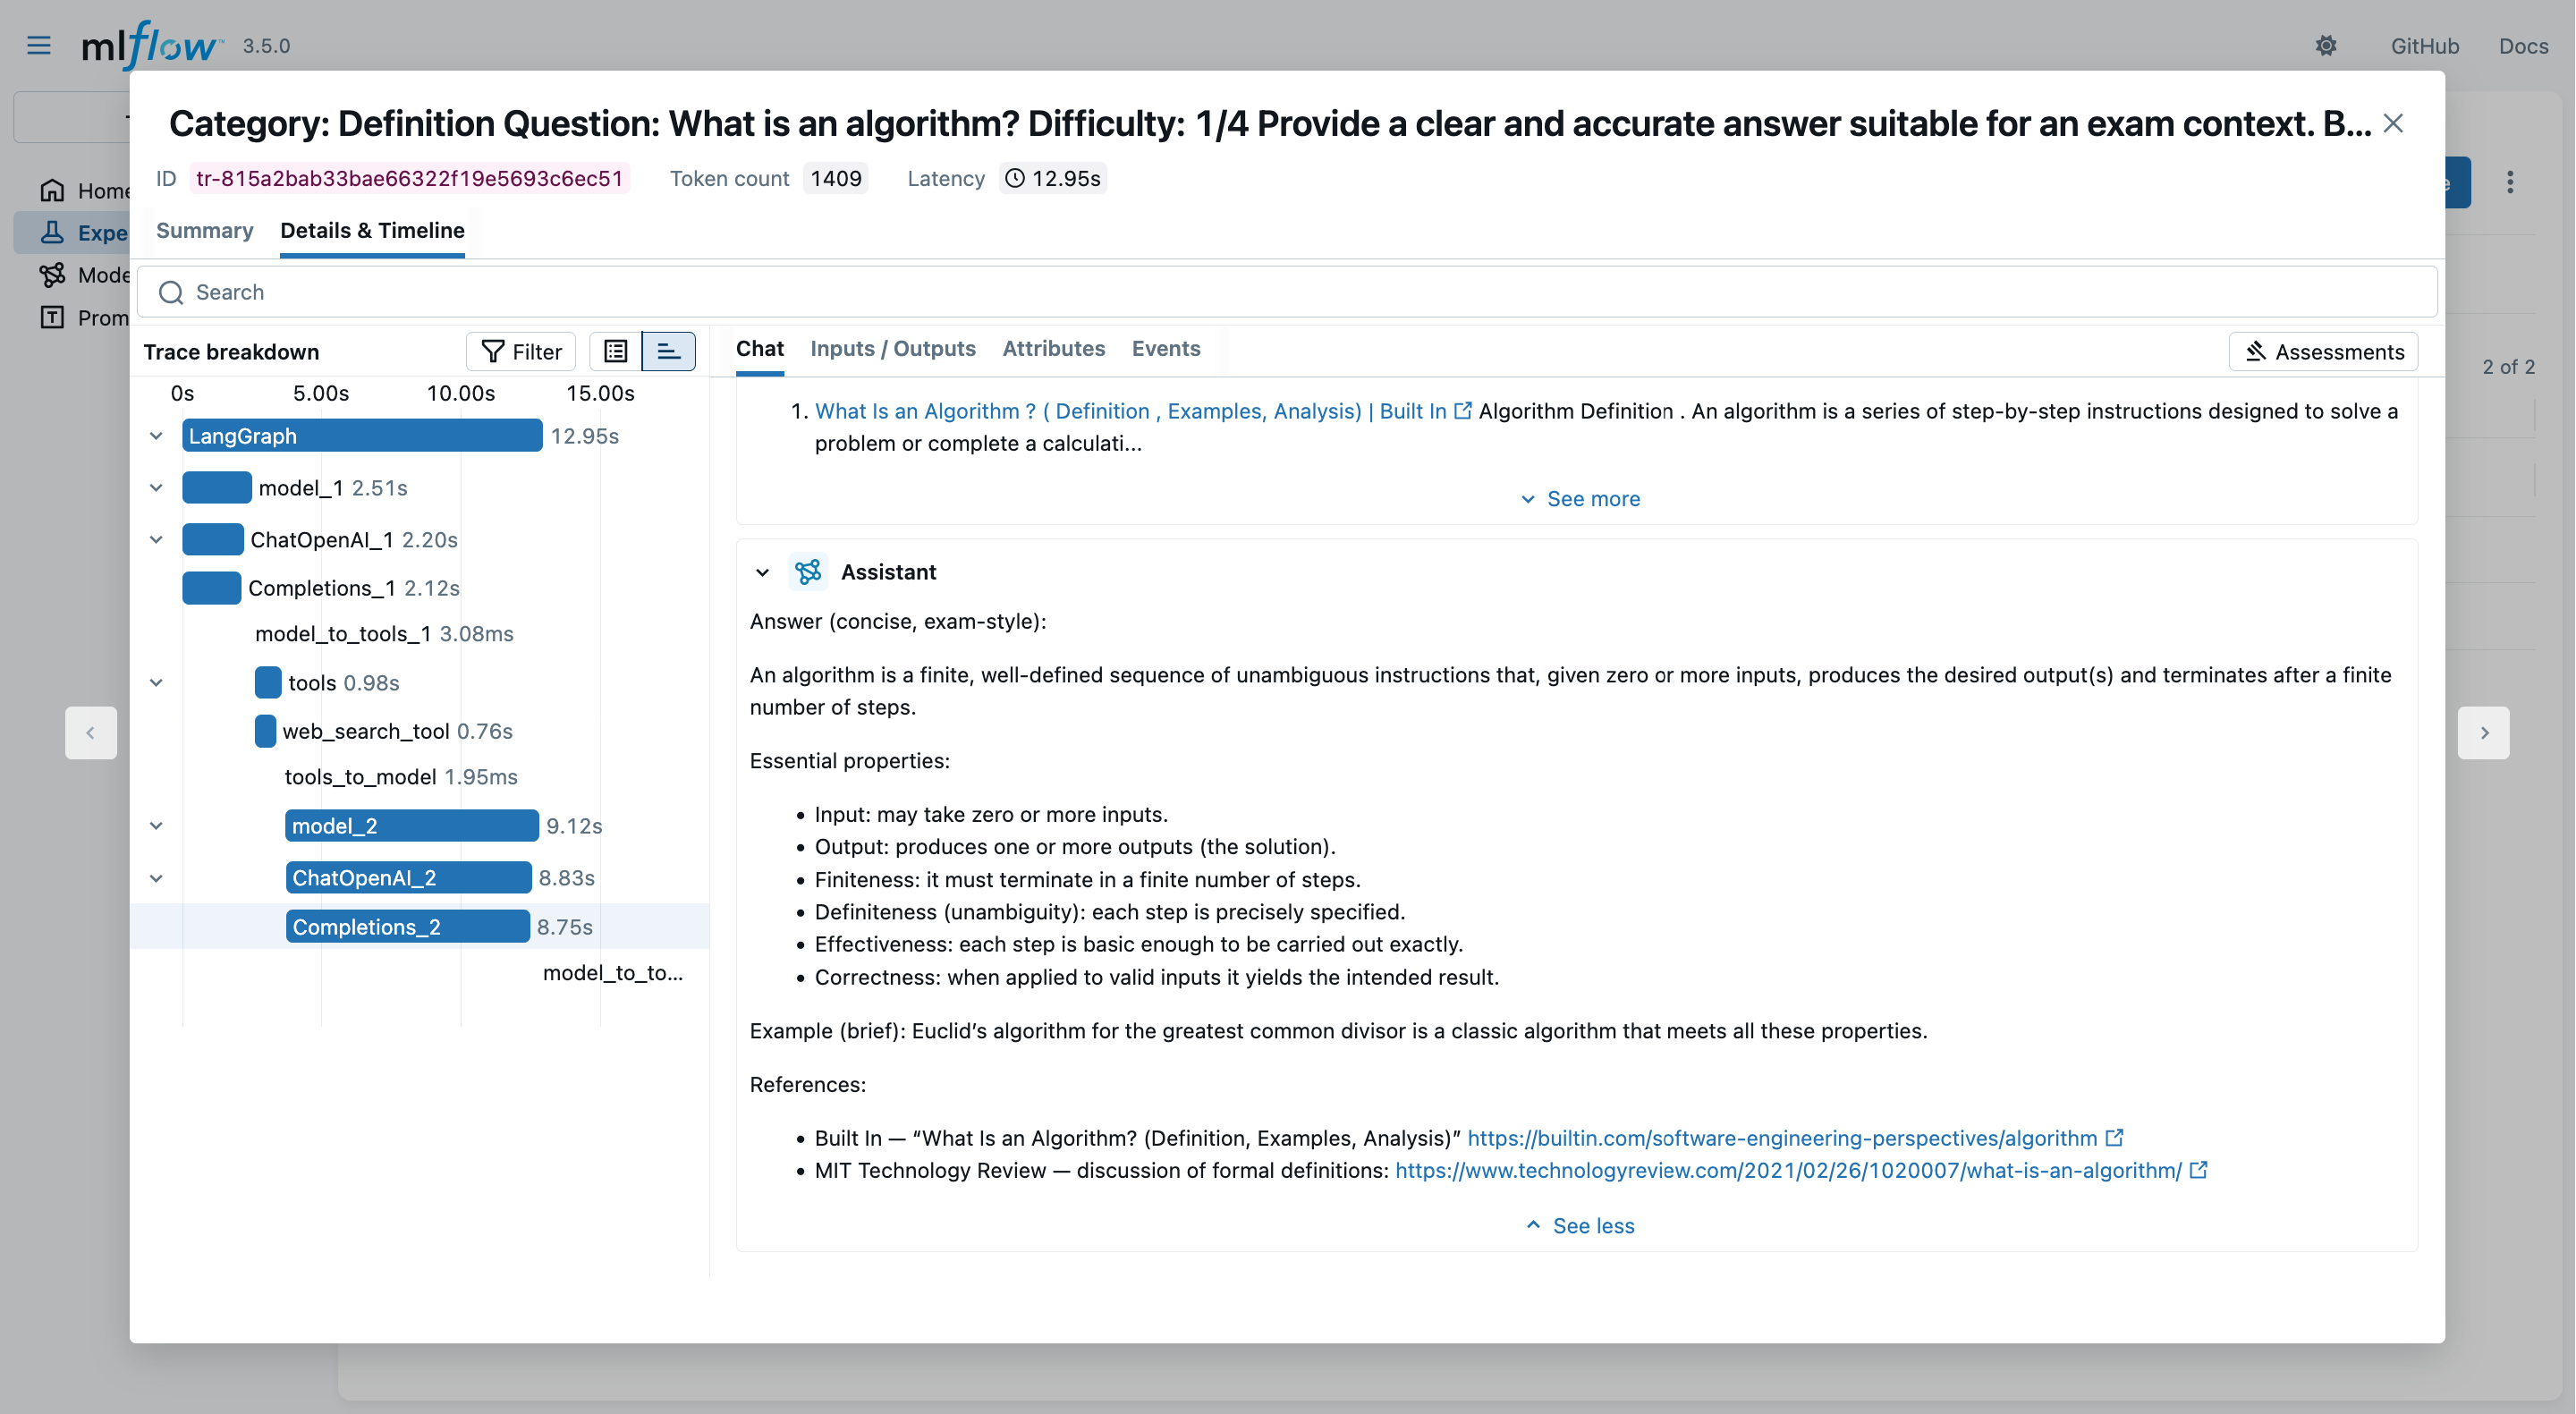
Running example for LLM-based Application (pt. 6)
Example: Question 2, with prompt 1, on model gpt-5-mini, with agents & tools (cont’d)
-
Generated intermediate tool invocation:
web_search_tool("What is an algorithm definition concise exam context computer science", max_results=3)Result:
Relevant Web search results:

- [Wikipedia Algorithm - Wikipedia](https://en.wikipedia.org/wiki/Algorithm)
4 days ago -
In mathematics and computer science, an algorithm ...
- [Scribbr What is an algorithm in computer science?](https://www.scribbr.com/frequently-asked-questions/algorithm-computer-science/)
August 9, 2023 -
In computer science, an algorithm is a list of unambiguous instructions ...
- ...
- Final generated answer:
An algorithm is a finite, well‑defined sequence of unambiguous instructions that, given specified input(s),
produces the desired output(s) and terminates after a finite number of steps.

Key properties (for exam answers)
- Input and output: takes zero or more inputs and yields one or more outputs.
- Finiteness (termination): completes in a finite number of steps for every valid input.
- Definiteness (unambiguous): each step is precisely specified.
- Effectiveness: each step is basic enough to be carried out in practice.
- Correctness: when implemented, it solves the intended problem for all valid inputs.

Example (brief): the Euclidean algorithm for computing the greatest common divisor of two integers.

References:
- Wikipedia: Algorithm — <https://en.wikipedia.org/wiki/Algorithm>
- Scribbr: What is an algorithm in computer science? — <https://www.scribbr.com/frequently-asked-questions/algorithm-computer-science/>
Exemplifying MLflow for LLM Applications (pt. 1)
-
Clone the repository and start a local MLflow Tracking Server via Docker Compose:
git clone https://github.com/gciatto/example-llmops.git cd example-llmops docker-compose up -d --wait -
Set the environment variables for MLflow Tracking Server URI and OpenAI API key:
export MLFLOW_TRACKING_URI="http://localhost:5000" export OPENAI_API_KEY="sk-..." # on Windows (cmd): # set MLFLOW_TRACKING_URI=http://localhost:5000 # set OPENAI_API_KEY=sk-... # on Windows (PowerShell): # $env:MLFLOW_TRACKING_URI="http://localhost:5000" # $env:OPENAI_API_KEY="sk-..." -
Create and activate a Python virtual environment, then install dependencies:
python -m venv .venv
source .venv/bin/activate # on Windows: .venv\Scripts\activate
pip install -r requirements.txt
Exemplifying MLflow for LLM Applications (pt. 2)
- Have a look to the project structure (Docker and other irrelevant files are omitted):
example-llmops/
├── MLproject                   # MLflow Project descriptor file
├── register_all_prompts.py     # Script to register prompt templates
├── generate_answers.py         # Script to generate answers without agents/tools
├── generate_answers_with_agent.py # Script to generate answers with agents/tools
├── evaluate_responses.py       # Script to evaluate generated responses
├── prompts                     # Directory with prompt templates
│   ├── academic.txt
│   ├── basic.txt
│   ├── concise.txt
│   ├── practical.txt
│   ├── system.txt
│   └── tools.txt
├── python_env.yaml             # Python environment (dependencies)
└──  questions.csv              # CSV file with input questions
Exemplifying MLflow for LLM Applications (pt. 3)
-
Notice the
MLprojectfile in the repository root, paying attention to the entry points defined therein, and their parameters:name: quiz-answer-generator python_env: python_env.yaml entry_points: register_all_prompts: command: "python register_all_prompts.py" evaluate_responses: parameters: generation_run_id: {type: str, default: "none"} judge_model: {type: str, default: "openai:/gpt-4.1-mini"} command: "python evaluate_responses.py --generation-run-id {generation_run_id} --judge-model {judge_model}" generate_answers: parameters: prompt_template: {type: str, default: "basic"} max_questions: {type: int, default: -1} model: {type: str, default: "gpt-4.1-mini"} temperature: {type: float, default: 0.7} max_tokens: {type: int, default: 500} command: | python generate_answers.py \ --prompt-template {prompt_template} \ --max-questions {max_questions} \ --model {model} \ --temperature {temperature} \ --max-tokens {max_tokens} generate_answers_with_agent: parameters: prompt_template: {type: str, default: "basic"} search_results_count: {type: int, default: 3} max_questions: {type: int, default: -1} model: {type: str, default: "gpt-5-mini"} temperature: {type: float, default: 0.7} max_tokens: {type: int, default: 1500} command: | python generate_answers_with_agent.py \ --prompt-template {prompt_template} \ --search-results-count {search_results_count} \ --max-questions {max_questions} \ --model {model} \ --temperature {temperature} \ --max-tokens {max_tokens}- use
python generate_answers.py --helpto see details about generation script parameters - use
python evaluate_responses.py --helpto see details about evaluation script parameters
- use
Exemplifying MLflow for LLM Applications (pt. 4)
- Also give a look to the code in
evaluate_responses.pyscript, where evaluation criteria are defined:import mlflow from mlflow.entities import Feedback from mlflow.genai.scorers import Guidelines, scorer, RelevanceToQuery@scorer def enough_words(outputs: dict) -> Feedback: text = outputs['choices'][-1]['message']['content'] word_count = len(text.split()) score = word_count >= 10 rationale = ( f"The response has more than 10 words: {word_count}" if score else f"The response does not have enough words because it has less than 10 words: {word_count}." ) return Feedback(value=score, rationale=rationale)@scorer def not_too_many_words(outputs: dict) -> Feedback: text = outputs['choices'][-1]['message']['content'] word_count = len(text.split()) score = word_count <= 1000 rationale = ( f"The response has less than 1000 words: {word_count}" if score else f"The response has too many words: {word_count}." ) return Feedback(value=score, rationale=rationale)def guidelines_model(model: str = None): yield Guidelines(model=model, name="english", guidelines="The answer should be in English.") yield Guidelines(model=model, name="software_engineering_related", guidelines="The answer is correctly contextualizing the question within the domain of software engineering.") yield Guidelines(model=model, name="reference_to_definition", guidelines="The answer should reference and/or quote relevant definitions for the concepts mentioned in the question.") yield RelevanceToQuery(model=model) yield enough_words yield not_too_many_words
Exemplifying MLflow for LLM Applications (pt. 5)
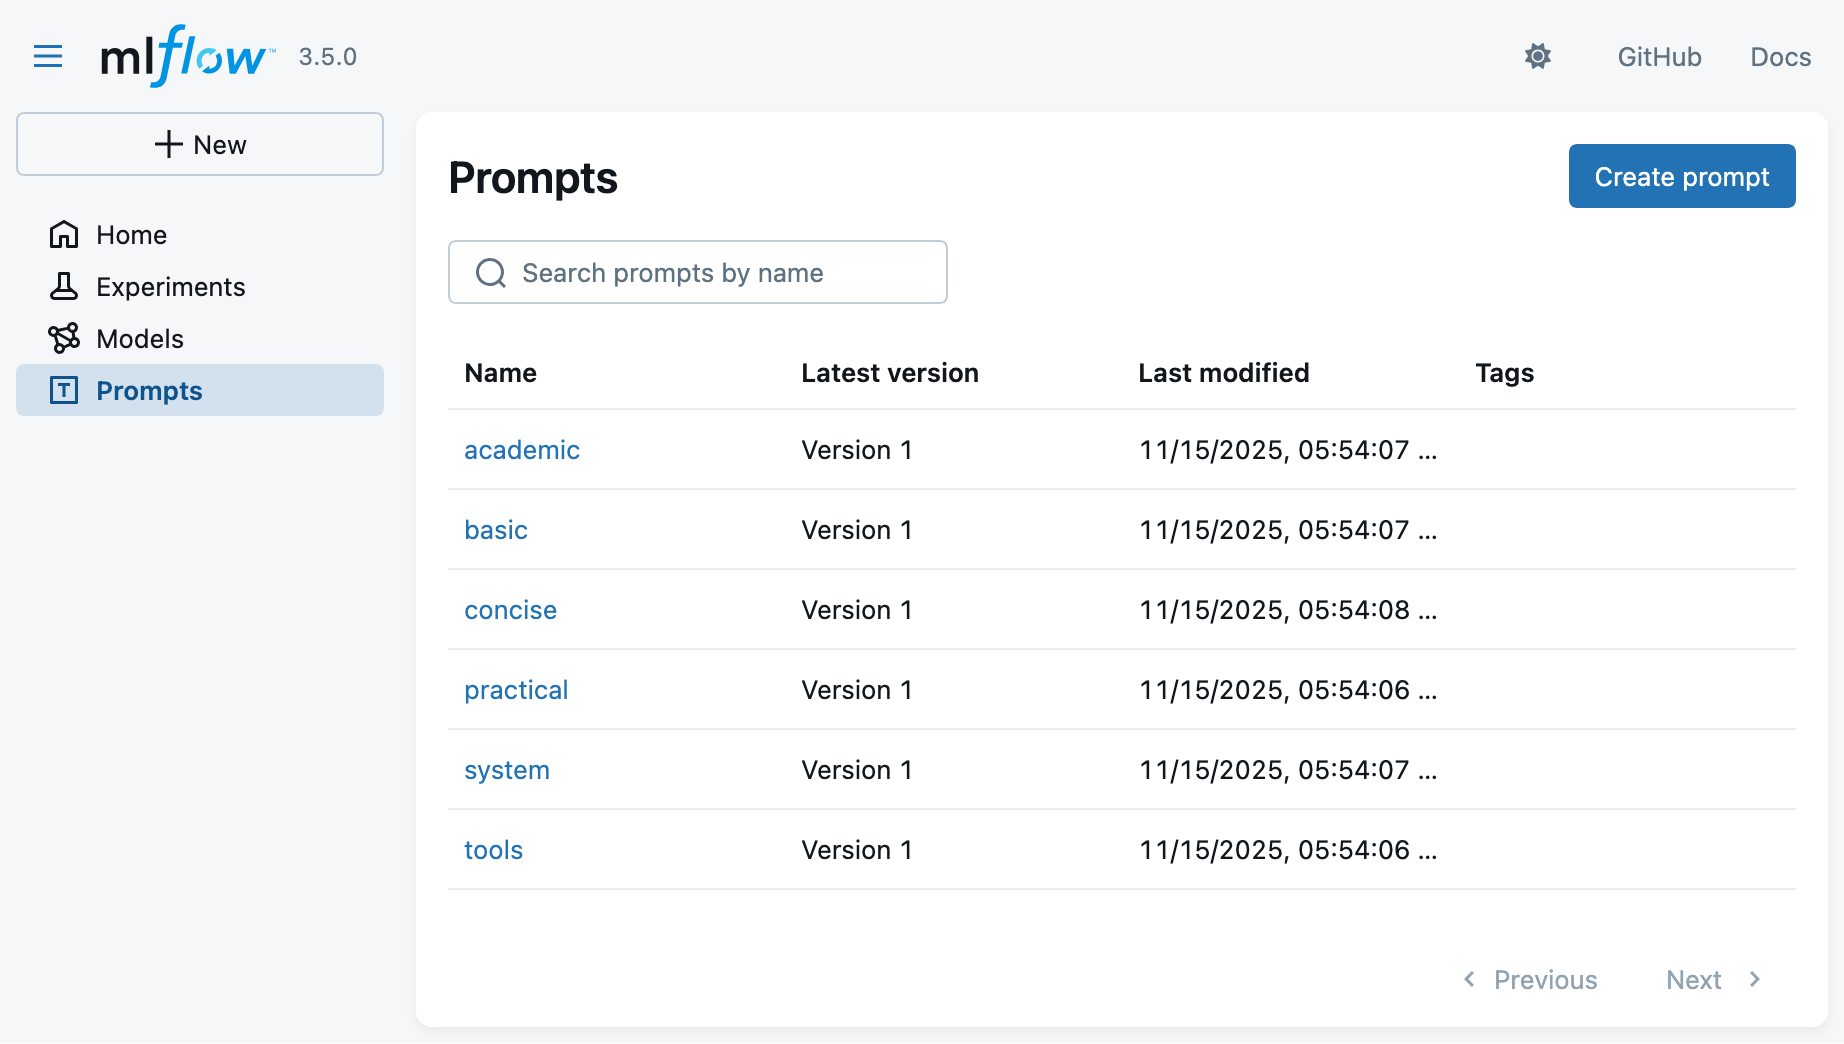
-
You may now register all prompt templates in a new experiment via:
EXPERIMENT_ID="se-answers-$(date +'%Y-%m-%d-%H-%M')" mlflow run -e register_all_prompts --env-manager=local --experiment-name $EXPERIMENT_ID . -
Look at the MLflow UI (“Prompts” main section) to see the registered prompts:
Exemplifying MLflow for LLM Applications (pt. 6)
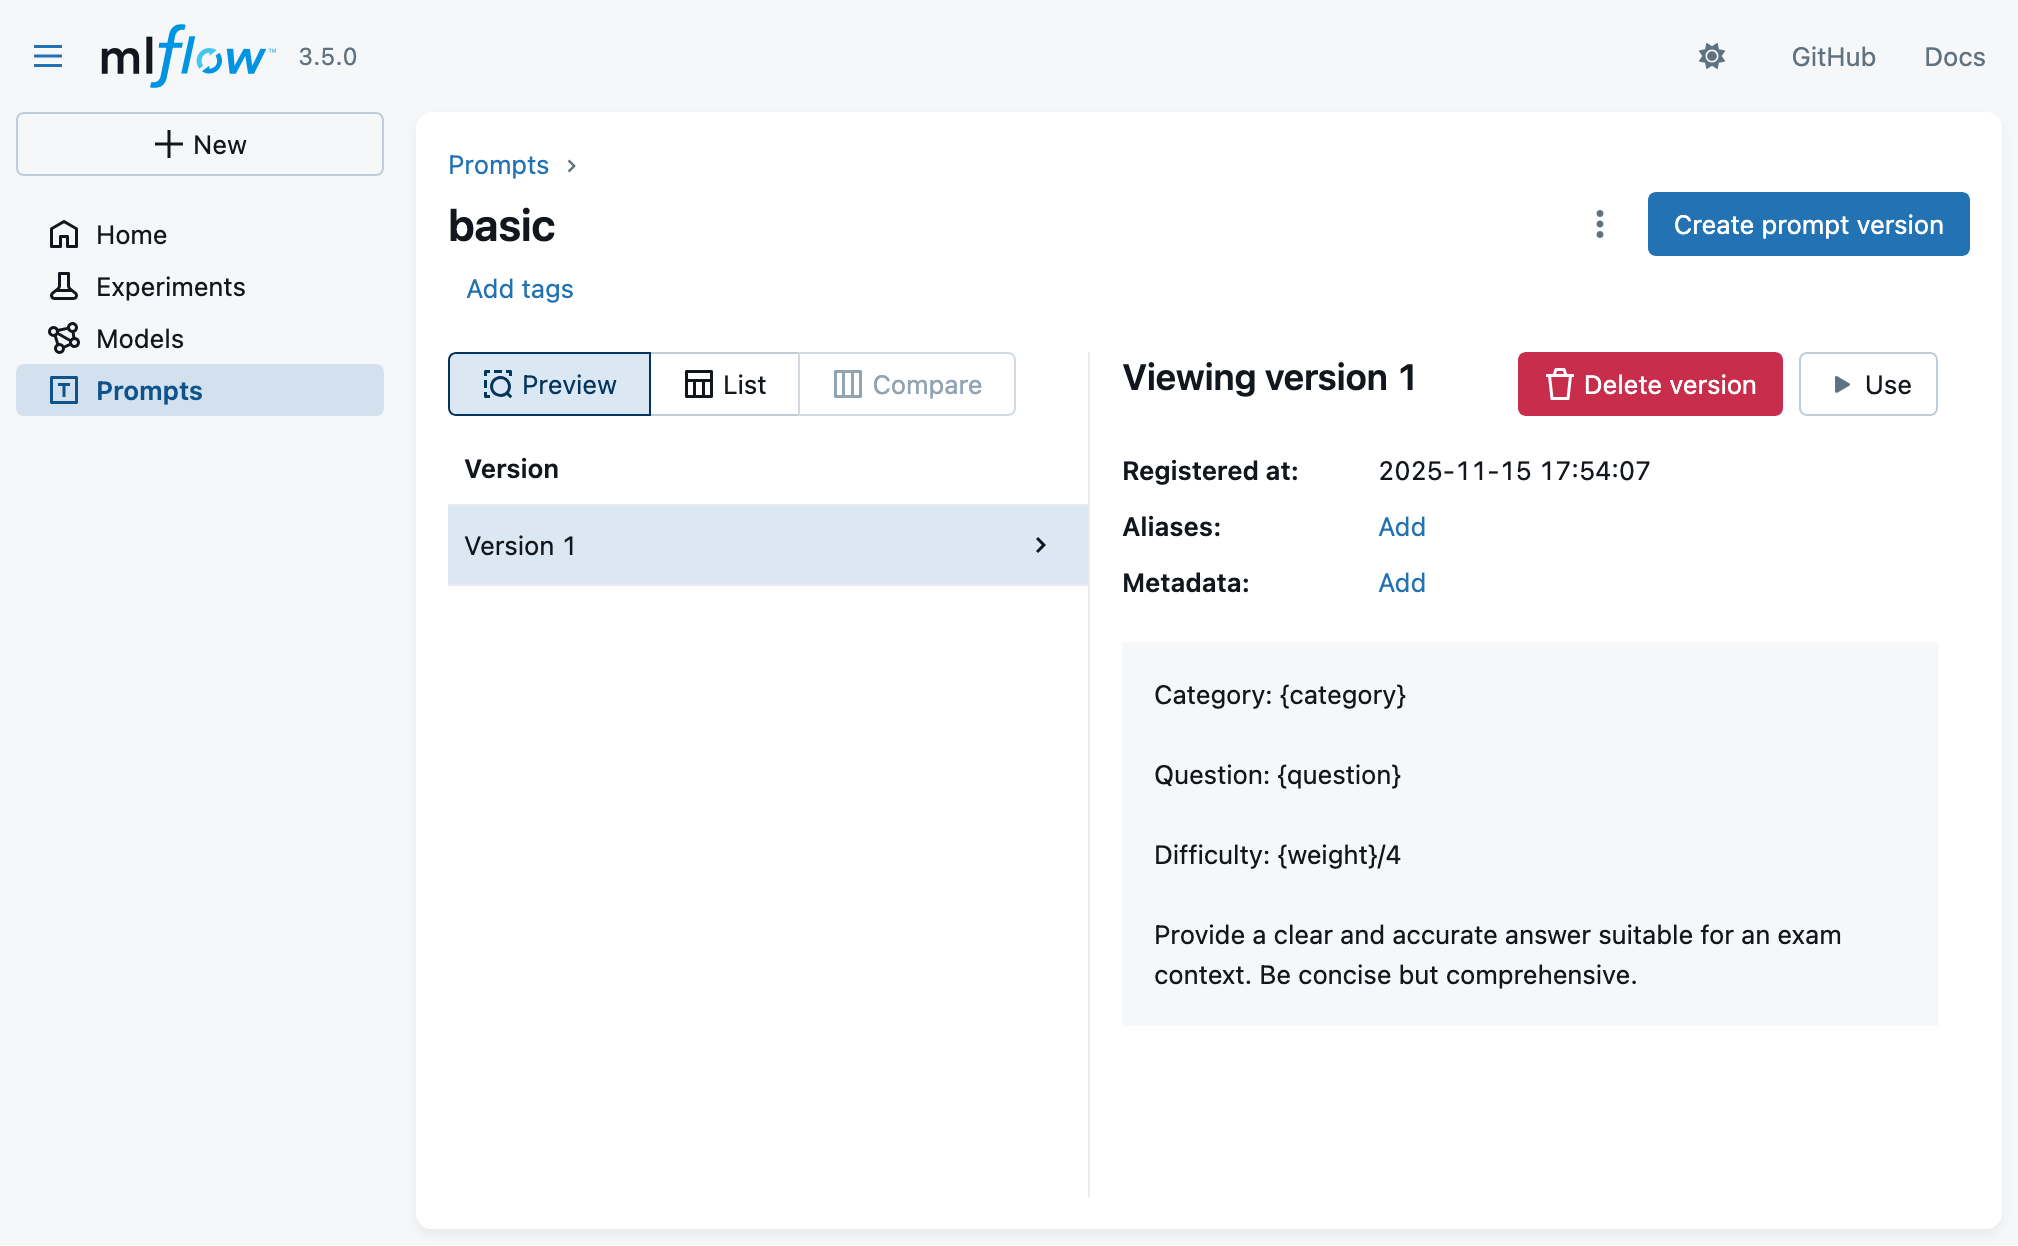
- Clicking on a prompt template, you may see its details (versioning, content, etc.):
Exemplifying MLflow for LLM Applications (pt. 7)
-
You may now generate answers via:
mlflow run -e generate_answers --env-manager=local --experiment-name $EXPERIMENT_ID . -P max_questions=4(we put a limit of 4 questions to save time and costs)
-
Look at the MLflow UI (“Experiments” main section) to see the generation runs:
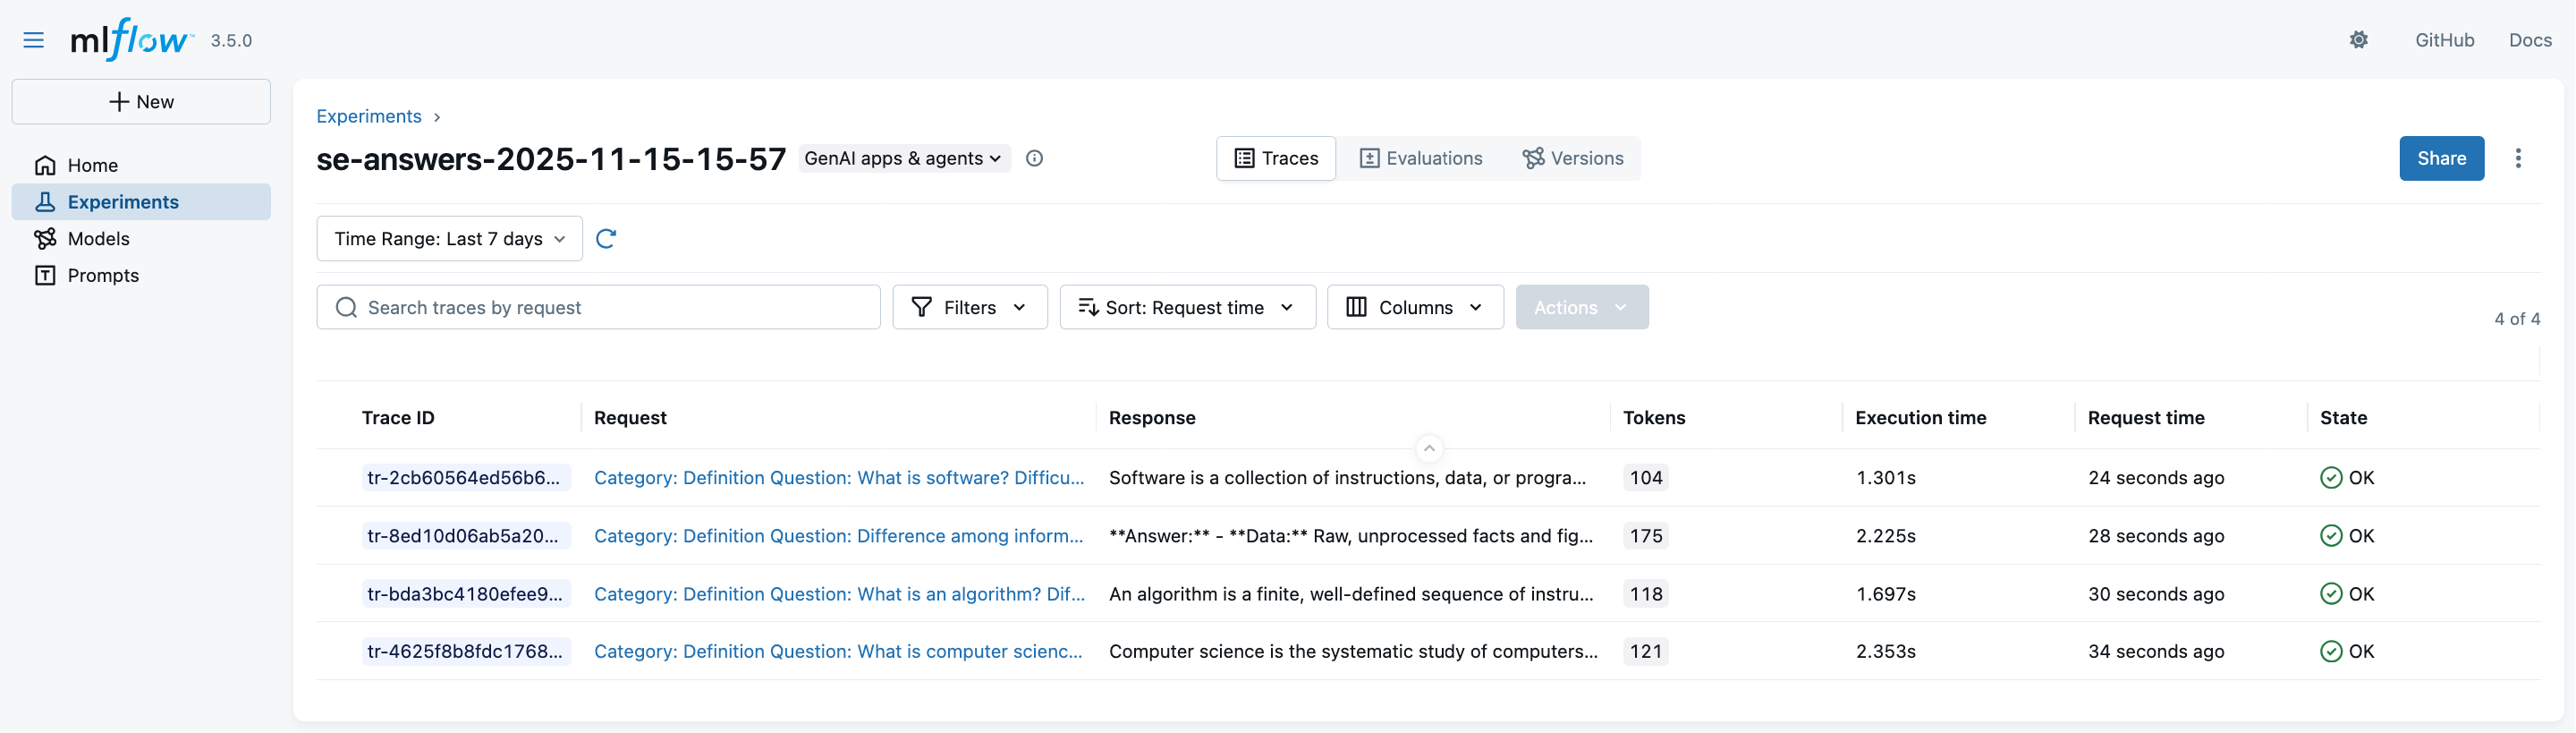
Exemplifying MLflow for LLM Applications (pt. 8)
-
Clicking on a trace, you may observe details about the interactions with the LLM provider:
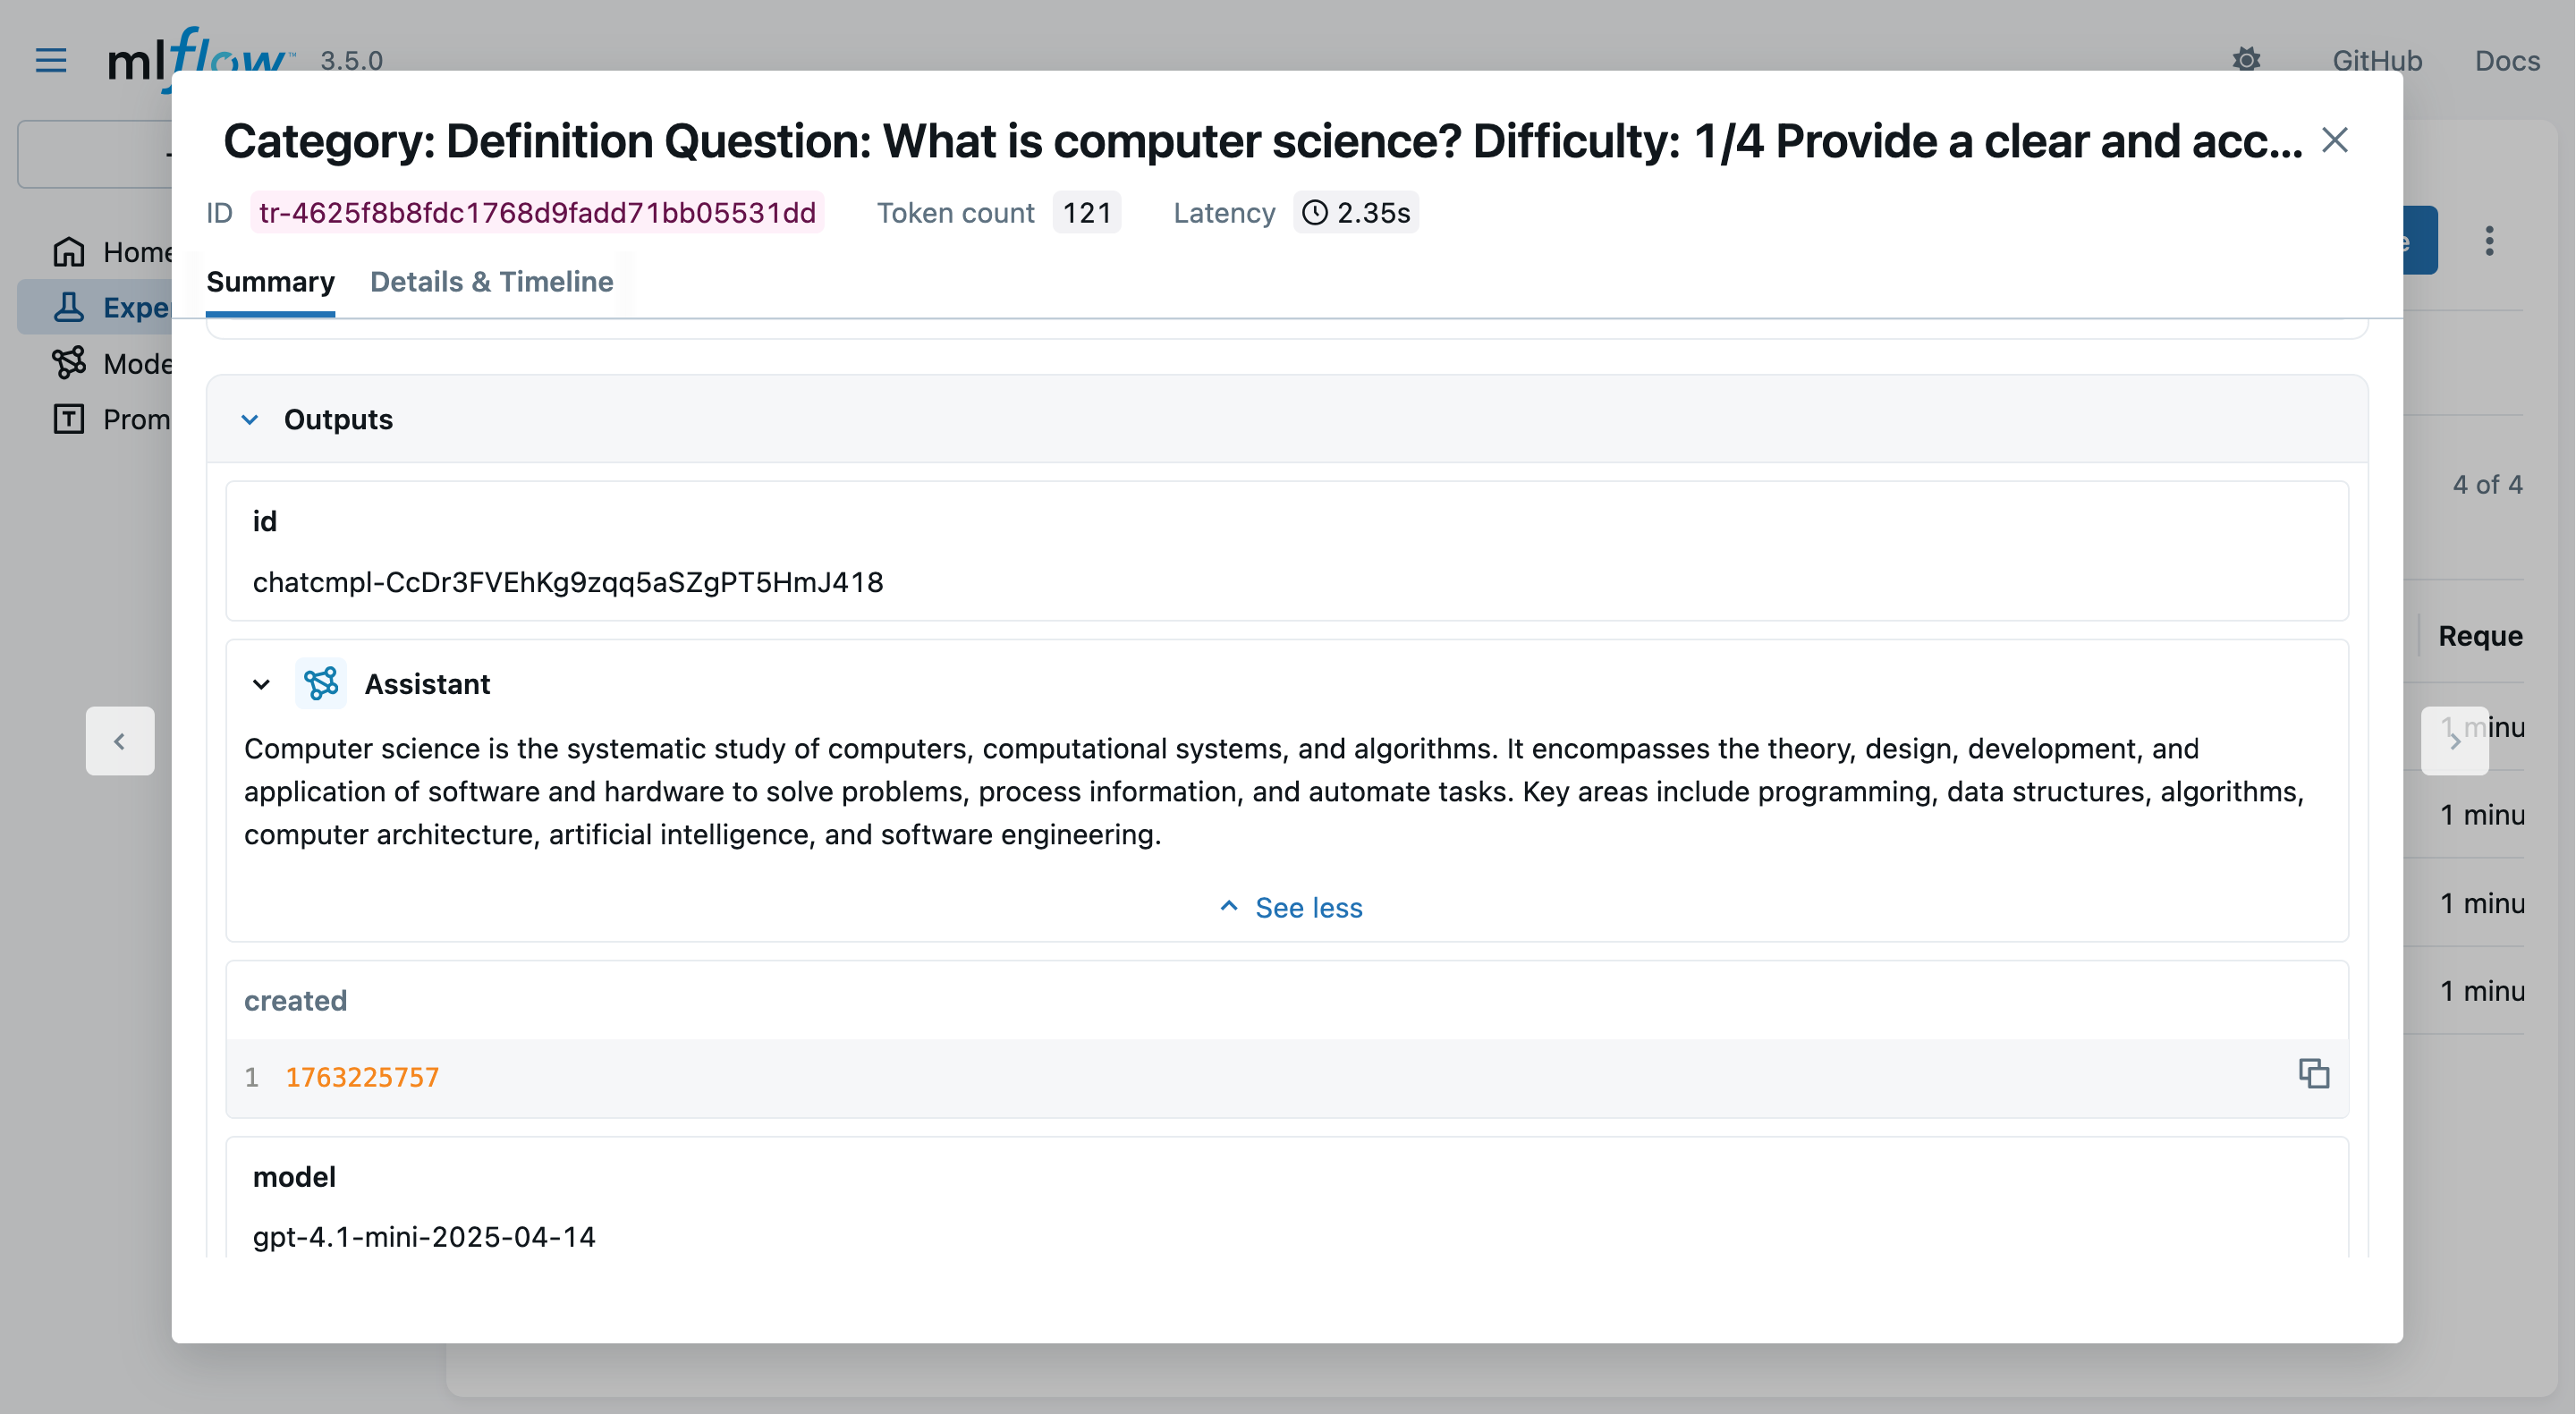
- notice the logged prompts, responses, metrics, etc.
Exemplifying MLflow for LLM Applications (pt. 9)
-
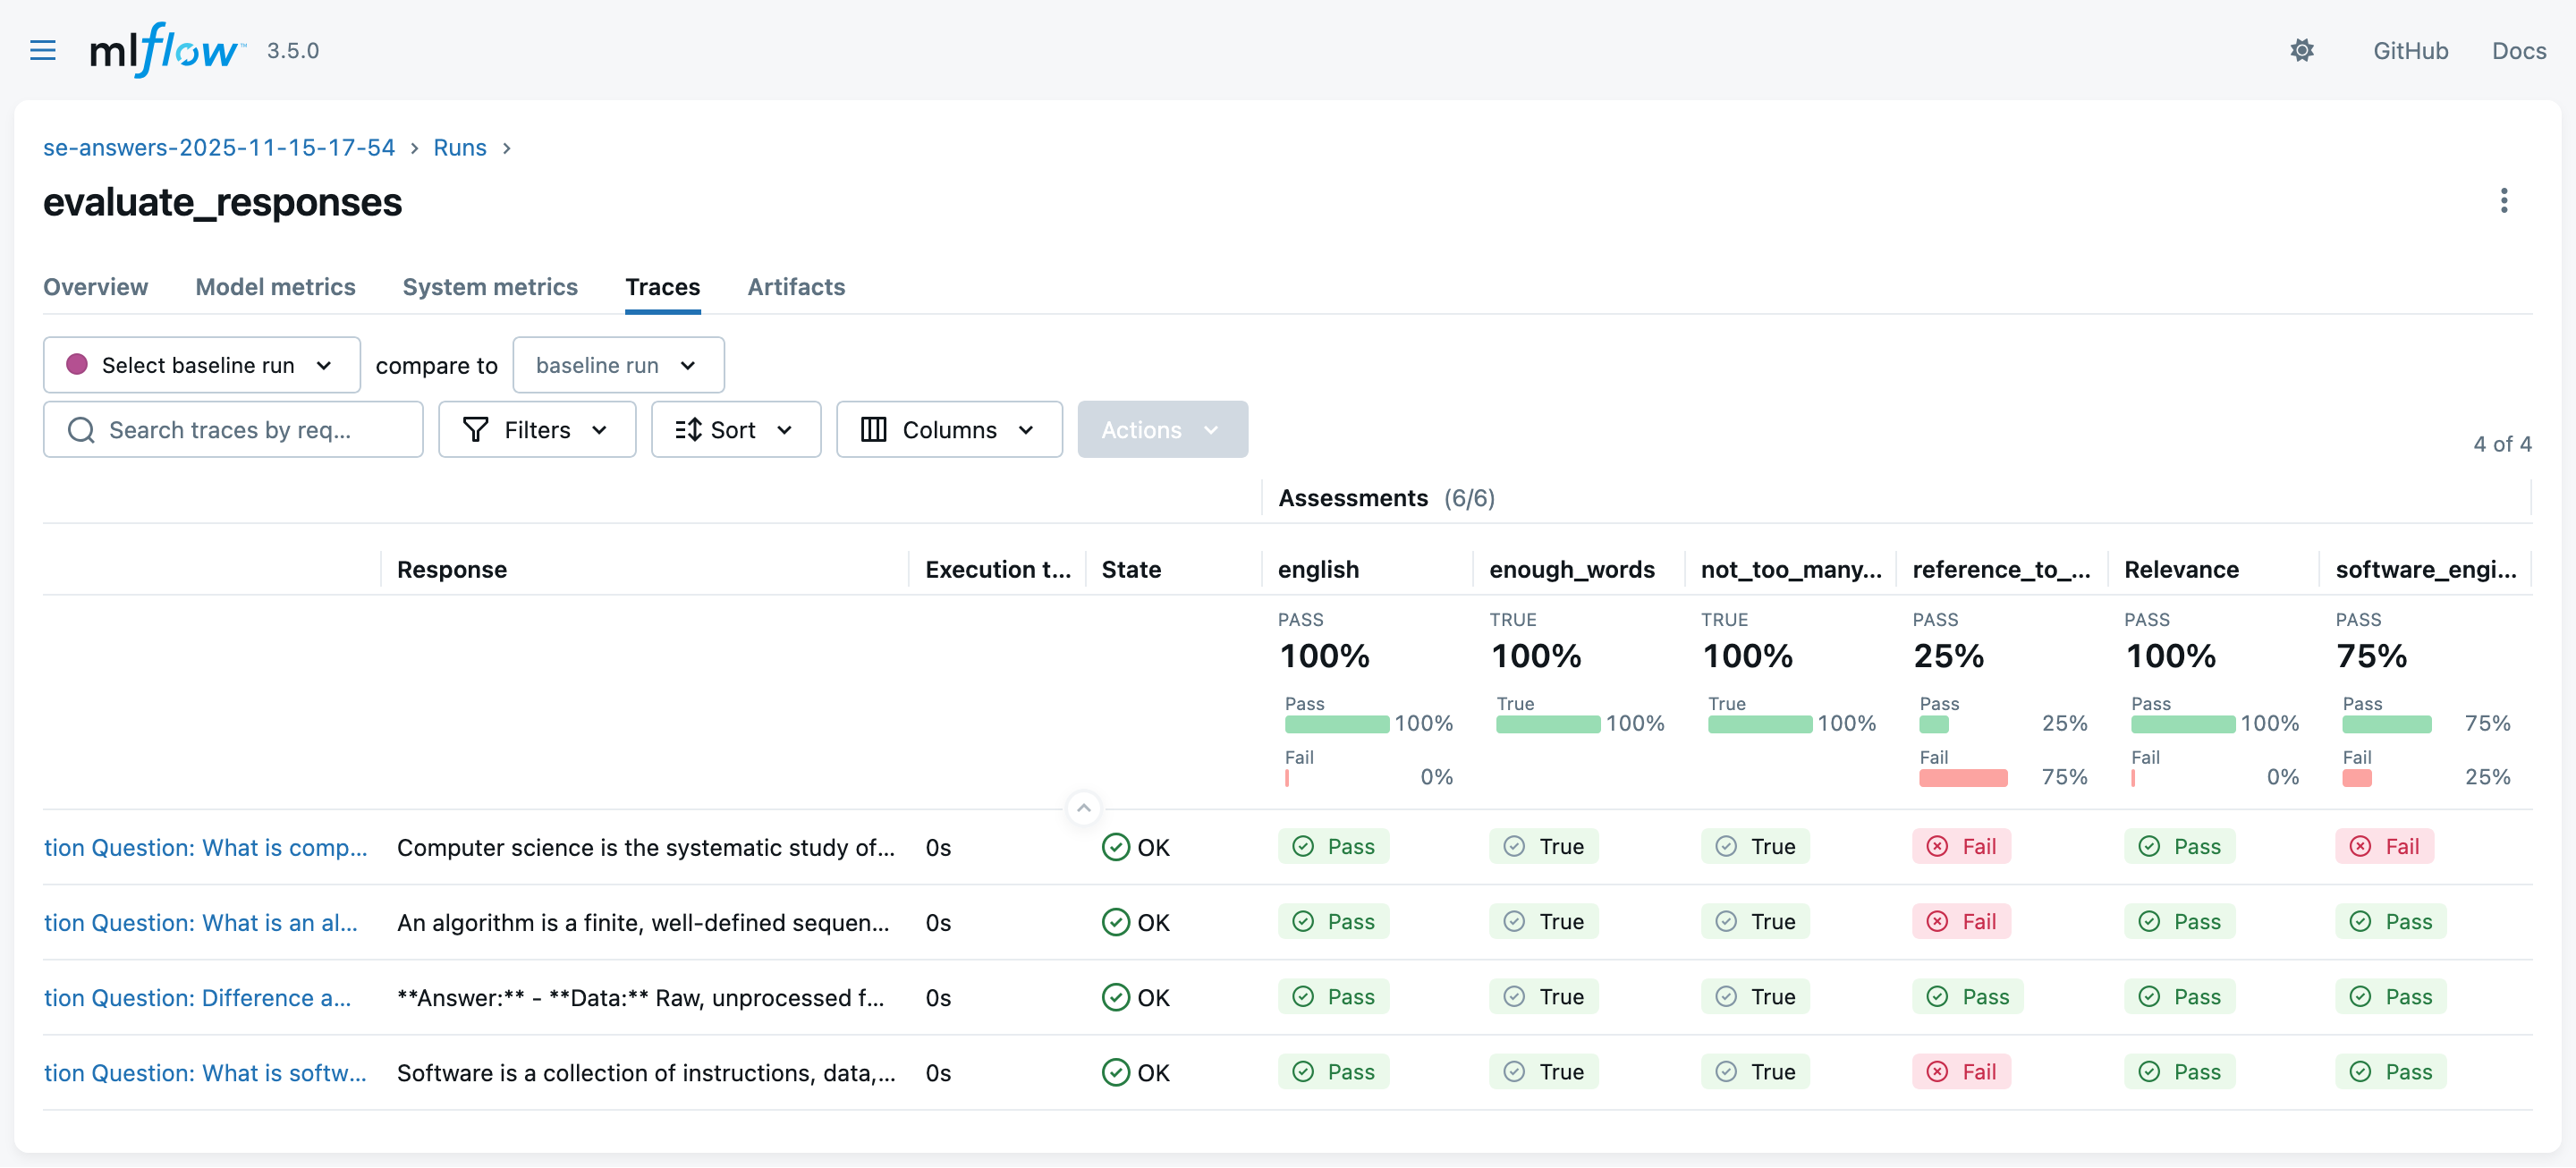
You may now evaluate generated answers via (see the output of generation runs for the exact command):
# reuse same EXPERIMENT_ID as in generation step
mlflow run -e evaluate_responses --env-manager=local --experiment-id <EXPERIMENT_ID> . -P generation_run_id=<GENERATION_RUN_ID>
(this may take some time, as
Guidelinesevaluations are performed via further LLM queries) -
Look at the MLflow UI (“Experiments” main section) to see the evaluation runs:
Exemplifying MLflow for LLM Applications (pt. 10)
-
You may now generate answers with agents & tools via:
EXPERIMENT_ID="se-answers-agents-$(date +'%Y-%m-%d-%H-%M')"
mlflow run -e generate_answers_with_agent --env-manager=local --experiment-name $EXPERIMENT_ID . -P max_questions=2
(we put a limit of 2 questions to save time and costs)
-
In the MLflow UI, you may inspect which and how many tool invocations were performed:
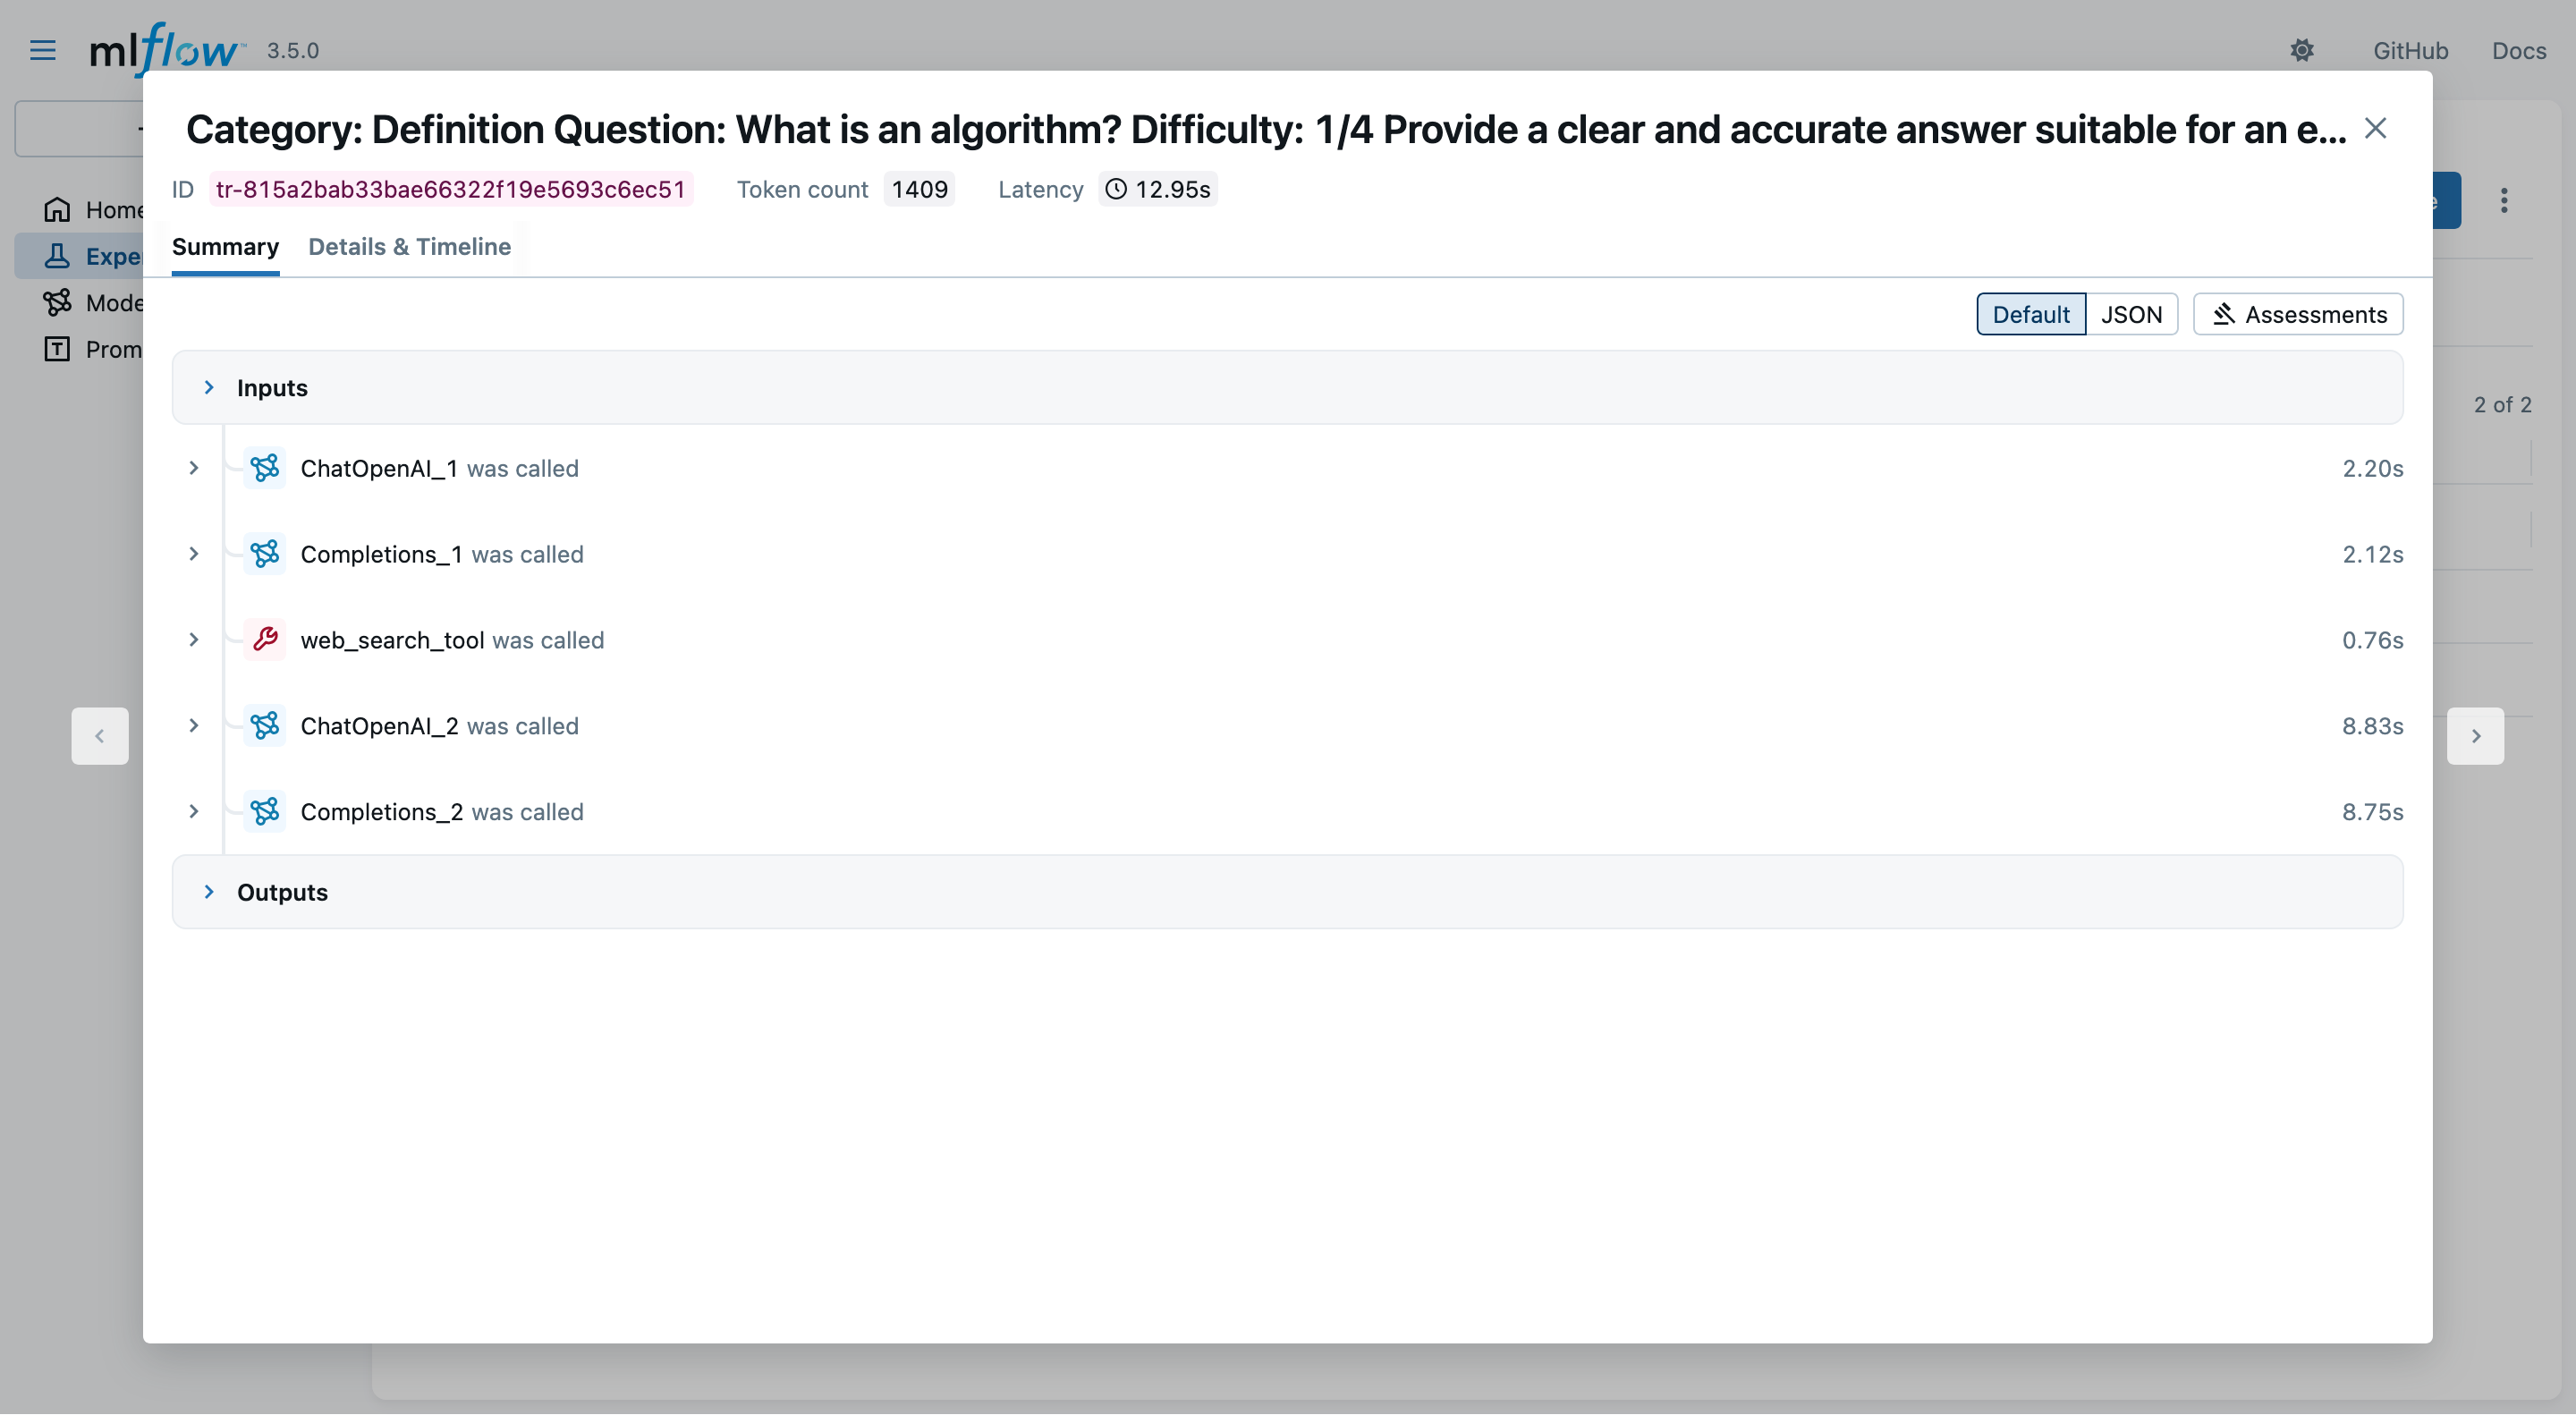
Exemplifying MLflow for LLM Applications (pt. 11)
- Clicking on the “Details & Timeline” tab, you may profile the entire data-flow back-and-forth between client and LLM provider:
Talk is Over
Compiled on: 2026-04-28 — printable version